Spring is here. Fresh flowers bloom. Birds sing. The world wakes up from winter’s long sleep.
Your family needs fun activities that celebrate the season. Kids want hands-on projects that spark their creativity. You want beautiful decor that won’t break the bank.
This guide gives you simple spring crafts anyone can make. Use paper plates, egg cartons, and treasures from your backyard. Most projects cost less than five dollars.
Find quick crafts for busy afternoons and longer projects for weekends. Toddlers through adults will discover something they love. Each idea shows the time, cost, and skill level you need.
Grab your scissors and glue. Let’s bring the beauty of spring into your home.
Paper and Cardboard Spring Crafts
Paper crafts are perfect for spring projects. They cost almost nothing to make. Kids love cutting, folding, and gluing colorful paper. Adults enjoy making cards and decorations.
These five crafts use basic supplies you have at home. Paper plates, coffee filters, and tissue paper transform into beautiful spring art. Each project takes less than an hour. Most work great for groups or classrooms.
1. Paper Plate Flower Garden
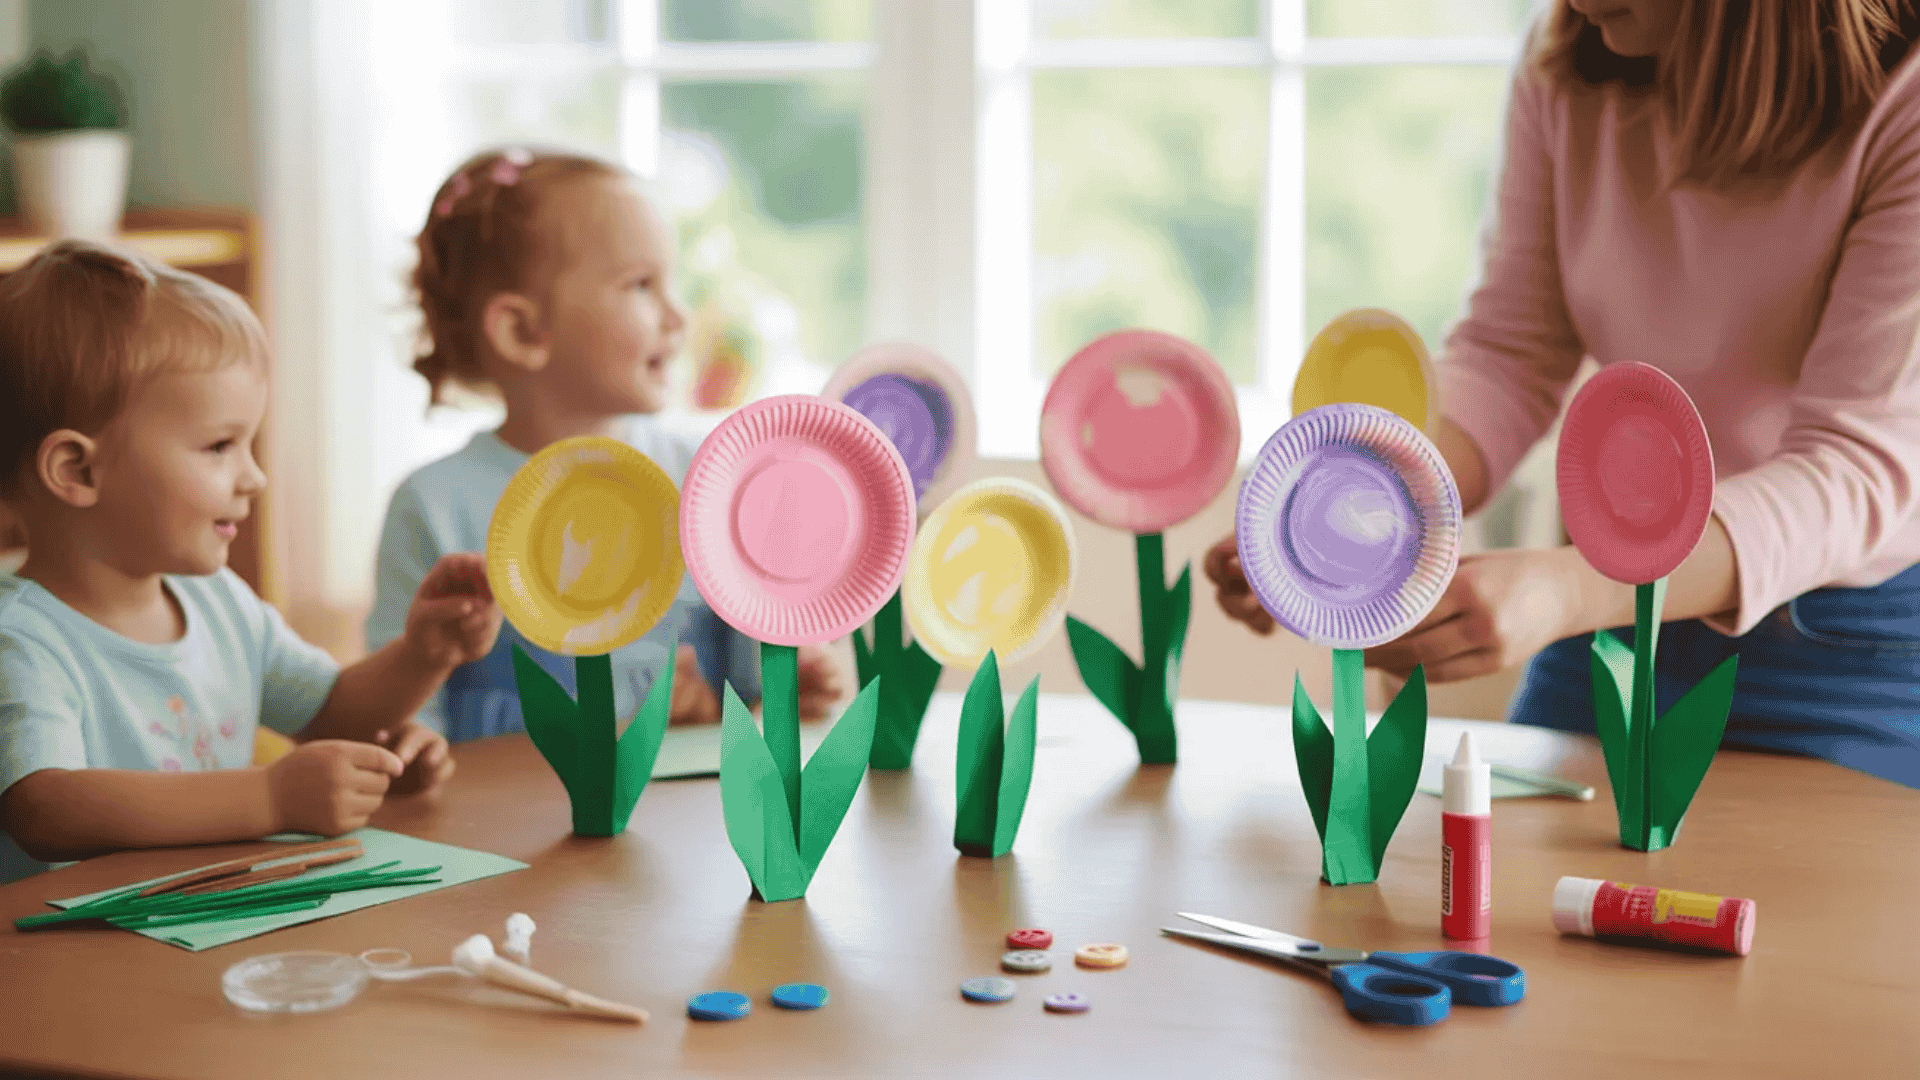
Turn plain paper plates into a cheerful garden display. This craft works for all ages. Younger kids can paint while older ones add details.
Difficulty Level: Beginner
Time Needed: 30 minutes
Cost Estimate: Under $3
Materials Needed:
- Paper plates (white or colored)
- Paint (tempera or acrylic)
- Paintbrushes
- Green construction paper
- Scissors
- Glue stick
- Optional: buttons, glitter, markers
Instructions:
- Paint the paper plate in bright spring colors like pink, yellow, or purple. Let it dry completely.
- Cut petal shapes around the edge of the plate. Make them even or mix different sizes for variety.
- Cut stems and leaves from green construction paper. Make stems about six inches long.
- Glue the flower head to the stem. Add leaves on both sides.
- Decorate the center with buttons, markers, or glitter to make your flower pop.
Pro Tip: Make several flowers and tape them to a wall or window for a full garden scene.
2. Coffee Filter Butterflies
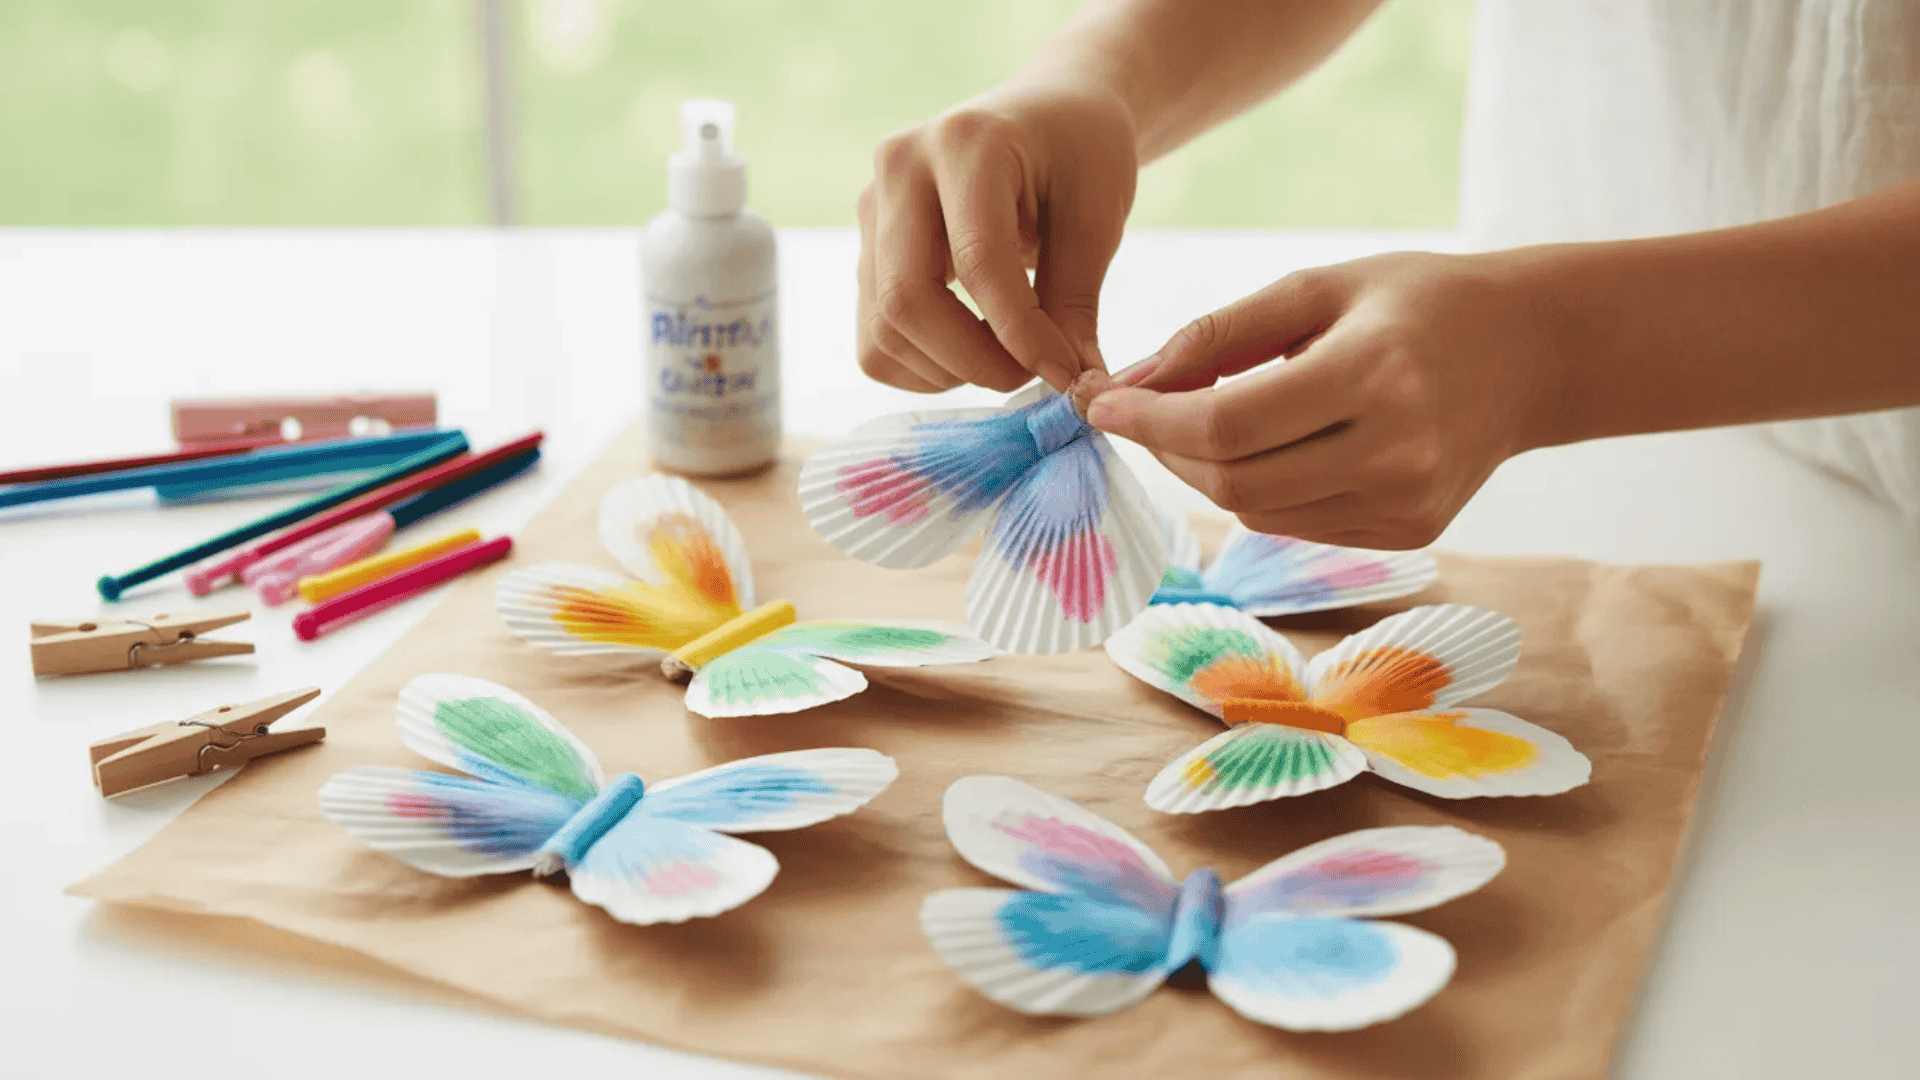
Coffee filters create the perfect butterfly wings. The thin paper absorbs color beautifully. Kids love watching the colors blend and spread.
Difficulty Level: Beginner
Time Needed: 20 minutes (plus drying time)
Cost Estimate: Under $2
Materials Needed:
- White coffee filters (basket style)
- Washable markers
- Spray bottle with water
- Clothespins (wooden)
- Pipe cleaners
- Googly eyes (optional)
Instructions:
- Flatten a coffee filter on a protected surface. Draw colorful designs with markers all over it.
- Lightly spray the filter with water. Watch the colors blend and spread together.
- Let the filter dry completely. This takes about an hour, or you can use a hairdryer to speed it up.
- Pinch the center of the filter and clip a clothespin around it to create wings.
- Wrap a pipe cleaner around the top of the clothespin for antennae. Add googly eyes if desired.
Pro Tip: Use spring colors like pastels or bright rainbow shades. Make a bunch and hang them from the ceiling with fishing line.
3. Tissue Paper Rainbows
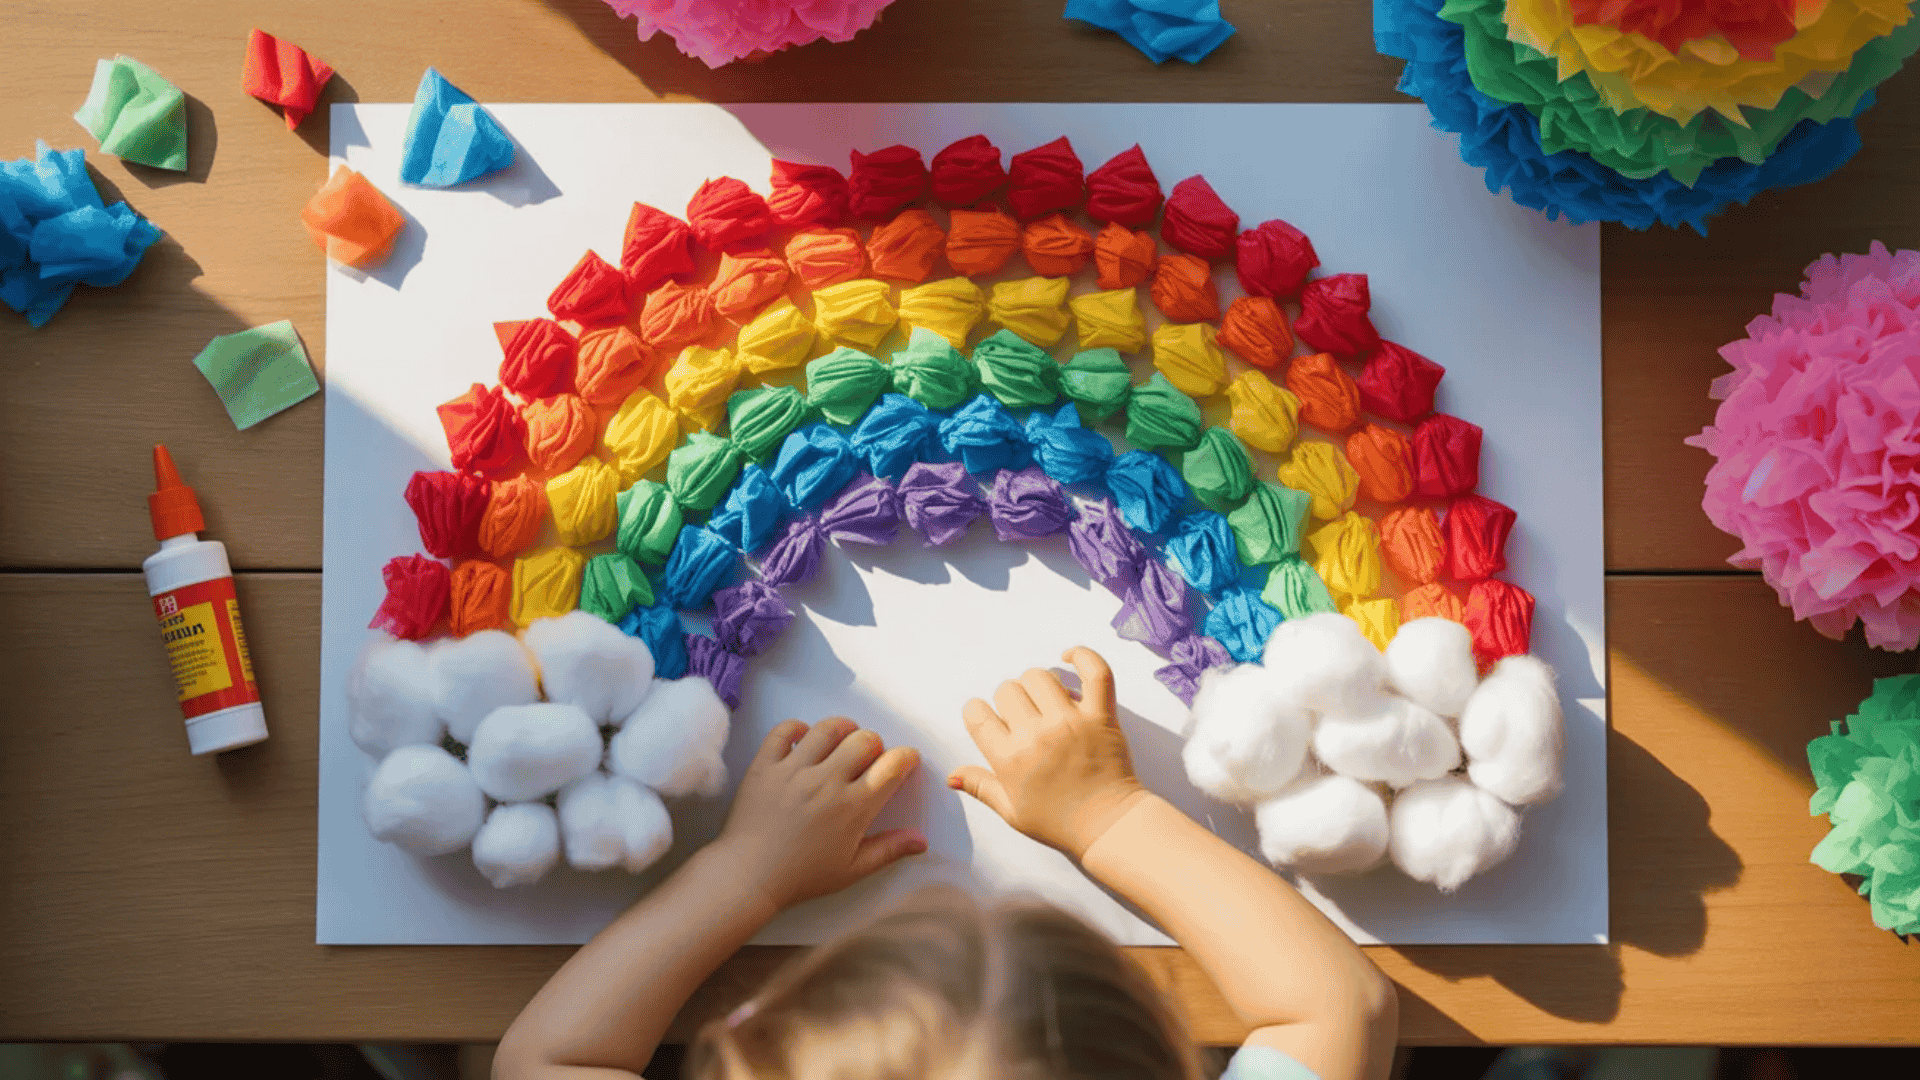
Spring showers bring rainbows. This craft captures that magic. Tissue paper squares create a bright, textured rainbow arc.
Difficulty Level: Beginner
Time Needed: 25 minutes
Cost Estimate: Under $4
Materials Needed:
- White cardstock or poster board
- Tissue paper in rainbow colors
- Glue or glue stick
- Pencil
- Cotton balls (for clouds)
- Scissors
Instructions:
- Draw a rainbow arc shape on your cardstock. Make it large enough to fill most of the page.
- Cut tissue paper into small squares. You need red, orange, yellow, green, blue, and purple.
- Start with red at the outer arc. Scrunch each tissue square and glue it down in rows.
- Continue with each color moving inward. Keep the colors in rainbow order.
- Glue cotton balls at both ends to create fluffy clouds.
Pro Tip: This craft builds fine motor skills. Younger kids can tear tissue paper instead of cutting it.
4. Paper Bag Bunny Puppet
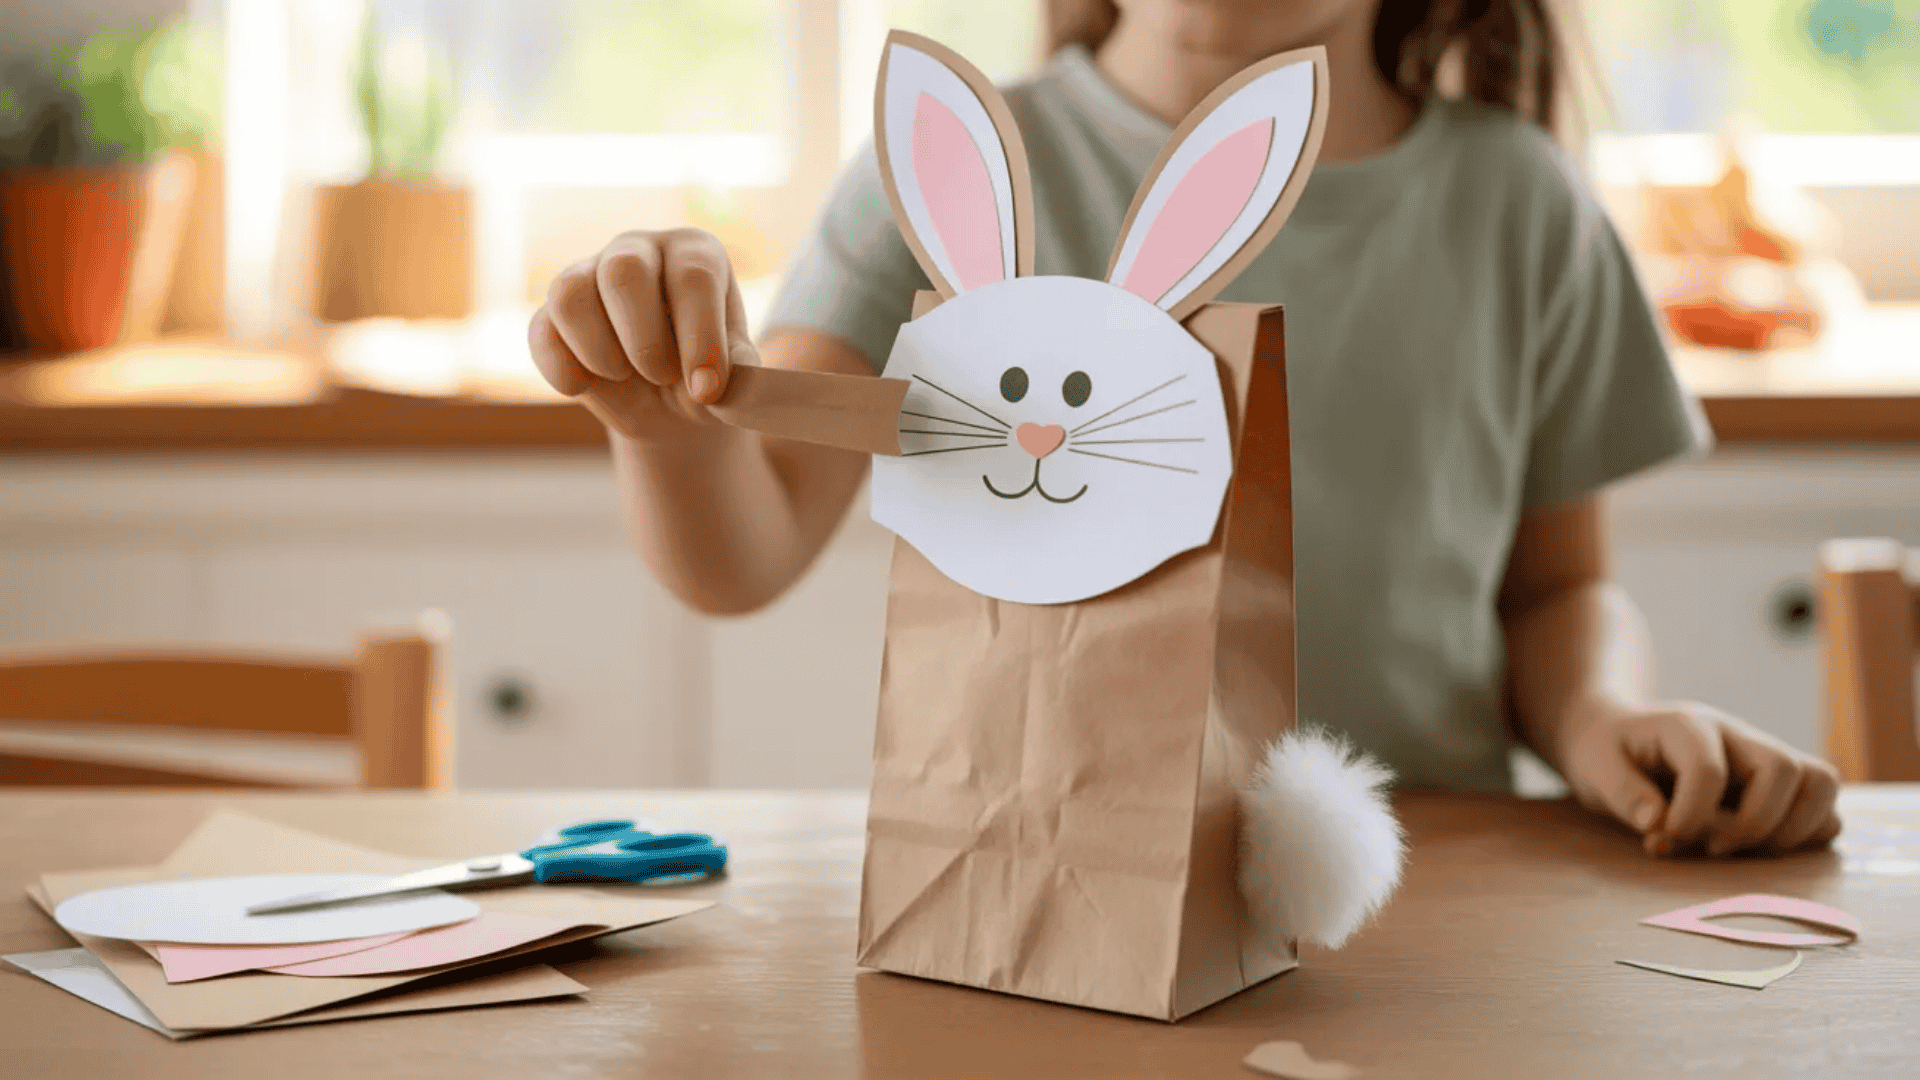
Brown paper bags become playful spring puppets. Kids can make them hop and talk. This craft combines art with imaginative play.
Difficulty Level: Beginner
Time Needed: 20 minutes
Cost Estimate: Under $2
Materials Needed:
- Brown paper lunch bags
- White and pink construction paper
- Markers or crayons
- Glue stick
- Scissors
- Cotton ball (for tail)
Instructions:
- Keep the paper bag folded with the flap at the top. This flap becomes the bunny’s mouth.
- Cut two long ear shapes from white paper. Add pink centers and glue ears to the top back of the bag.
- Draw or cut out eyes and glue them above the flap on the bag’s face.
- Draw a nose and whiskers on the flap itself. When you move the flap, the bunny talks.
- Glue a cotton ball to the bottom of the bag for a fluffy tail.
Pro Tip: Put your hand inside the bag and fold the flap over your fingers to make the bunny talk.
5. Watercolor Spring Cards
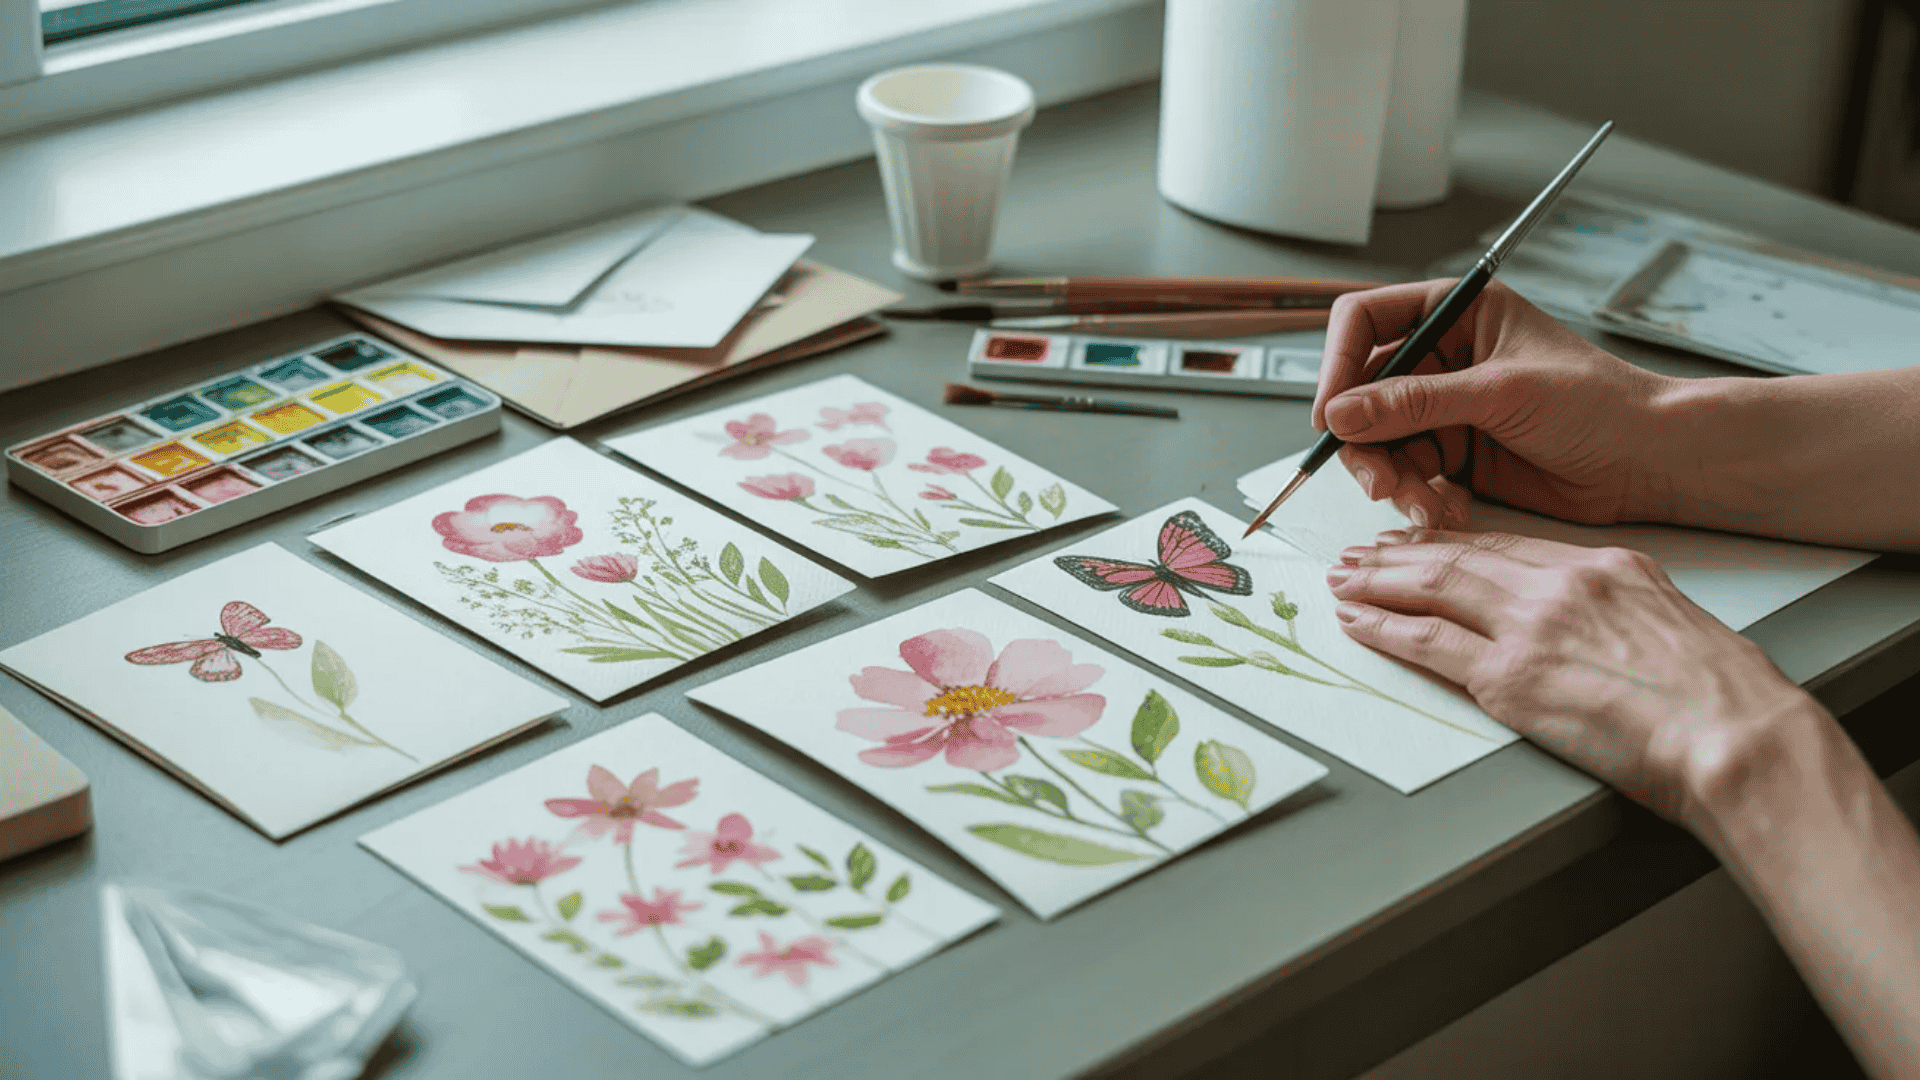
Handmade cards mean more than store-bought ones. Watercolors create soft, pretty spring scenes. Give them as gifts or mail them to friends.
Difficulty Level: Beginner to Intermediate
Time Needed: 40 minutes
Cost Estimate: Under $5
Materials Needed:
- Watercolor paper or thick cardstock
- Watercolor paints
- Paintbrushes
- Water cup
- Paper towels
- Markers or pens (for details)
- Envelopes
Instructions:
- Fold your paper in half to create a card shape. Work on the front panel.
- Lightly sketch spring designs with a pencil. Try flowers, butterflies, or simple landscapes.
- Paint with watercolors using light, watery strokes. Let colors blend naturally on the paper.
- Allow the paint to dry completely. This prevents smudging when you add details.
- Use markers or pens to outline shapes and add details like flower centers or grass blades.
Pro Tip: Practice watercolor techniques on scrap paper first. Wet-on-wet creates soft blends while wet-on-dry gives sharper edges.
Recycled Material Spring Crafts
Recycling turns trash into treasure. Empty containers become fun spring projects. Save egg cartons, toilet paper rolls, and plastic bottles. These materials cost nothing and keep waste out of landfills.
Kids learn about reusing while they create. These five crafts prove you don’t need fancy supplies. Your recycling bin holds everything you need for a crafting afternoon.
6. Egg Carton Tulips
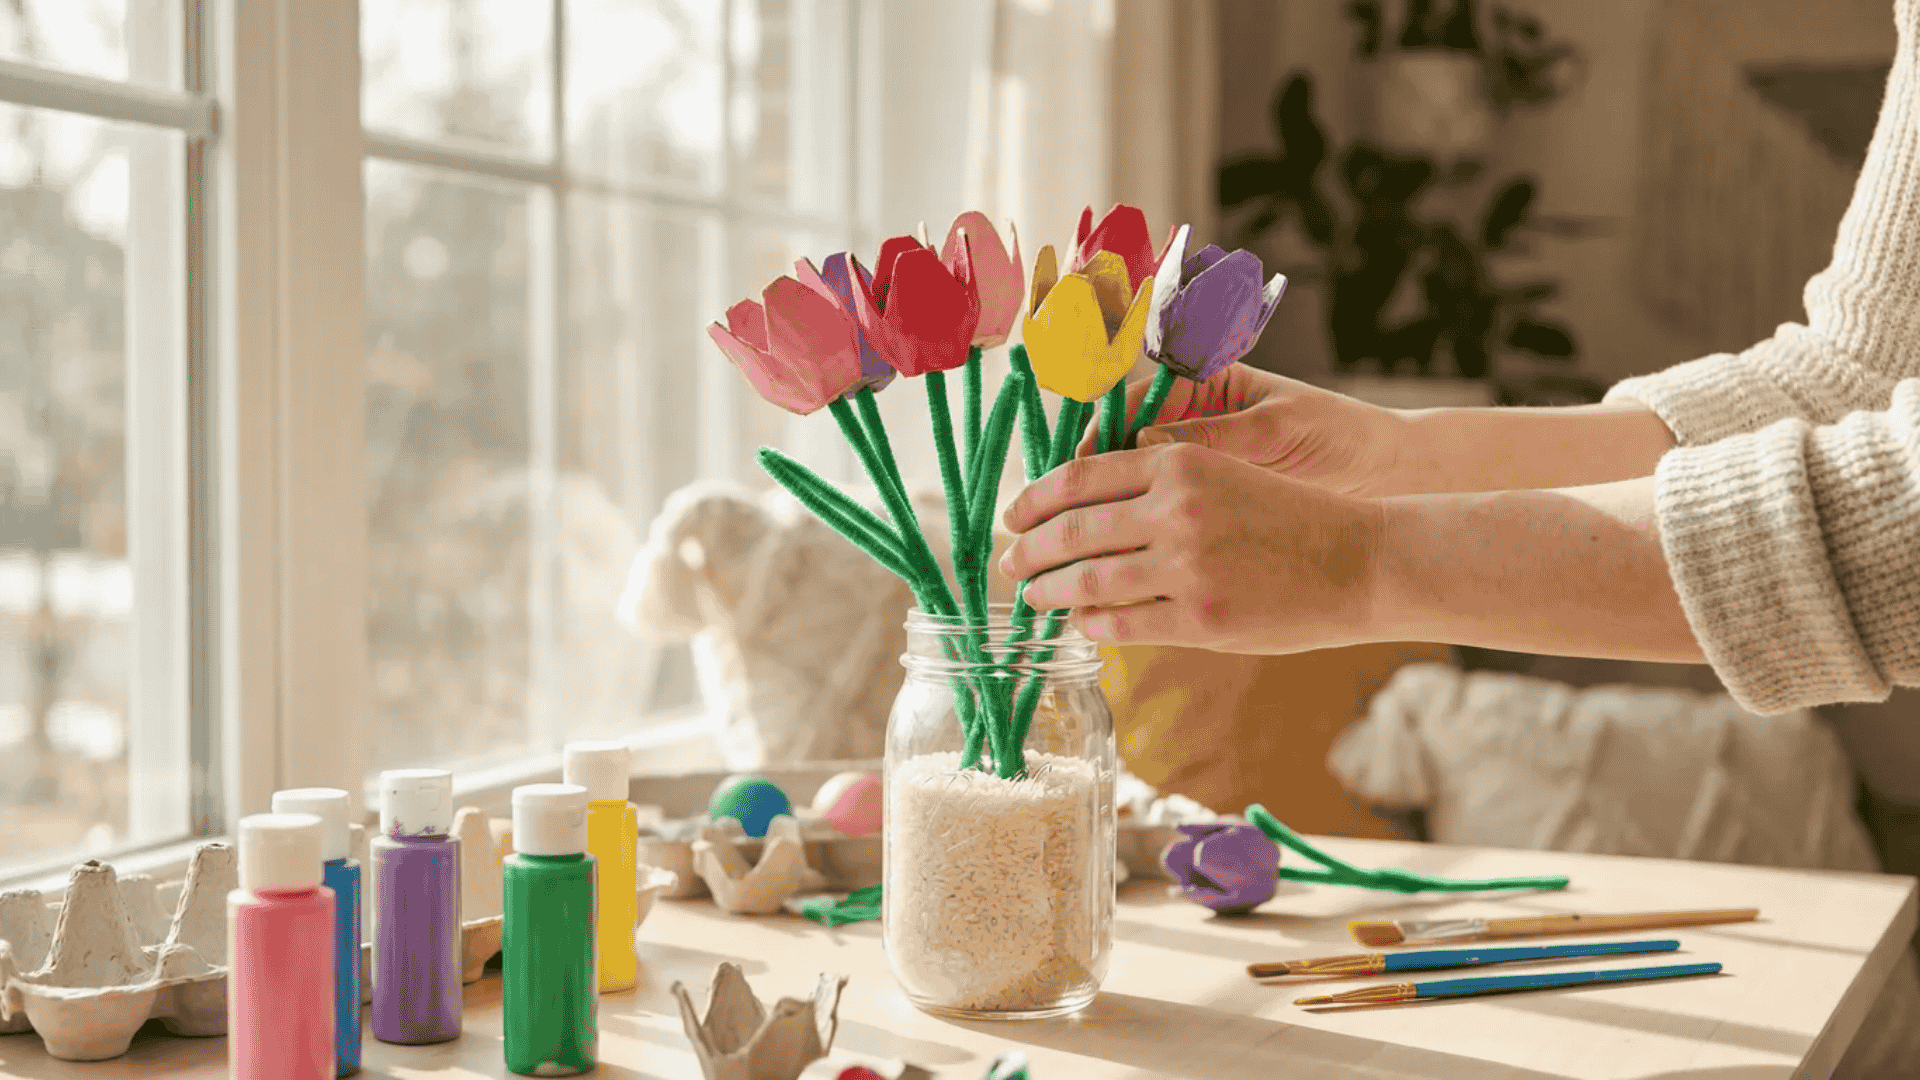
Egg cartons make perfect tulip petals. The cup shape looks just like real flowers. Paint them in spring colors for a cheerful bouquet.
Difficulty Level: Beginner
Time Needed: 35 minutes
Cost Estimate: Under $3
Materials Needed:
- Cardboard egg carton
- Acrylic paint (pink, red, yellow, purple)
- Paintbrushes
- Green pipe cleaners or straws
- Scissors
- Hot glue gun or strong craft glue
- Small vase or jar
Instructions:
- Cut individual cups from the egg carton. Trim the edges to create petal shapes with four points.
- Paint each cup in bright tulip colors. You can do solid colors or add details like streaks.
- Let the paint dry completely. Apply a second coat if the cardboard shows through.
- Poke a small hole in the bottom center of each tulip cup with scissors.
- Push a green pipe cleaner or straw through the hole as a stem. Secure with glue inside the flower.
Pro Tip: Display your tulips in a mason jar filled with beans or rice to hold stems upright.
7. Toilet Paper Roll Bees
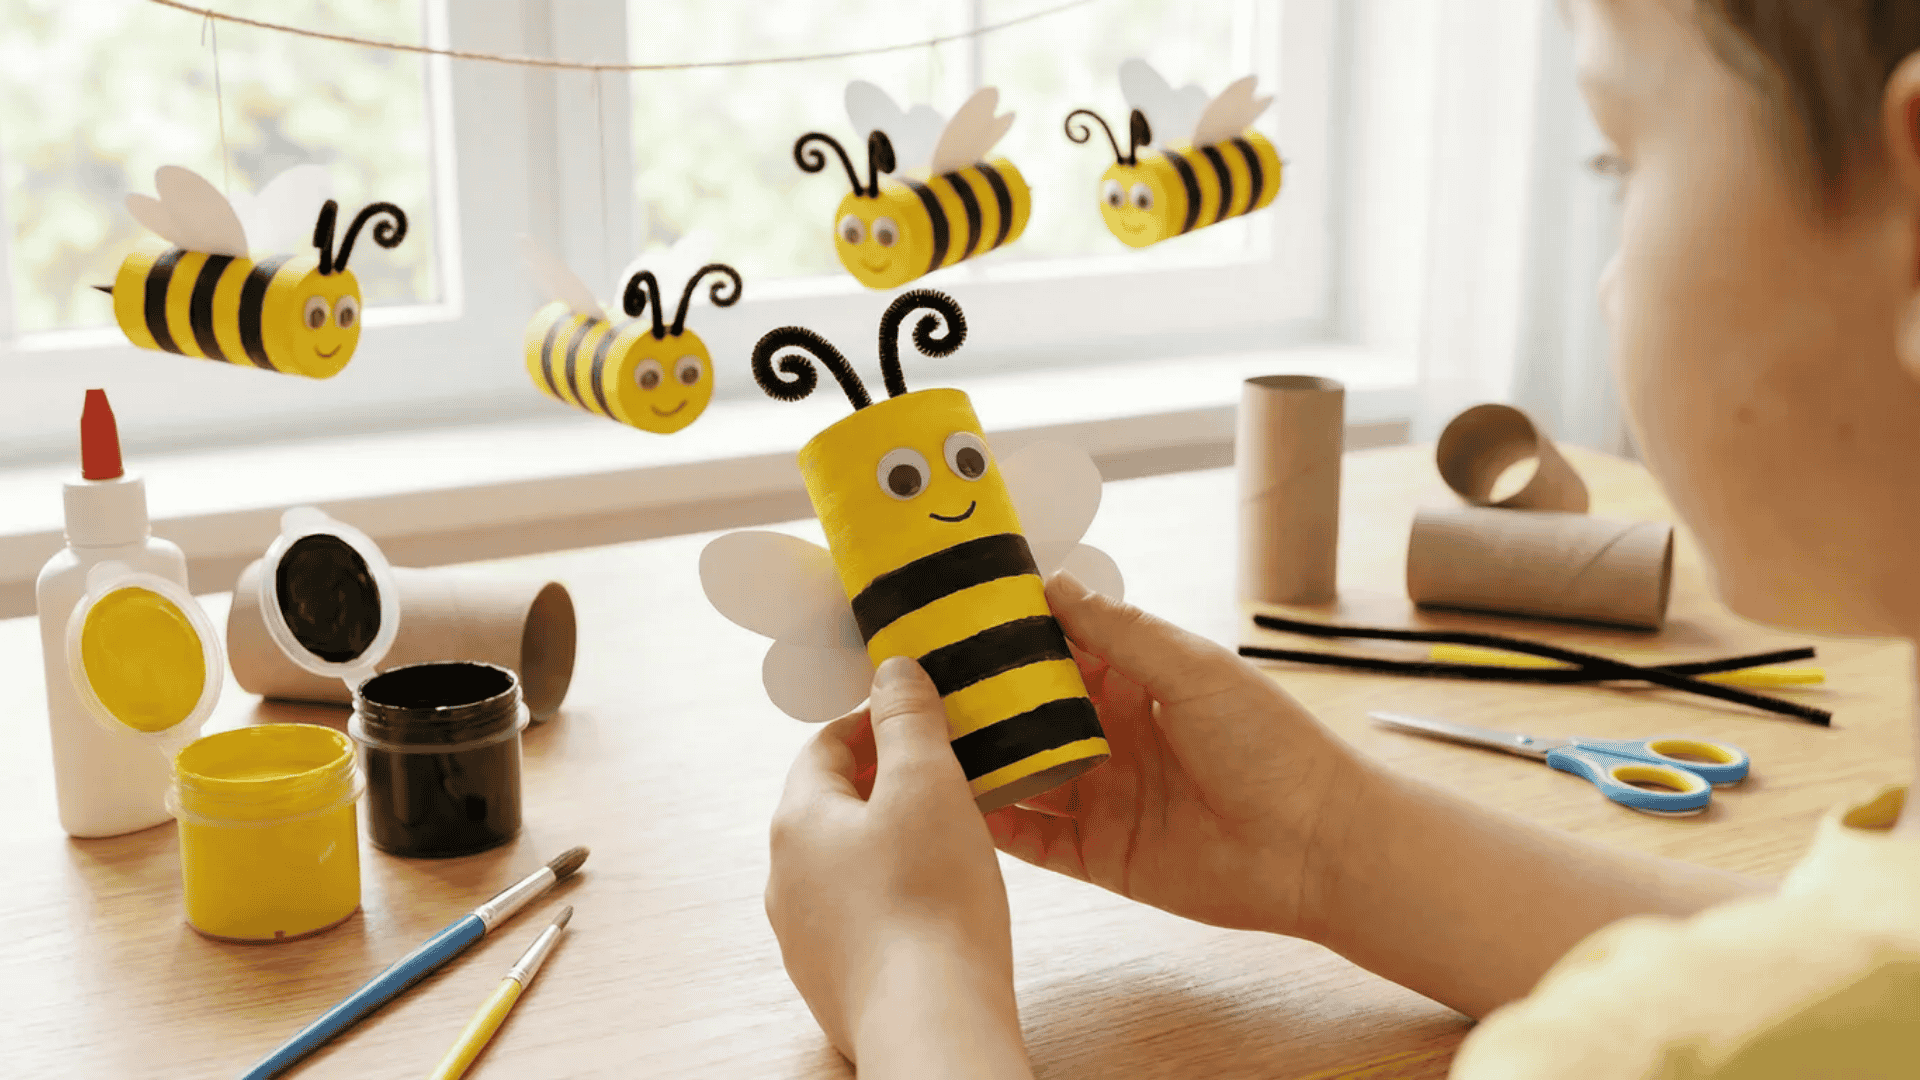
These buzzing bees bring spring to life. Toilet paper rolls form the perfect bee body. Kids love making them and playing with them afterward.
Difficulty Level: Beginner
Time Needed: 25 minutes
Cost Estimate: Under $2
Materials Needed:
- Empty toilet paper rolls
- Yellow paint
- Black paint or marker
- Paintbrush
- White paper or wax paper (for wings)
- Googly eyes
- Black pipe cleaner
- Glue
- Scissors
Instructions:
- Paint the toilet paper roll yellow. Let it dry completely before moving to the next step.
- Add three black stripes around the roll using paint or marker to create the bee’s body.
- Cut two wing shapes from white paper or wax paper. Make them oval and slightly larger than the roll.
- Glue wings to the back of the bee’s body. Position them so they stick out on both sides.
- Glue on googly eyes. Cut a pipe cleaner in half and curl the ends for antennae. Glue them inside the top of the roll.
Pro Tip: Make several bees and hang them from a string at different heights for a fun spring mobile.
8. Clothespin Dragonflies
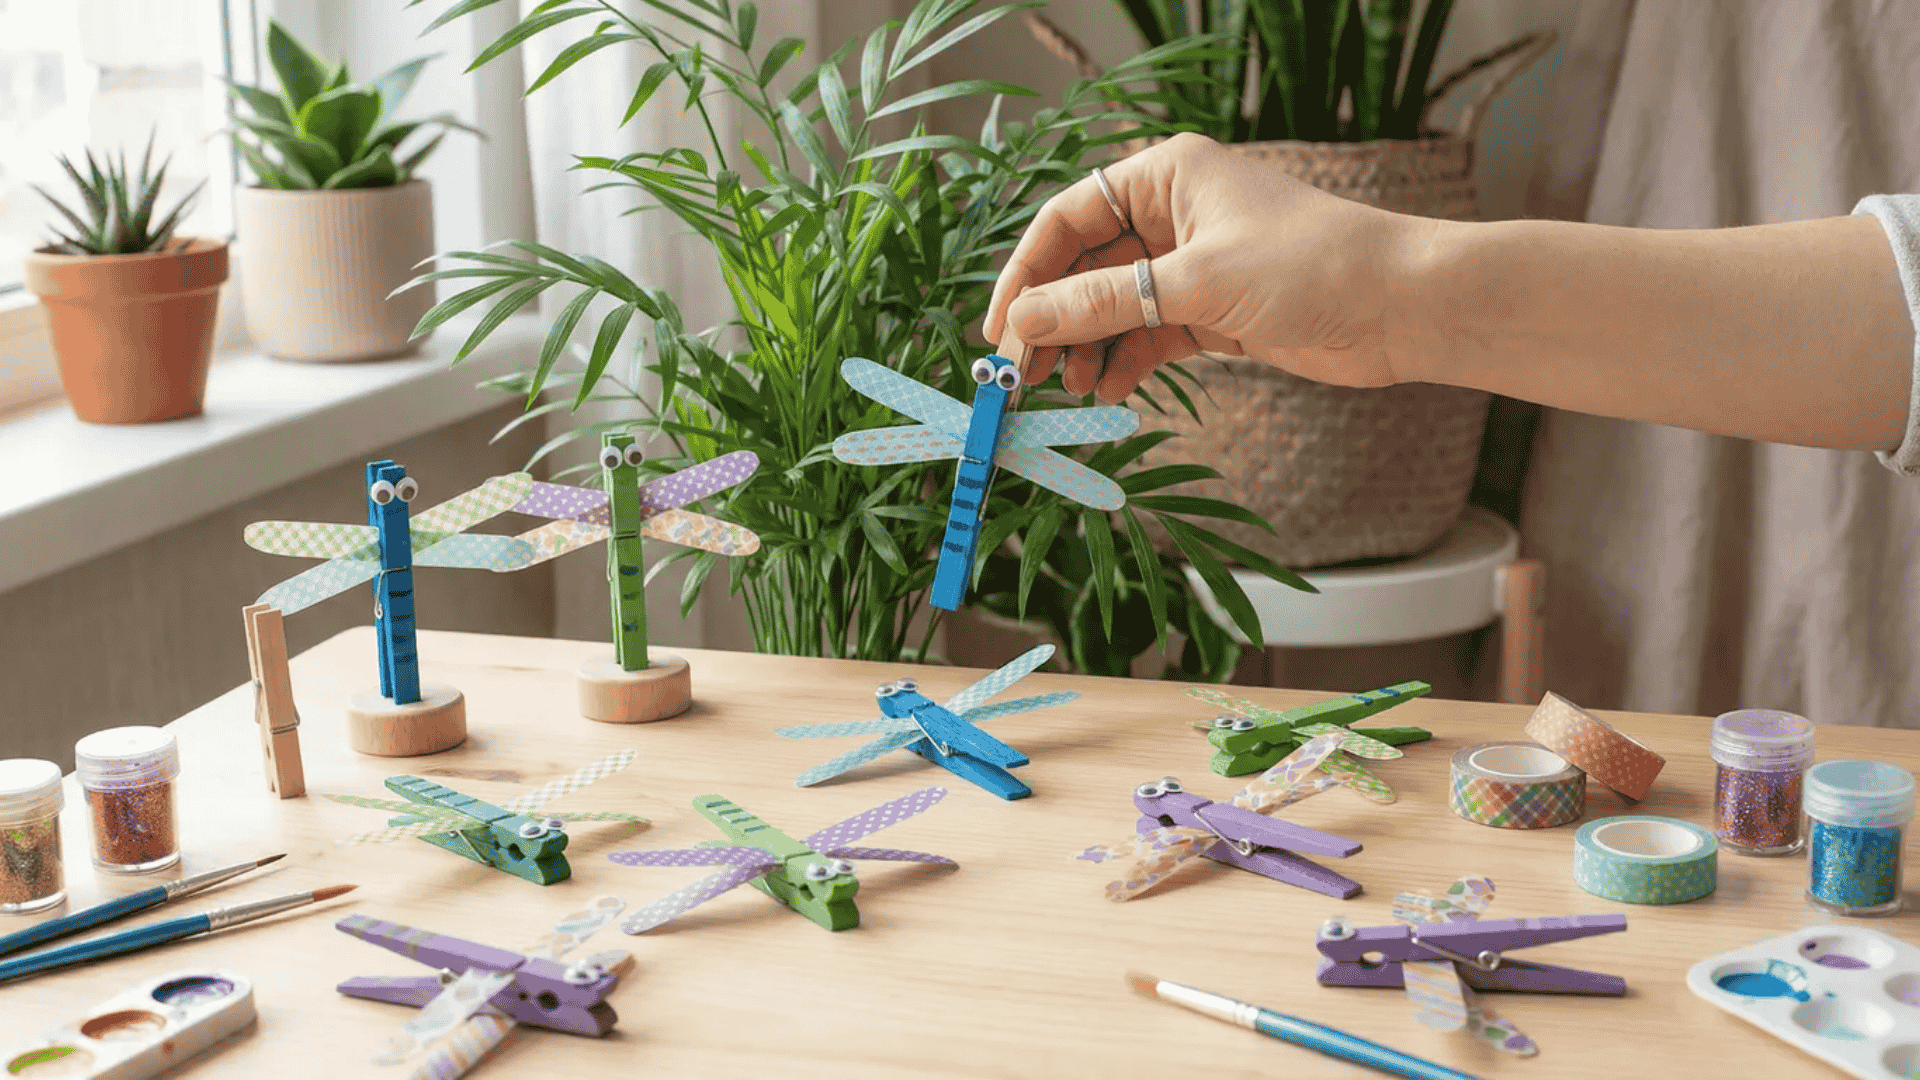
Clothespins transform into delicate dragonflies. The pinching action makes them fun to play with. Hang them around your home for whimsical spring decor.
Difficulty Level: Beginner
Time Needed: 20 minutes
Cost Estimate: Under $3
Materials Needed:
- Wooden clothespins
- Acrylic paint
- Small paintbrush
- Googly eyes
- Washi tape or colorful tape
- Glitter (optional)
- Craft glue
Instructions:
- Paint the clothespin body in bright colors like blue, green, or purple. Let it dry.
- Add stripes, dots, or patterns with different colored paint if desired. Sprinkle glitter while wet.
- Glue tiny googly eyes near the pinching end of the clothespin.
- Cut four wing shapes from washi tape or colorful tape. Make them thin and long.
- Stick two wings on each side of the clothespin body near the middle section.
Pro Tip: Clip these dragonflies onto curtains, plants, or lampshades for a fun spring surprise.
9. Cardboard Tube Bird Feeders
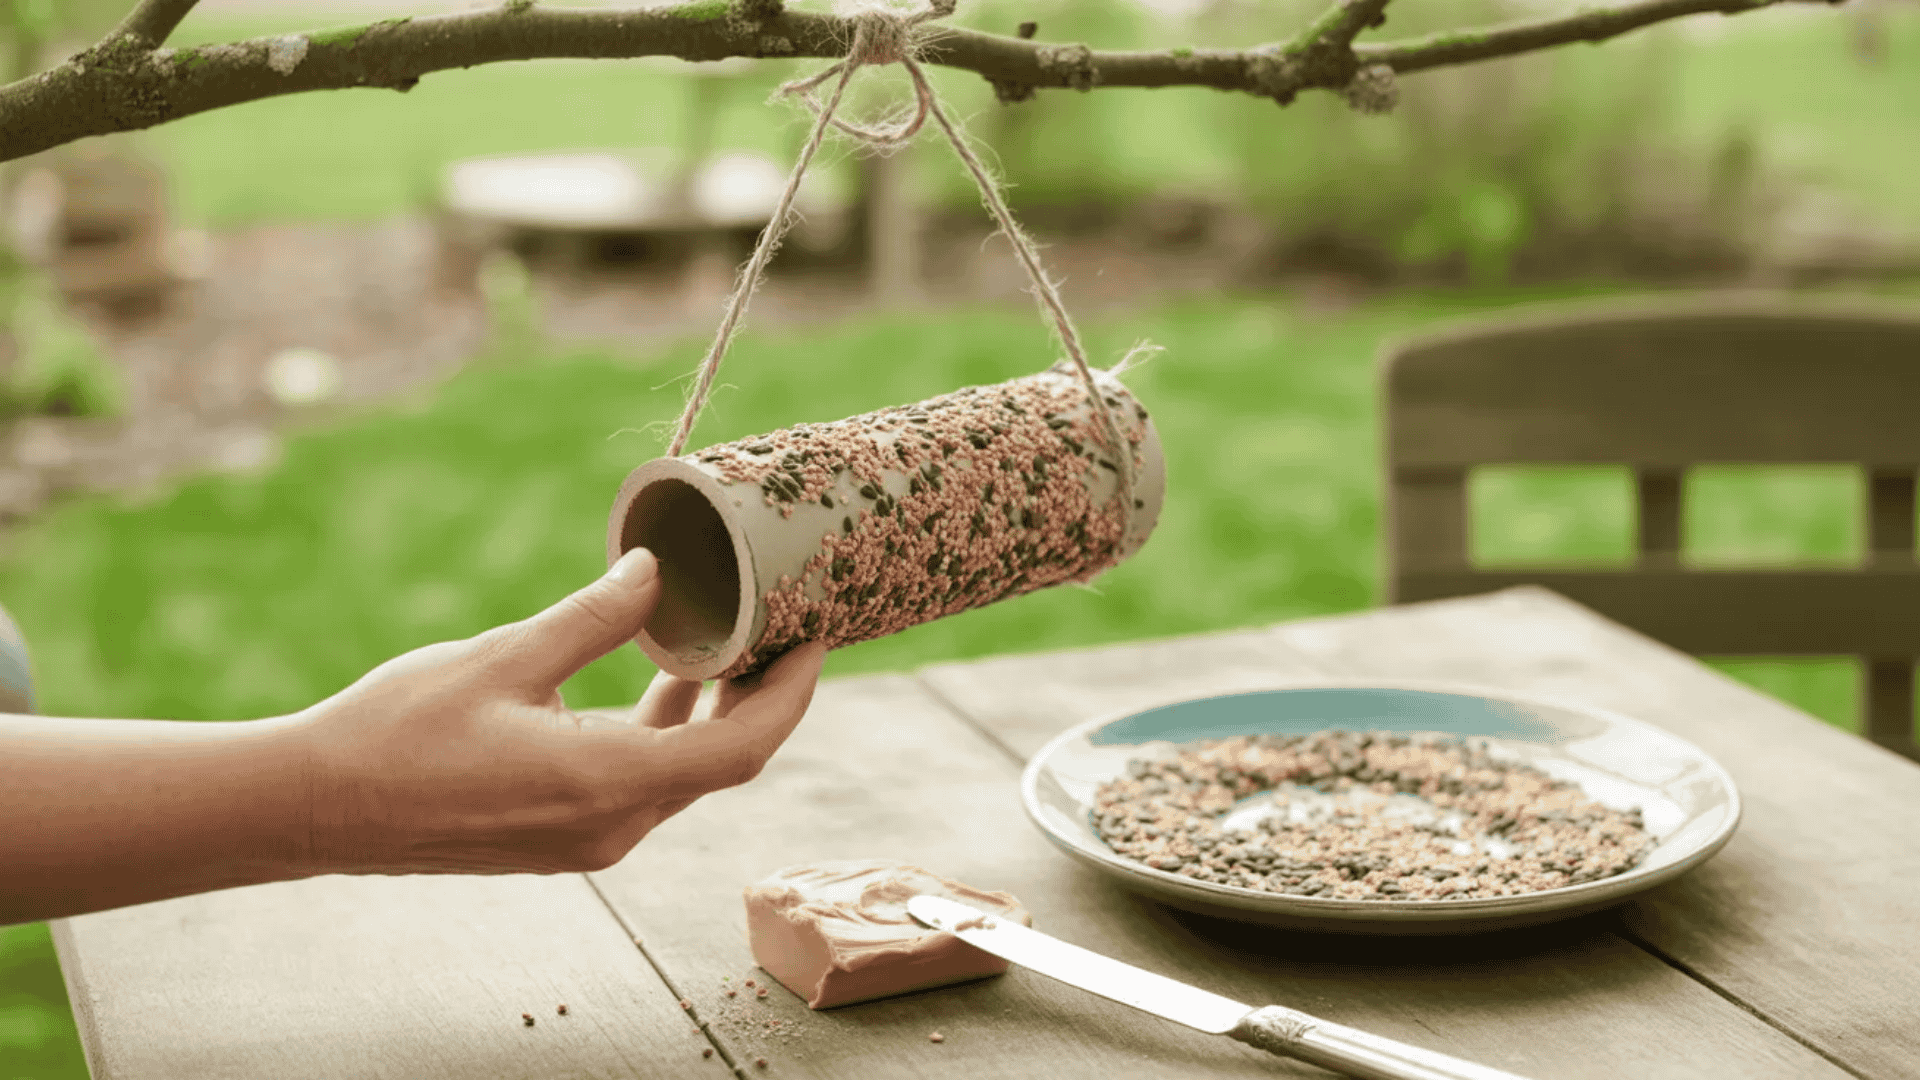
Feed the birds and recycle at the same time. These feeders attract colorful visitors to your yard. Watch birds enjoy the treat you made.
Difficulty Level: Beginner
Time Needed: 15 minutes (plus setting time)
Cost Estimate: Under $4
Materials Needed:
- Empty toilet paper or paper towel rolls
- Peanut butter or vegetable shortening
- Birdseed
- String or twine
- Plate or shallow dish
- Popsicle stick or butter knife
Instructions:
- Use a popsicle stick to spread peanut butter all over the outside of the cardboard tube. Make it thick.
- Pour birdseed onto a plate. Roll the peanut butter-covered tube in the seeds until completely covered.
- Thread the string through the center of the tube. Tie the ends together to create a hanging loop.
- Hang your feeder from a tree branch outside. Choose a spot you can see from a window.
- Watch for birds to visit. Refill when the seeds are gone by making a new feeder.
Pro Tip: Avoid using peanut butter if squirrels are a problem in your area. Use vegetable shortening instead.
10. Cupcake Liner Flowers
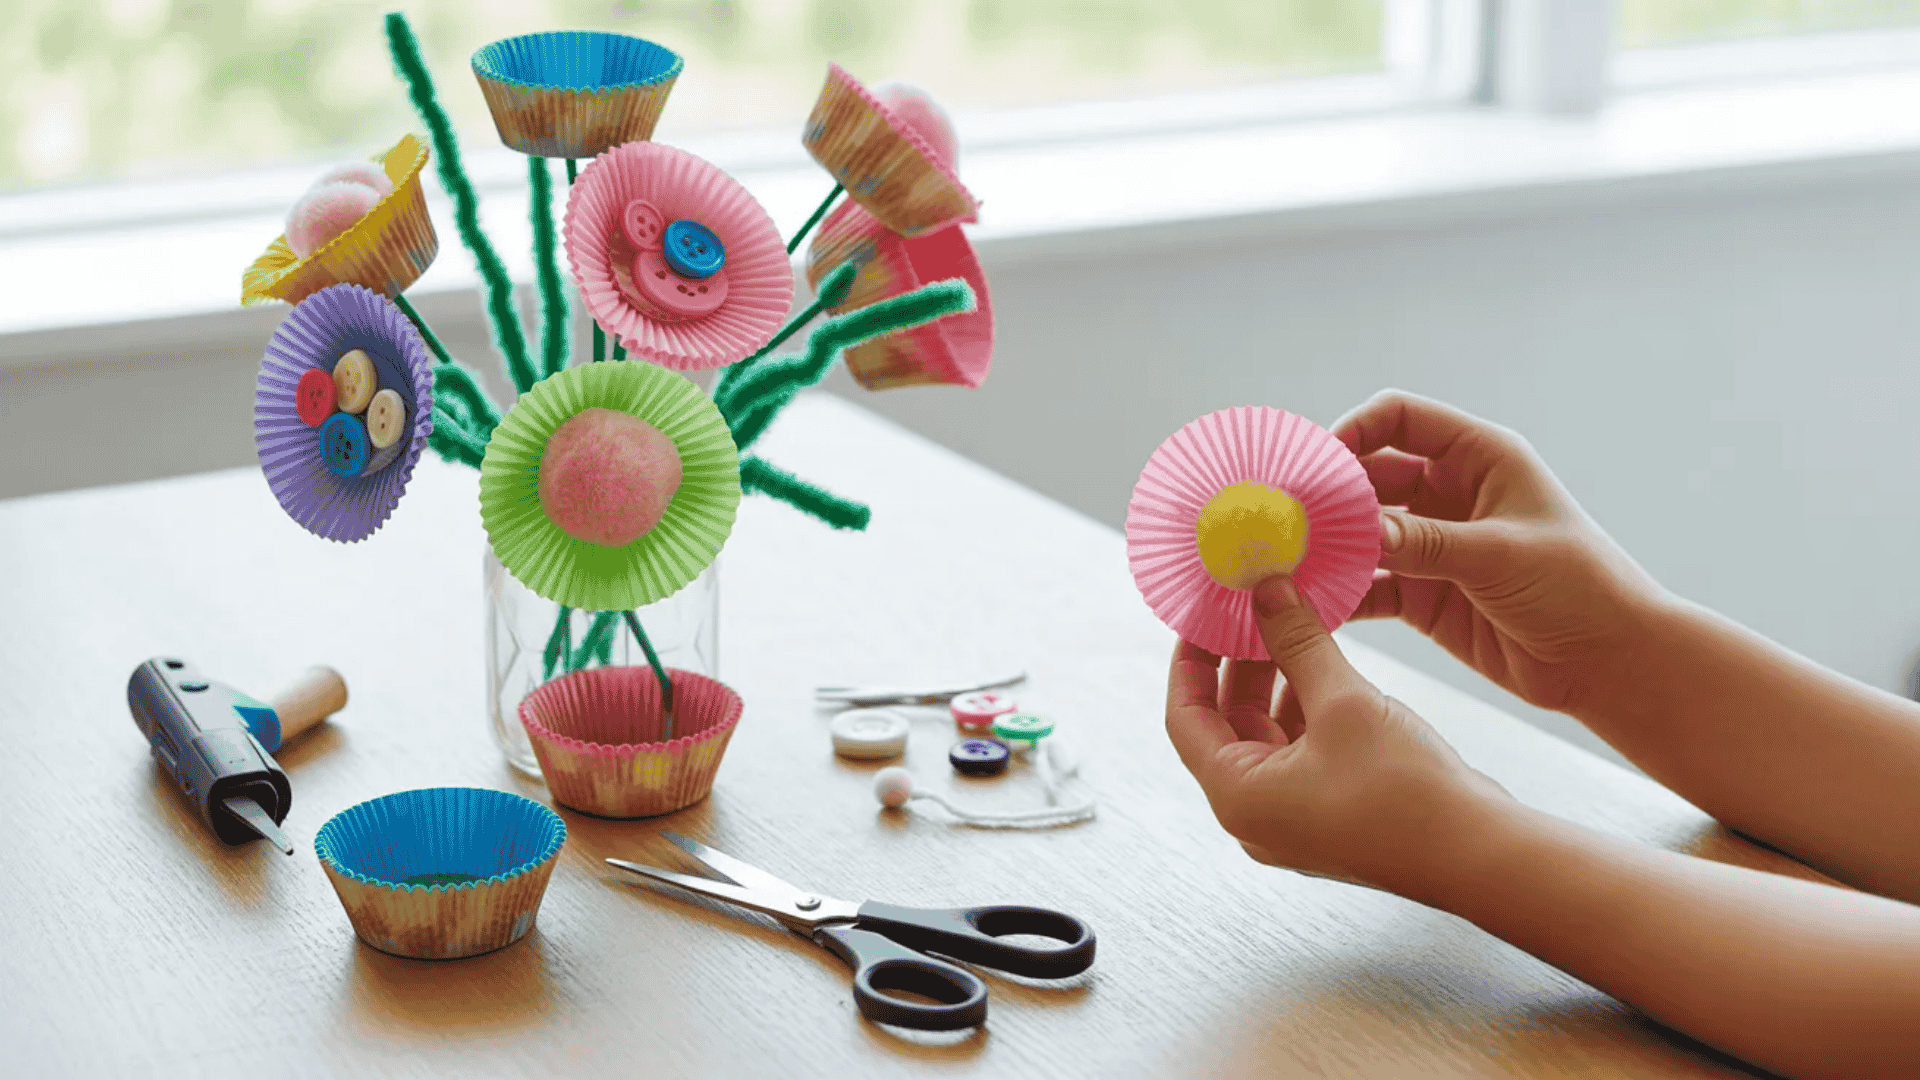
Colorful cupcake liners bloom into pretty flowers. The pleated edges create realistic petals. Stack different colors for depth and interest.
Difficulty Level: Beginner
Time Needed: 20 minutes
Cost Estimate: Under $3
Materials Needed:
- Colorful cupcake liners (paper or silicone)
- Green pipe cleaners or straws
- Buttons or pom-poms
- Hot glue gun or craft glue
- Scissors
- Green construction paper (optional for leaves)
Instructions:
- Flatten cupcake liners. You can use two or three per flower for a fuller look.
- Stack the liners on top of each other. Poke a small hole through all the centers.
- Push a green pipe cleaner through the hole from the back. This creates the stem.
- Glue a button or pom-pom in the center of the flower to hide the hole and add detail.
- Cut leaf shapes from green paper and glue them to the stem if desired.
Pro Tip: Use liners in different sizes. Put a smaller liner inside a larger one for a layered flower effect.
Nature and Outdoor Spring Crafts
Nature provides the best craft supplies. Take a walk outside and gather sticks, rocks, and flowers. These materials are free and connect kids to the outdoors. Spring is the perfect time to collect pinecones, leaves, and seeds.
Each craft in this section uses items you find in your yard or park. Working with natural materials teaches children about their environment. These projects work well for outdoor activity days or nature study units.
11. Painted Rock Ladybugs
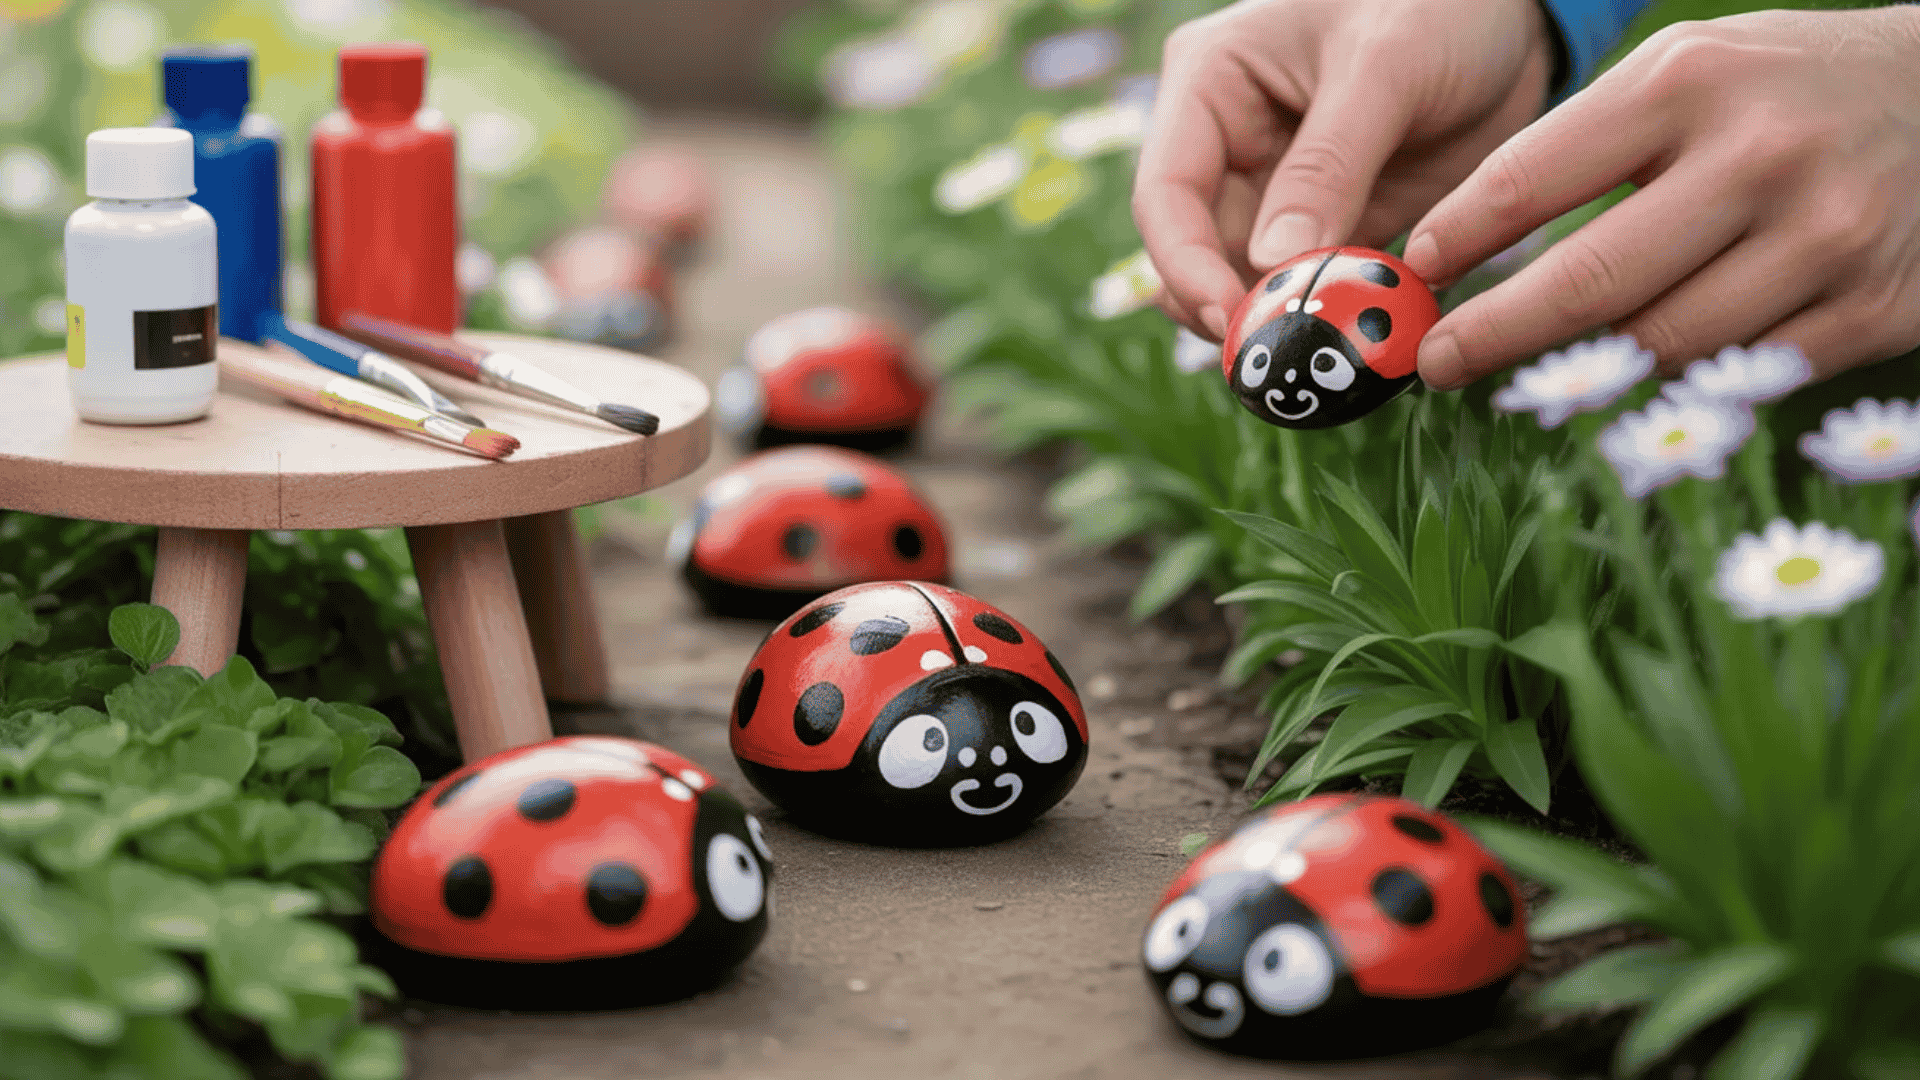
Smooth rocks become cheerful ladybugs with a few coats of paint. Hunt for rocks on your next outdoor walk. This craft works for all ages and skill levels.
Difficulty Level: Beginner
Time Needed: 30 minutes
Cost Estimate: Under $3
Materials Needed:
- Smooth oval rocks (palm-sized)
- Red acrylic paint
- Black acrylic paint
- White paint or paint pen
- Paintbrushes
- Pencil
- Clear sealer spray (optional)
Instructions:
- Wash and dry your rocks completely. Choose rocks with smooth surfaces for easier painting.
- Paint the entire rock red. Let it dry for about twenty minutes before adding details.
- Use a pencil to draw a line down the middle and mark spots for the wings.
- Paint the top third black to create the head. Add black dots on the red wings.
- Use white paint to add two small eyes on the head. Seal with clear spray if using outdoors.
Pro Tip: Place finished ladybugs in your garden or along walkways for a fun outdoor display.
12. Pinecone Bird Nest
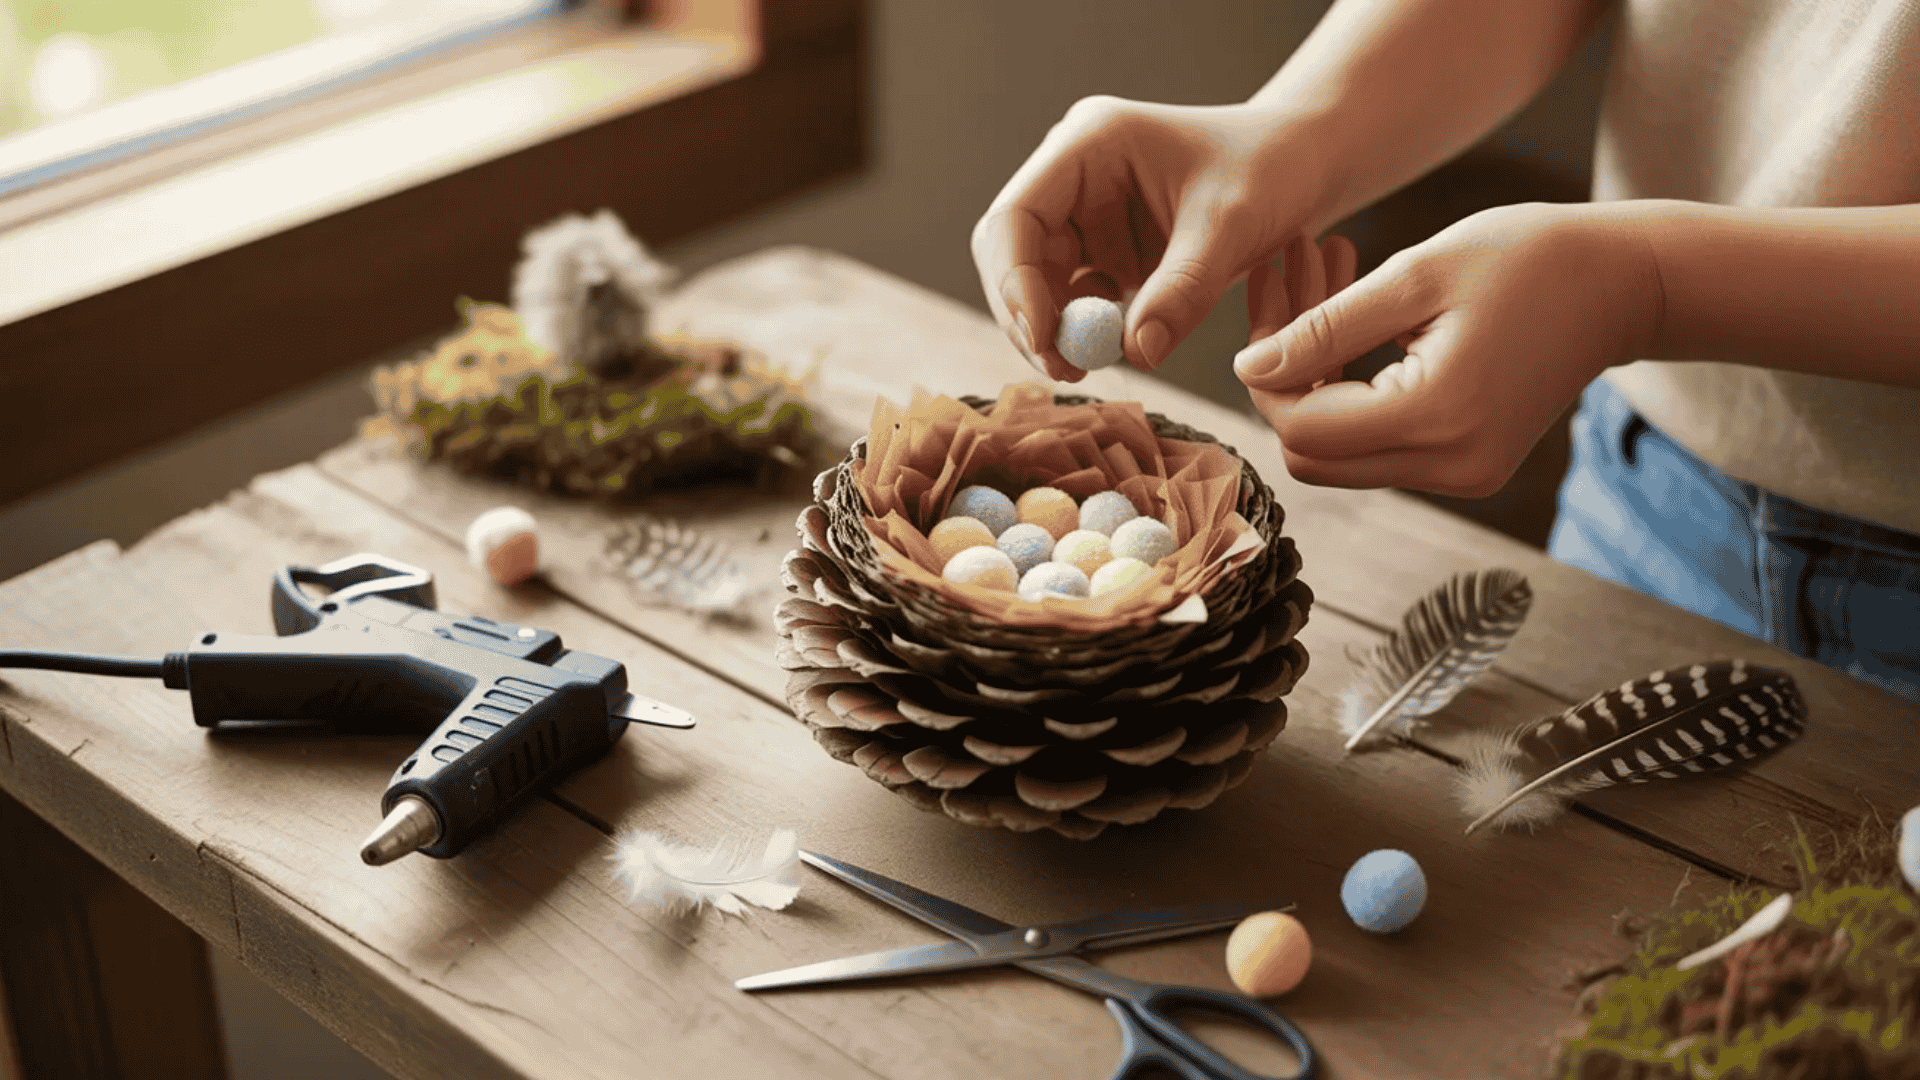
Create a tiny nest that looks real enough to fool the birds. This craft celebrates new life in spring. Display it indoors or place it gently in a tree.
Difficulty Level: Beginner
Time Needed: 25 minutes
Cost Estimate: Free to $2
Materials Needed:
- Large pinecones
- Brown tissue paper or paper shreds
- Small pom-poms or plastic eggs (for eggs)
- Craft glue or hot glue gun
- Scissors
- Optional: small feathers, moss, twigs
Instructions:
- Open the pinecone scales by baking it at 200 degrees for twenty minutes. Let it cool completely.
- Cut or tear brown tissue paper into thin strips. These will line the nest.
- Apply glue between the pinecone scales near the top. Press the paper strips into the glue.
- Create a small hollow space in the center by pushing down gently with your finger.
- Place small pom-poms or plastic eggs in the center nest. Add feathers or moss for decoration.
Pro Tip: Use different colored pom-poms to represent eggs from different bird species.
13. Nature Suncatcher
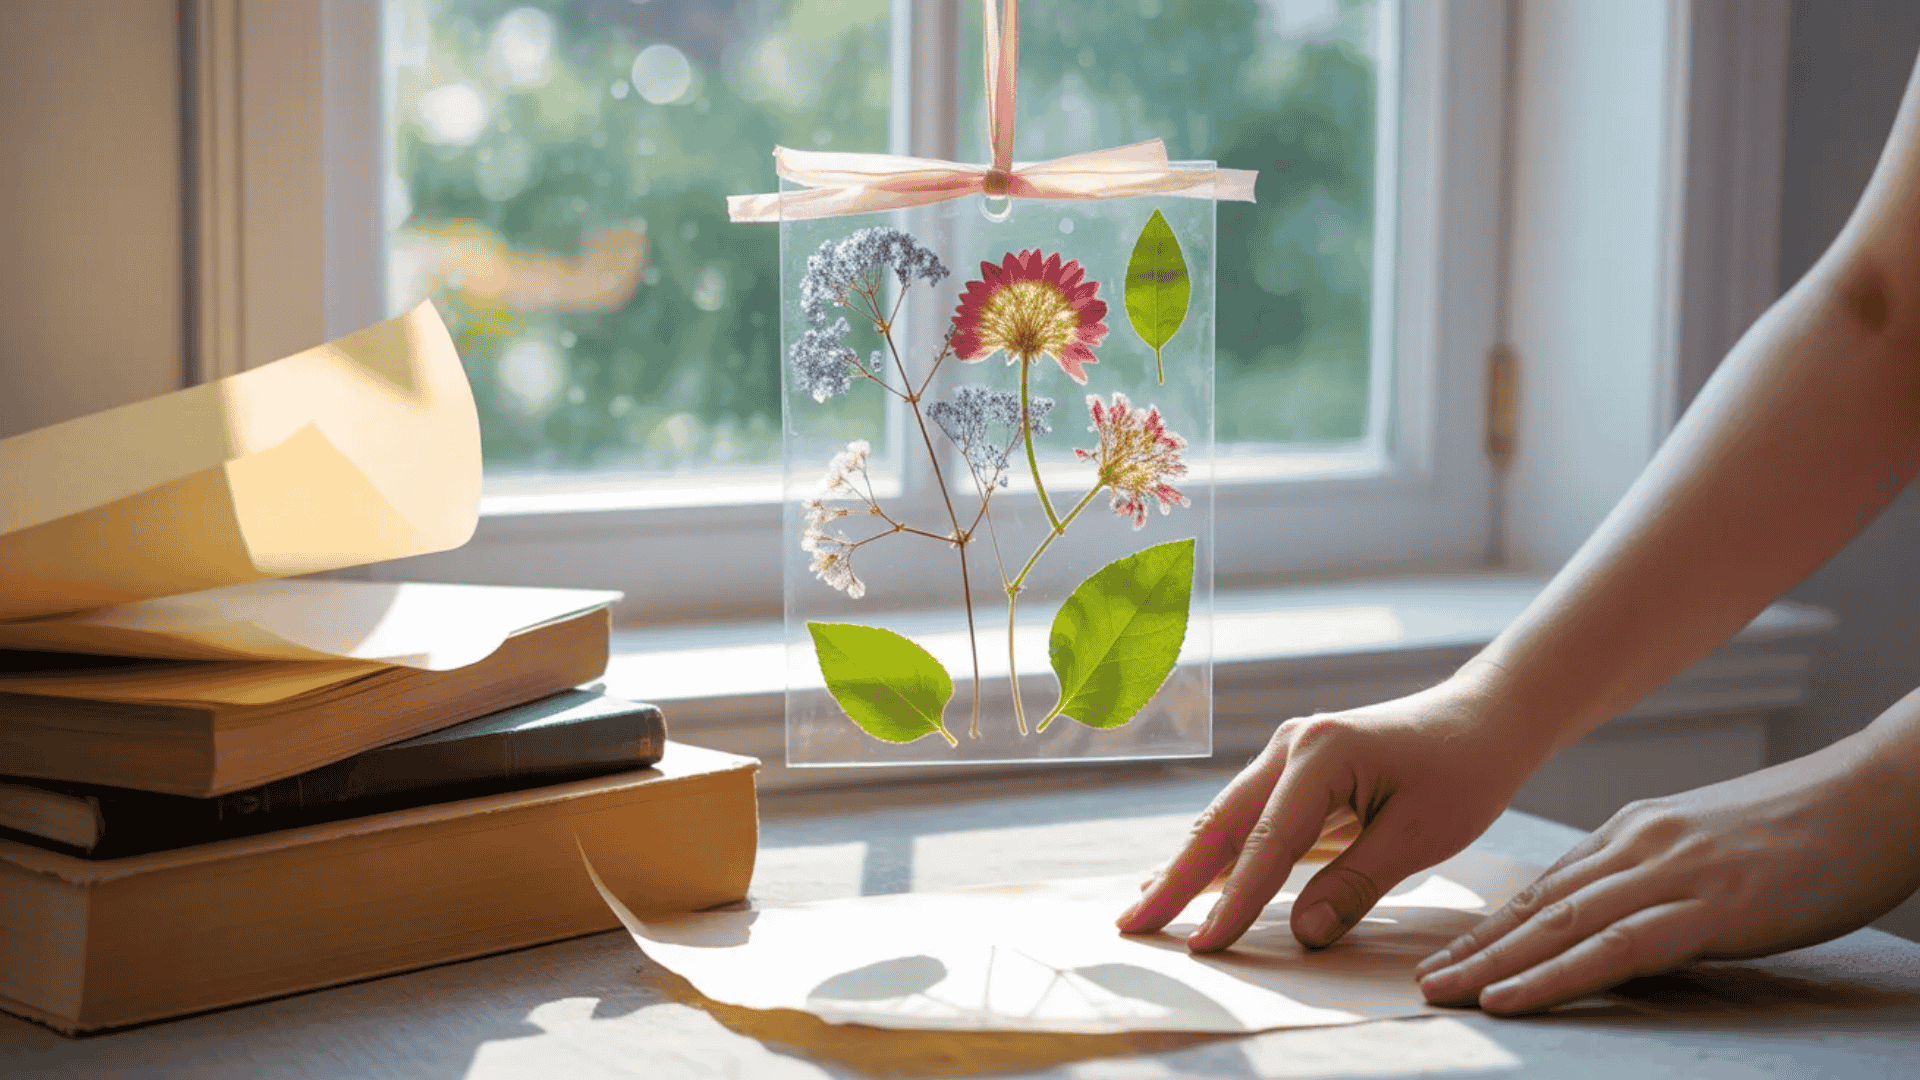
Capture spring beauty in a window hanging. Pressed flowers and leaves create colorful designs. Sunlight makes the colors glow beautifully.
Difficulty Level: Beginner to Intermediate
Time Needed: 45 minutes (plus pressing time)
Cost Estimate: Under $5
Materials Needed:
- Clear contact paper or laminating sheets
- Fresh flowers and leaves
- Scissors
- String or ribbon
- Hole punch
- Heavy books (for pressing)
- Parchment paper
Instructions:
- Press your flowers and leaves between parchment paper inside heavy books. Leave them for three to five days.
- Cut two pieces of contact paper the same size. Circles or squares work well for suncatchers.
- Peel the backing off one piece. Arrange your pressed flowers and leaves on the sticky side.
- Carefully place the second piece of contact paper over your design. Press out any air bubbles.
- Trim the edges if needed. Punch a hole at the top and thread ribbon through for hanging.
Pro Tip: Collect flowers on a dry day. Wet flowers can turn brown or moldy when pressed.
14. Stick and Twig Spring Wreath
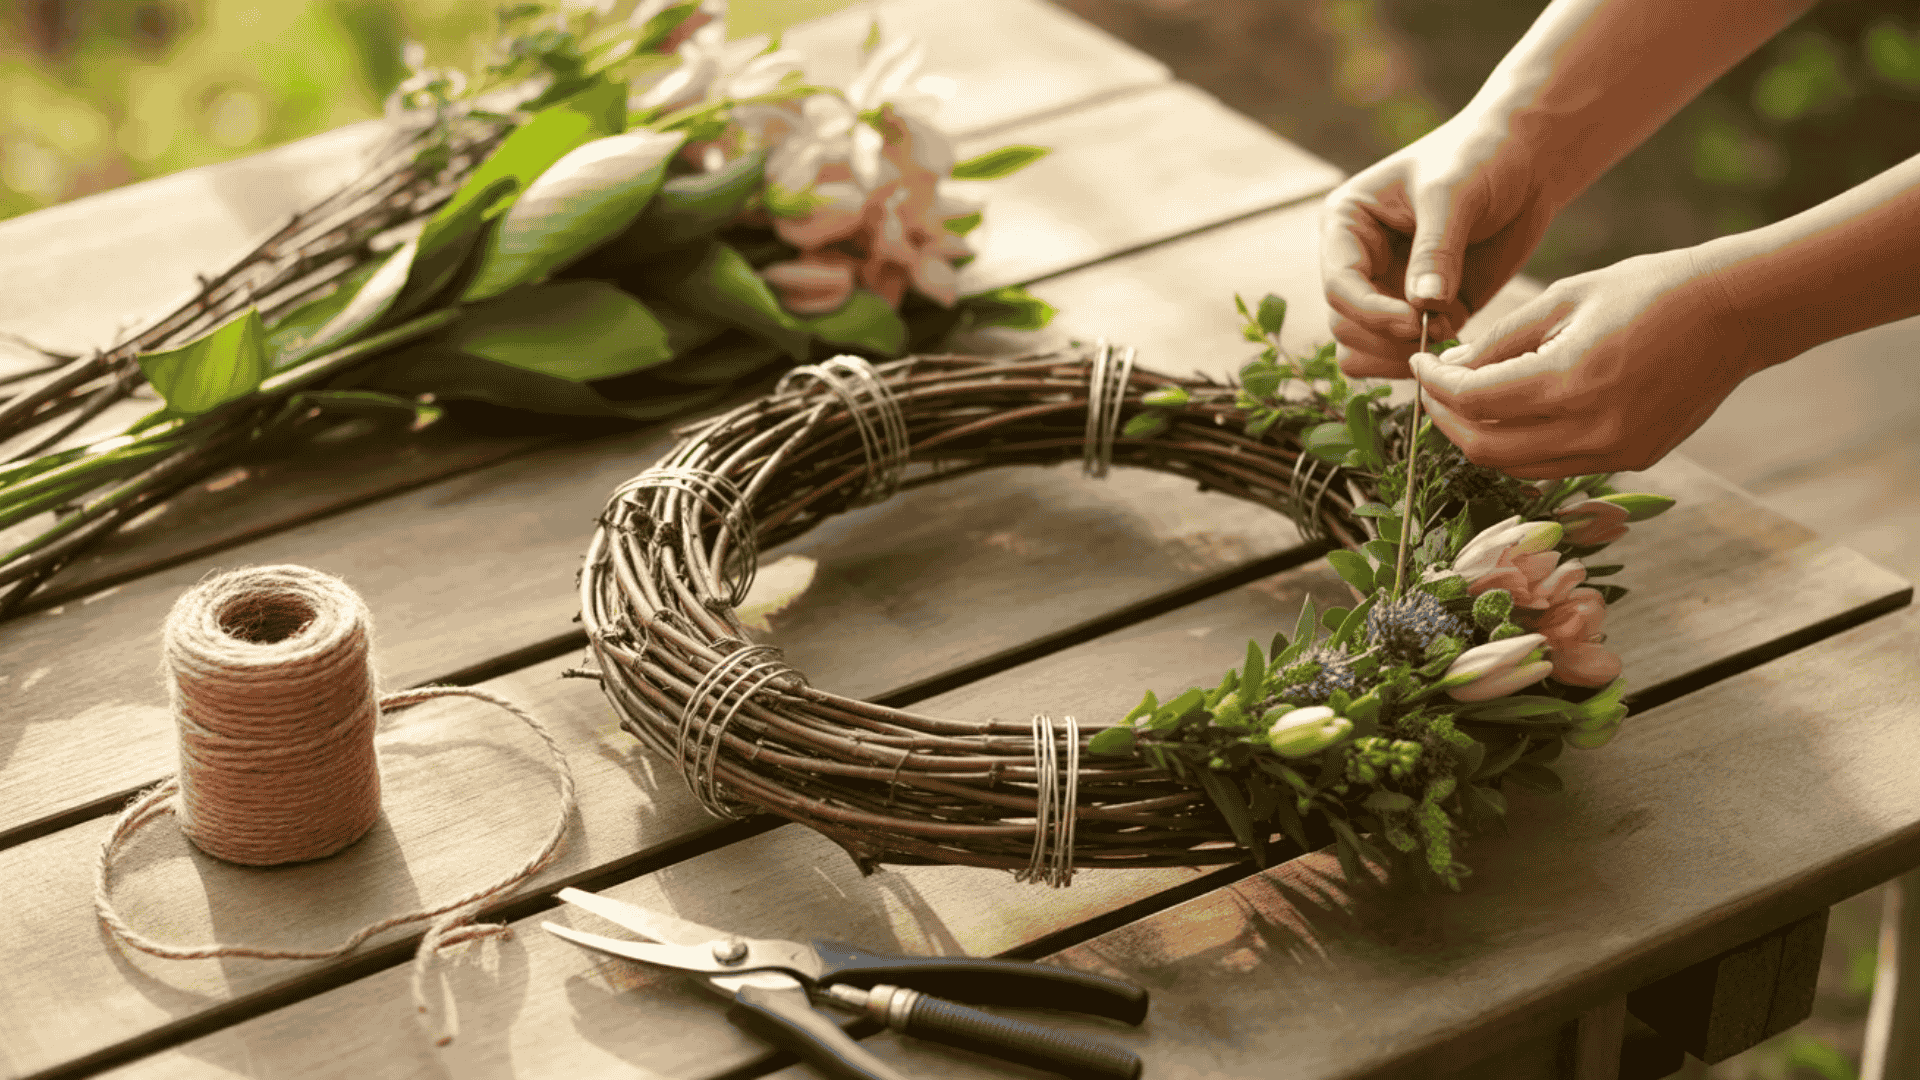
Build a rustic wreath from materials in your backyard. Flexible branches bend into perfect circles. This natural decoration looks beautiful on any door.
Difficulty Level: Intermediate
Time Needed: 50 minutes
Cost Estimate: Free to $3
Materials Needed:
- Long flexible branches or vines (grapevine works great)
- Floral wire or twine
- Fresh or artificial spring flowers
- Scissors or pruning shears
- Hot glue gun
- Ribbon (optional)
Instructions:
- Bend your longest branch into a circle shape. The size should match your desired wreath diameter.
- Wrap the branch around itself several times. Secure the ends with floral wire or twine.
- Weave additional branches through the base circle. Keep wrapping until the wreath looks full.
- Let the wreath dry for a day if using fresh branches. This helps it hold its shape.
- Hot glue flowers, leaves, or ribbon to the wreath. Focus decorations on one section for best results.
Pro Tip: Soak branches in water for an hour before bending. This makes them more flexible and less likely to snap.
15. DIY Seed Bombs
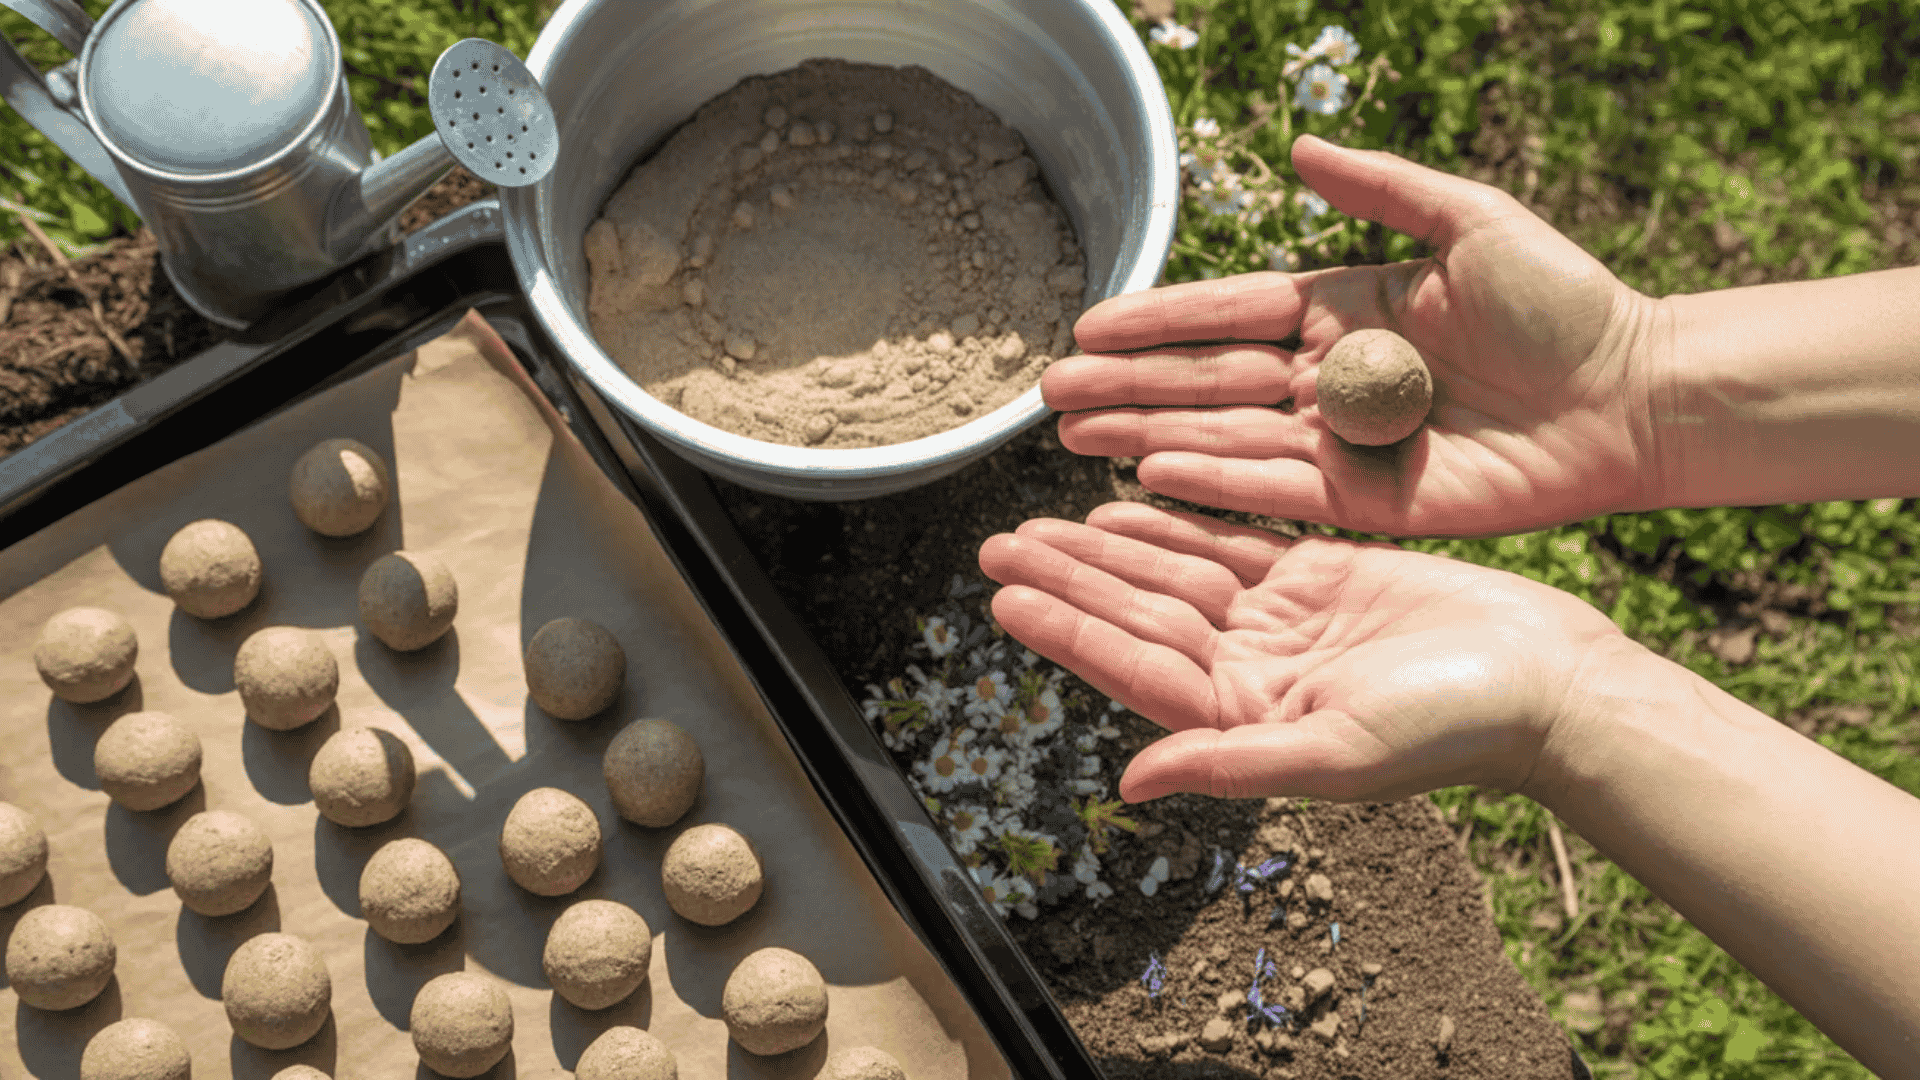
These little balls spread wildflowers wherever they land. Kids love molding the clay mixture. Toss them in empty lots or gardens to create spring blooms.
Difficulty Level: Beginner
Time Needed: 30 minutes (plus drying time)
Cost Estimate: Under $5
Materials Needed:
- Wildflower seeds
- Air-dry clay or modeling clay
- Compost or potting soil
- Water
- Large bowl
- Baking sheet or tray
Instructions:
- Mix five parts of clay with three parts of compost in a large bowl. Add water slowly until the mixture feels like dough.
- Add one part wildflower seeds to the mixture. Knead everything together until the seeds distribute evenly.
- Pinch off small amounts and roll them into balls about one inch wide.
- Place the seed bombs on a tray to dry. This takes about two days in a warm spot.
- Throw your dried seed bombs into bare soil areas. Rain will break them down, and the seeds will grow.
Pro Tip: Choose native wildflower seeds for your area. They grow better and support local wildlife.
Spring Crafts with Yarn and Fabric
Yarn and fabric add texture and softness to spring projects. These materials come in every color imaginable. Scraps from old clothing work perfectly for many crafts. You can create everything from flowers to decorations with basic sewing or no-sew techniques.
These five crafts range from simple yarn wrapping to basic stitching. Most require no special skills beyond tying knots or cutting fabric. Raid your craft closet or visit a thrift store for inexpensive supplies.
16. Yarn-Wrapped Flower Bouquet
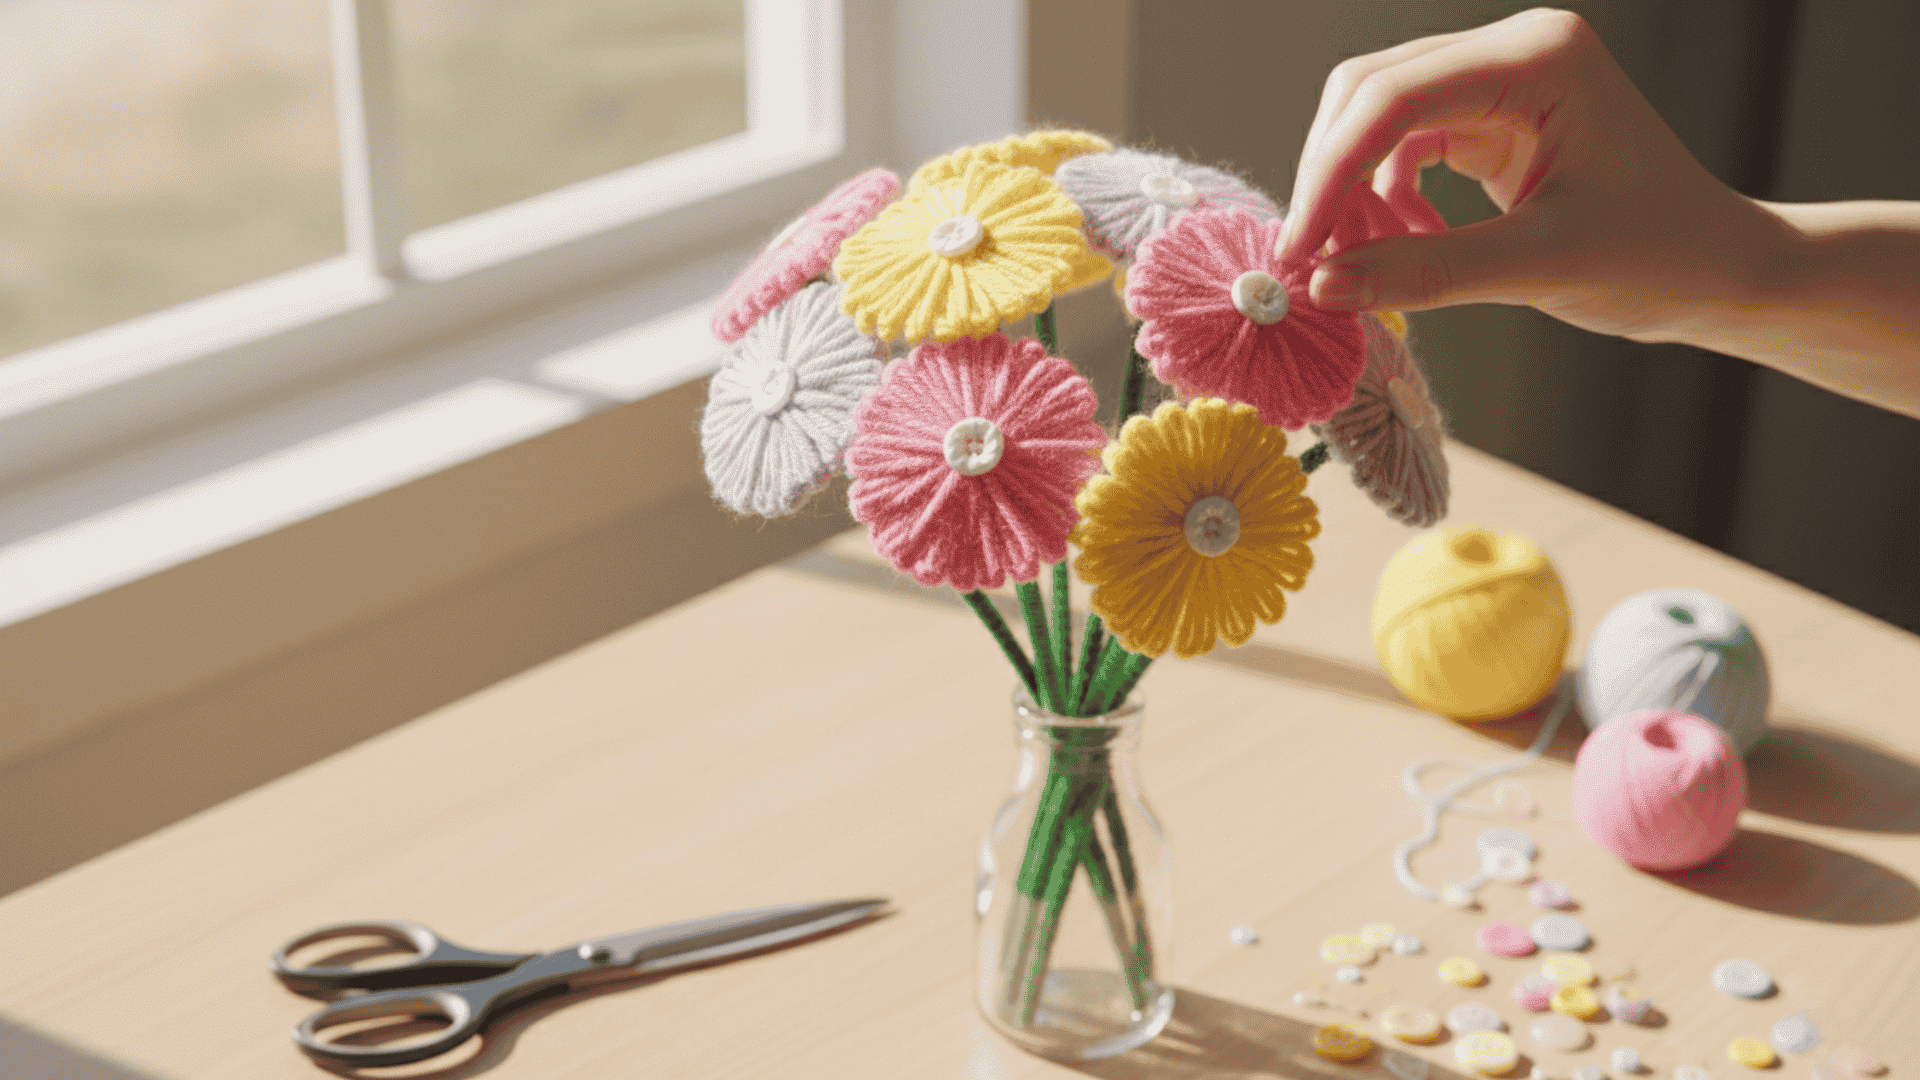
Transform cardboard and yarn into a lasting bouquet. The wrapped petals create an interesting texture. This craft works well for gifts or home decor.
Difficulty Level: Beginner
Time Needed: 40 minutes
Cost Estimate: Under $4
Materials Needed:
- Cardboard (cereal boxes work great)
- Yarn in spring colors
- Green pipe cleaners or wooden sticks
- Scissors
- Hot glue gun
- Pencil
- Button or bead (for center)
Instructions:
- Draw flower petal shapes on cardboard. Make five or six petals per flower, about three inches long.
- Cut out all the petal shapes. Poke a small hole at the bottom of each petal.
- Wrap yarn tightly around each petal. Start at the base and work to the tip and back.
- Thread all petals onto a pipe cleaner or stick. Arrange them in a circle to form the flower.
- Glue a button or bead in the center where all petals meet. This holds everything in place.
Pro Tip: Mix different yarn colors on one flower for a variegated look. Pink and white together look especially pretty.
17. Fabric Scrap Bunting
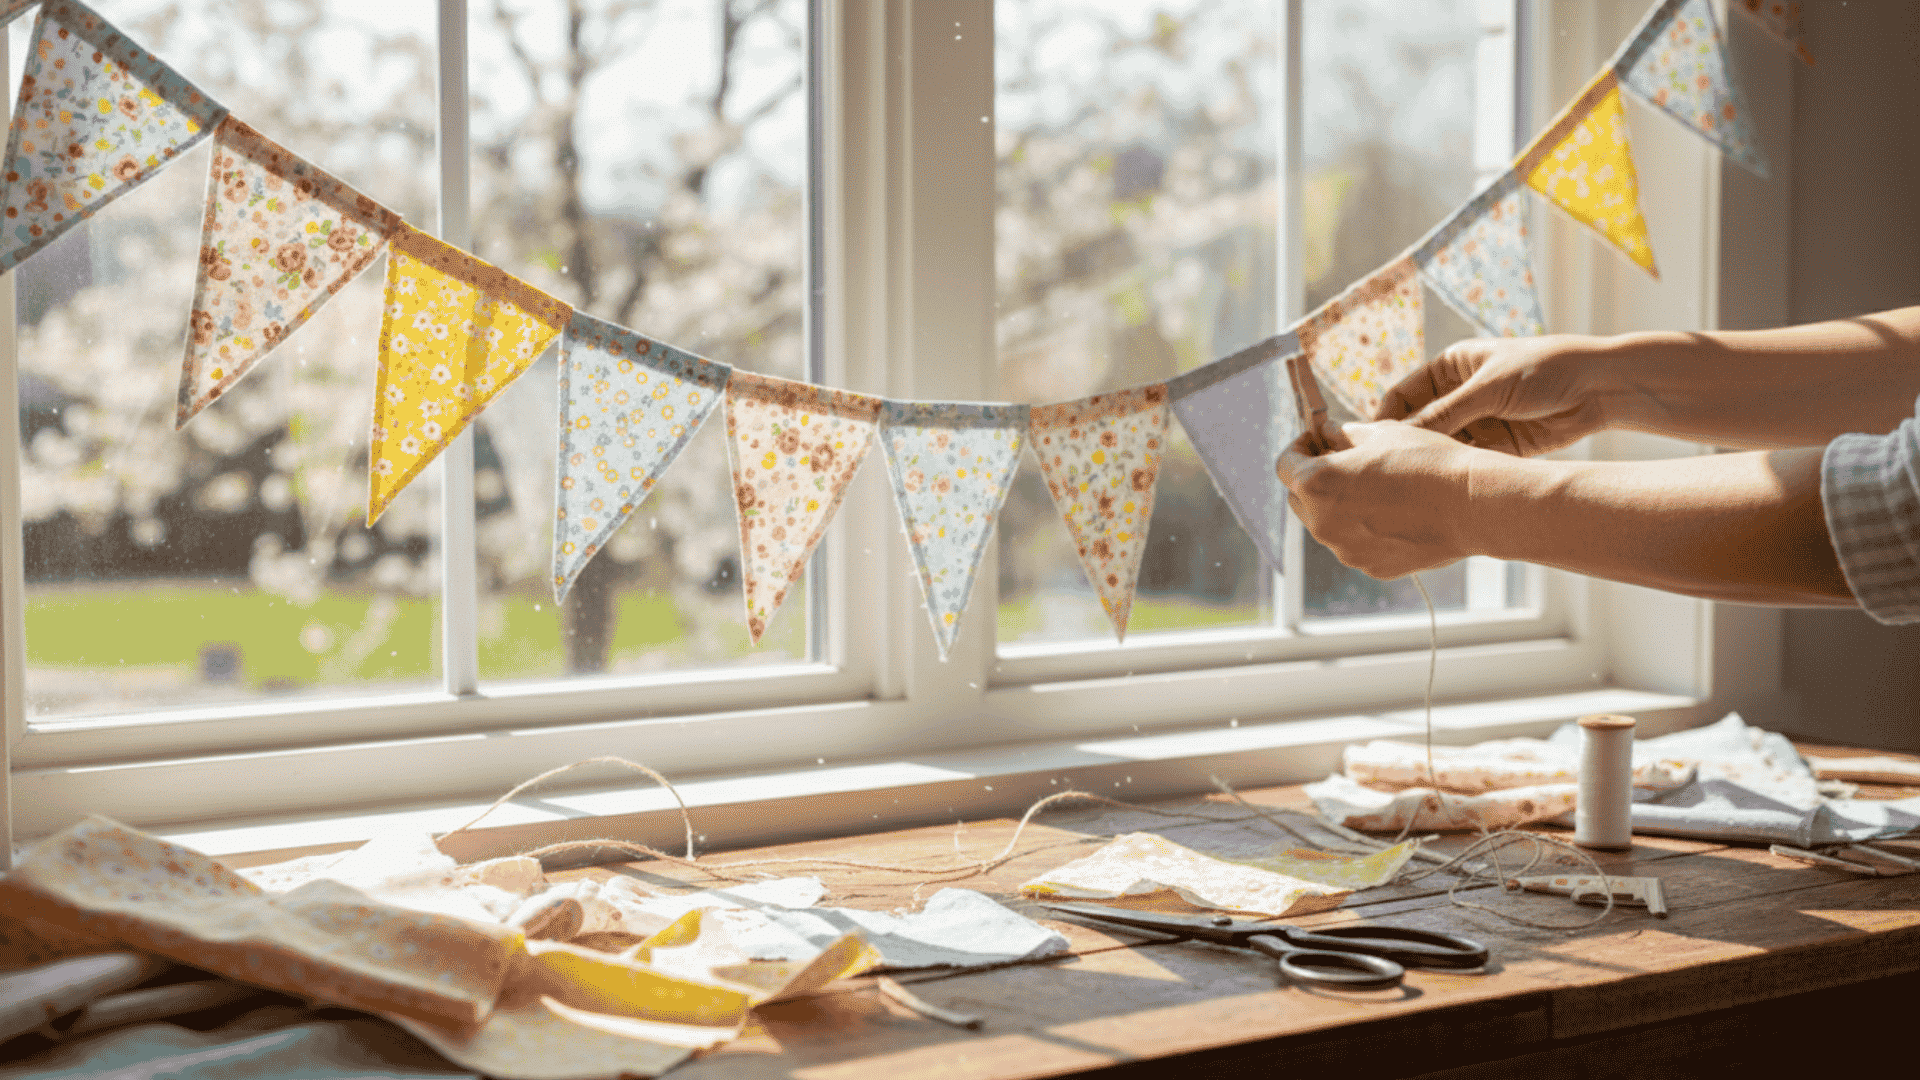
String together colorful fabric triangles for cheerful spring decor. This no-sew project uses fabric scraps or old clothes. Hang the bunting across mantels, windows, or party spaces.
Difficulty Level: Beginner
Time Needed: 35 minutes
Cost Estimate: Under $3
Materials Needed:
- Fabric scraps in spring colors and patterns
- Scissors or pinking shears
- Twine or ribbon (at least six feet long)
- Fabric glue or hot glue gun
- Ruler or template
- Clothespins (optional)
Instructions:
- Cut fabric into triangle shapes. Make them about five inches wide at the top and six inches tall.
- Fold the top edge of each triangle over the twine. Leave about two inches of fabric folded.
- Apply glue along the folded edge. Press firmly to secure the fabric to the twine.
- Space triangles about three inches apart along the twine. Alternate colors and patterns for visual interest.
- Let the glue dry completely before hanging. Use clothespins to attach bunting to walls or railings.
Pro Tip: Cut triangles with pinking shears to prevent fraying. Regular scissors work fine if you apply glue to all edges.
18. Pom-Pom Spring Wreath
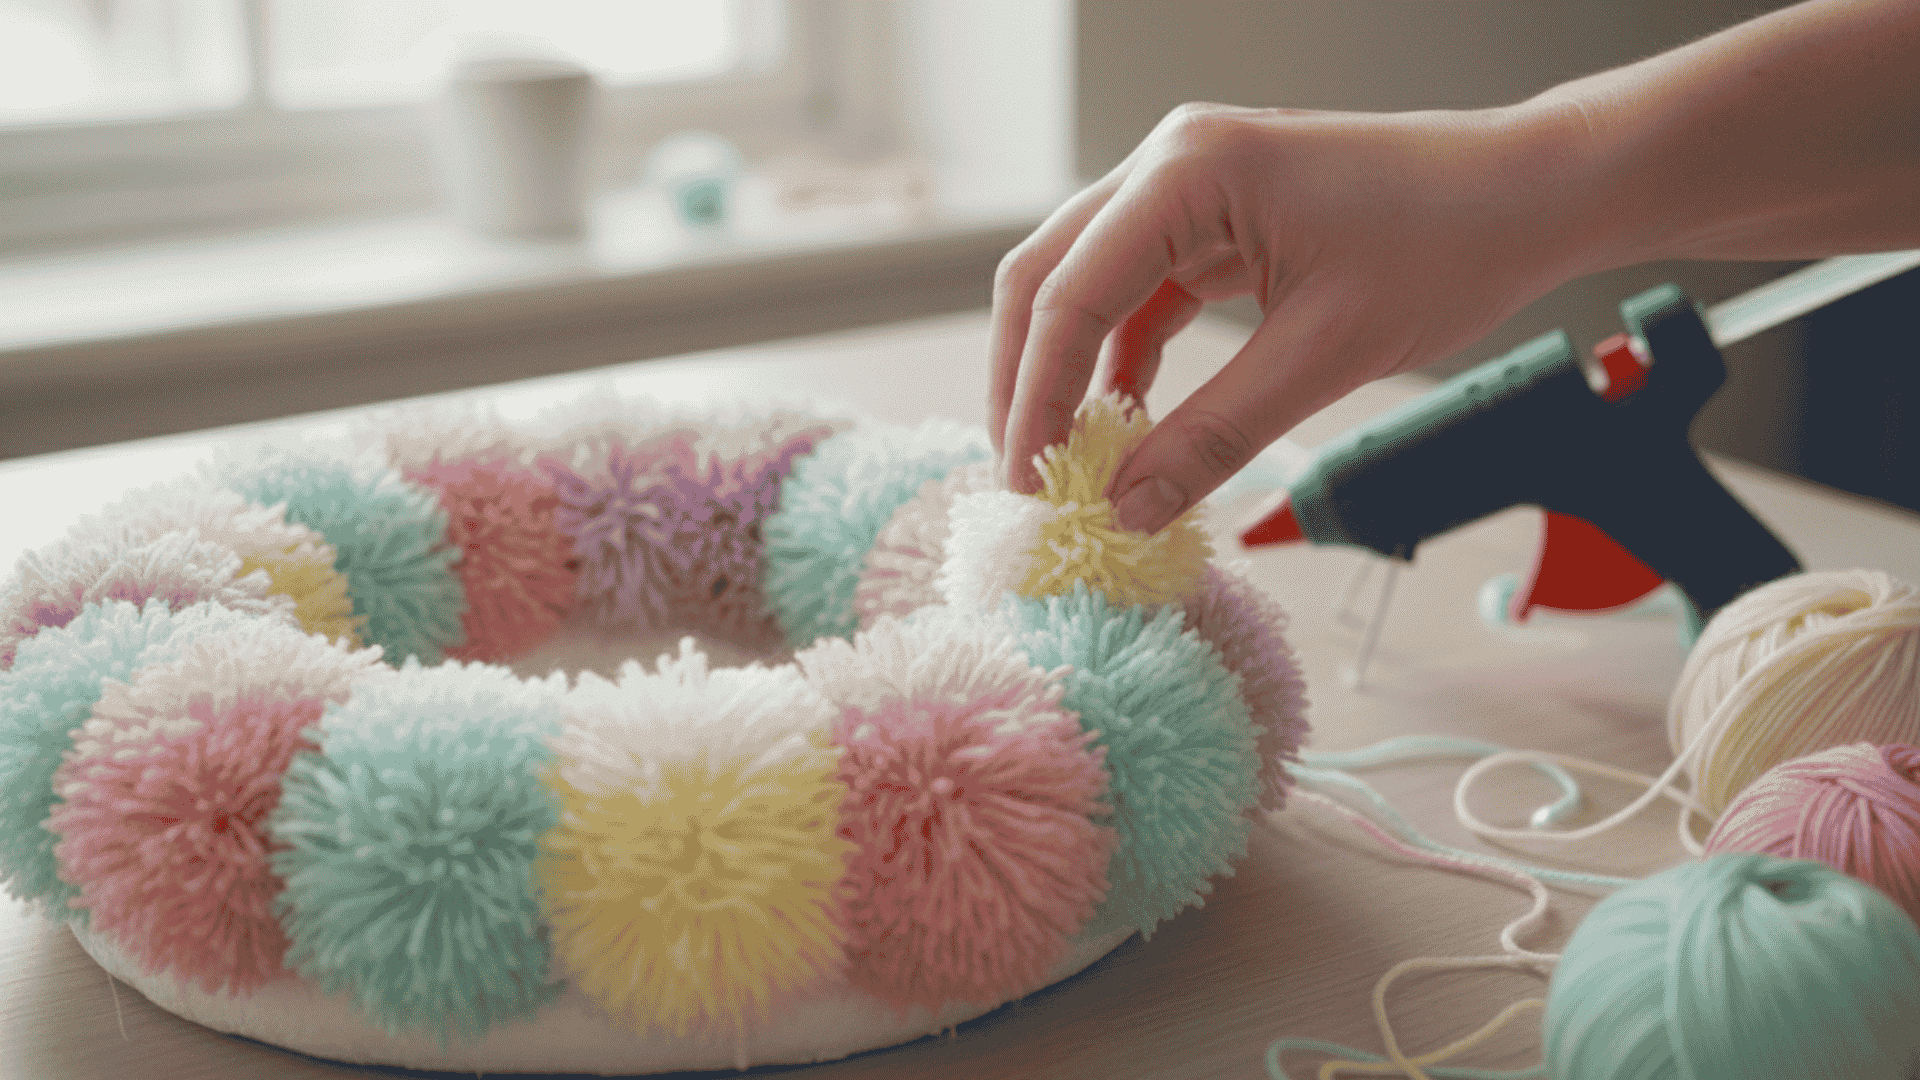
Fluffy yarn pom-poms cluster together into a soft, colorful wreath. The texture feels fun and looks cheerful. This craft takes time but requires no special skills.
Difficulty Level: Beginner
Time Needed: One hour
Cost Estimate: Under $8
Materials Needed:
- Yarn in various spring colors
- Foam or wire wreath form (twelve inches)
- Scissors
- Hot glue gun
- Cardboard (for pom-pom maker)
- Optional: ribbon for hanging
Instructions:
- Make pom-poms by wrapping yarn around two cardboard circles with holes cut in the centers. You need about thirty pom-poms.
- Cut between the layers of wrapped yarn. Tie a piece of yarn tightly around the middle before removing the cardboard.
- Trim pom-poms to make them round and even. Fluff them up by separating the yarn strands.
- Apply hot glue to the bottom of each pom-pom. Press them onto the wreath form close together.
- Continue gluing pom-poms until the entire wreath form is covered. Add a ribbon loop for hanging.
Pro Tip: Make pom-poms in different sizes. Mix large and small ones for more visual interest.
19. Felt Flower Garden
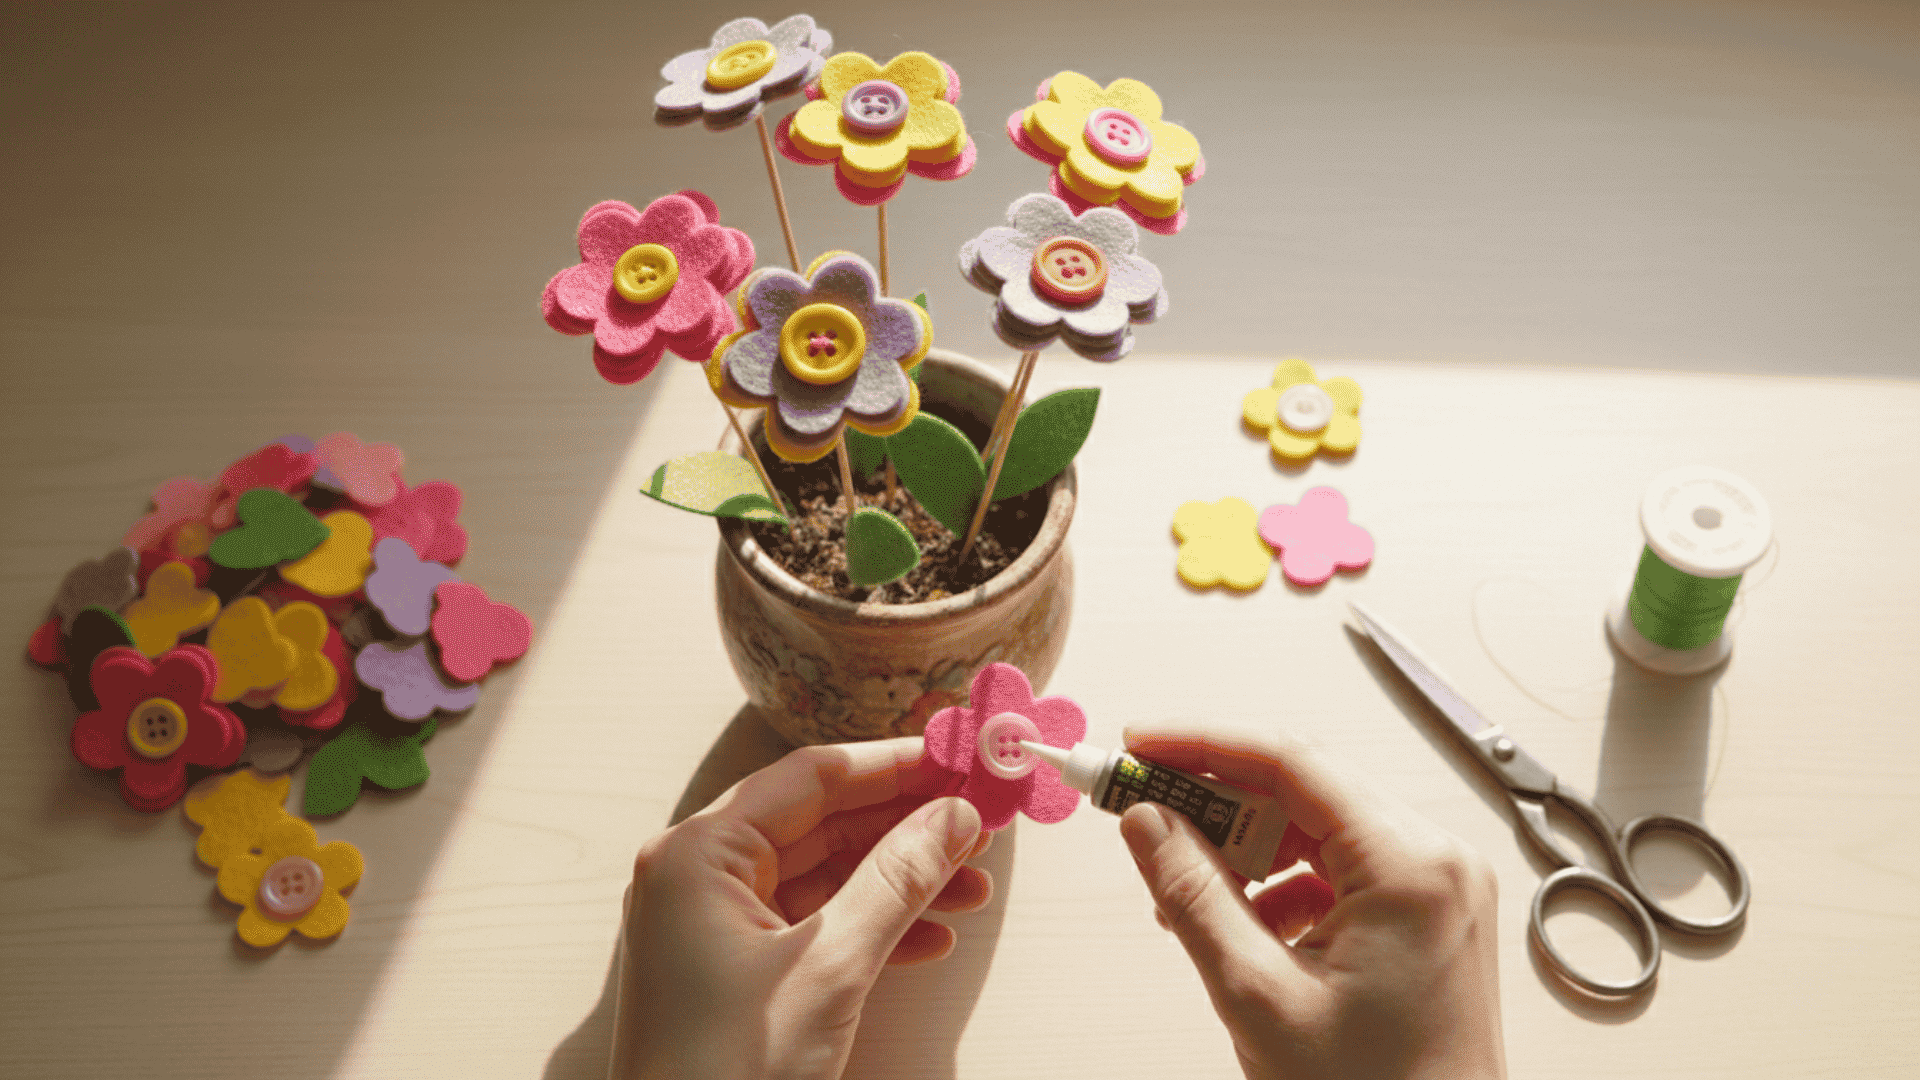
Felt flowers never wilt or need water. These blooms look realistic with simple cutting and layering. Create a whole garden that lasts all year.
Difficulty Level: Beginner to Intermediate
Time Needed: 45 minutes
Cost Estimate: Under $6
Materials Needed:
- Felt sheets in flower colors and green
- Scissors
- Hot glue gun
- Wooden skewers or green wire
- Buttons or beads (for centers)
- Small pot or vase
- Foam block (to hold stems)
Instructions:
- Cut flower petal shapes from felt. You need five to eight petals per flower, depending on the style.
- Layer petals in a circle with points meeting in the center. Glue them together at the base.
- Cut a small circle of felt for the flower back. Glue it where all petals join.
- Push a wooden skewer through the center back. Secure with hot glue on both sides.
- Glue a button or bead on the front center. Cut leaf shapes from green felt and glue to stems.
Pro Tip: Use different shades of the same color for each flower. Light pink, medium pink, and hot pink together look beautiful.
20. Fabric Butterfly Wall Art
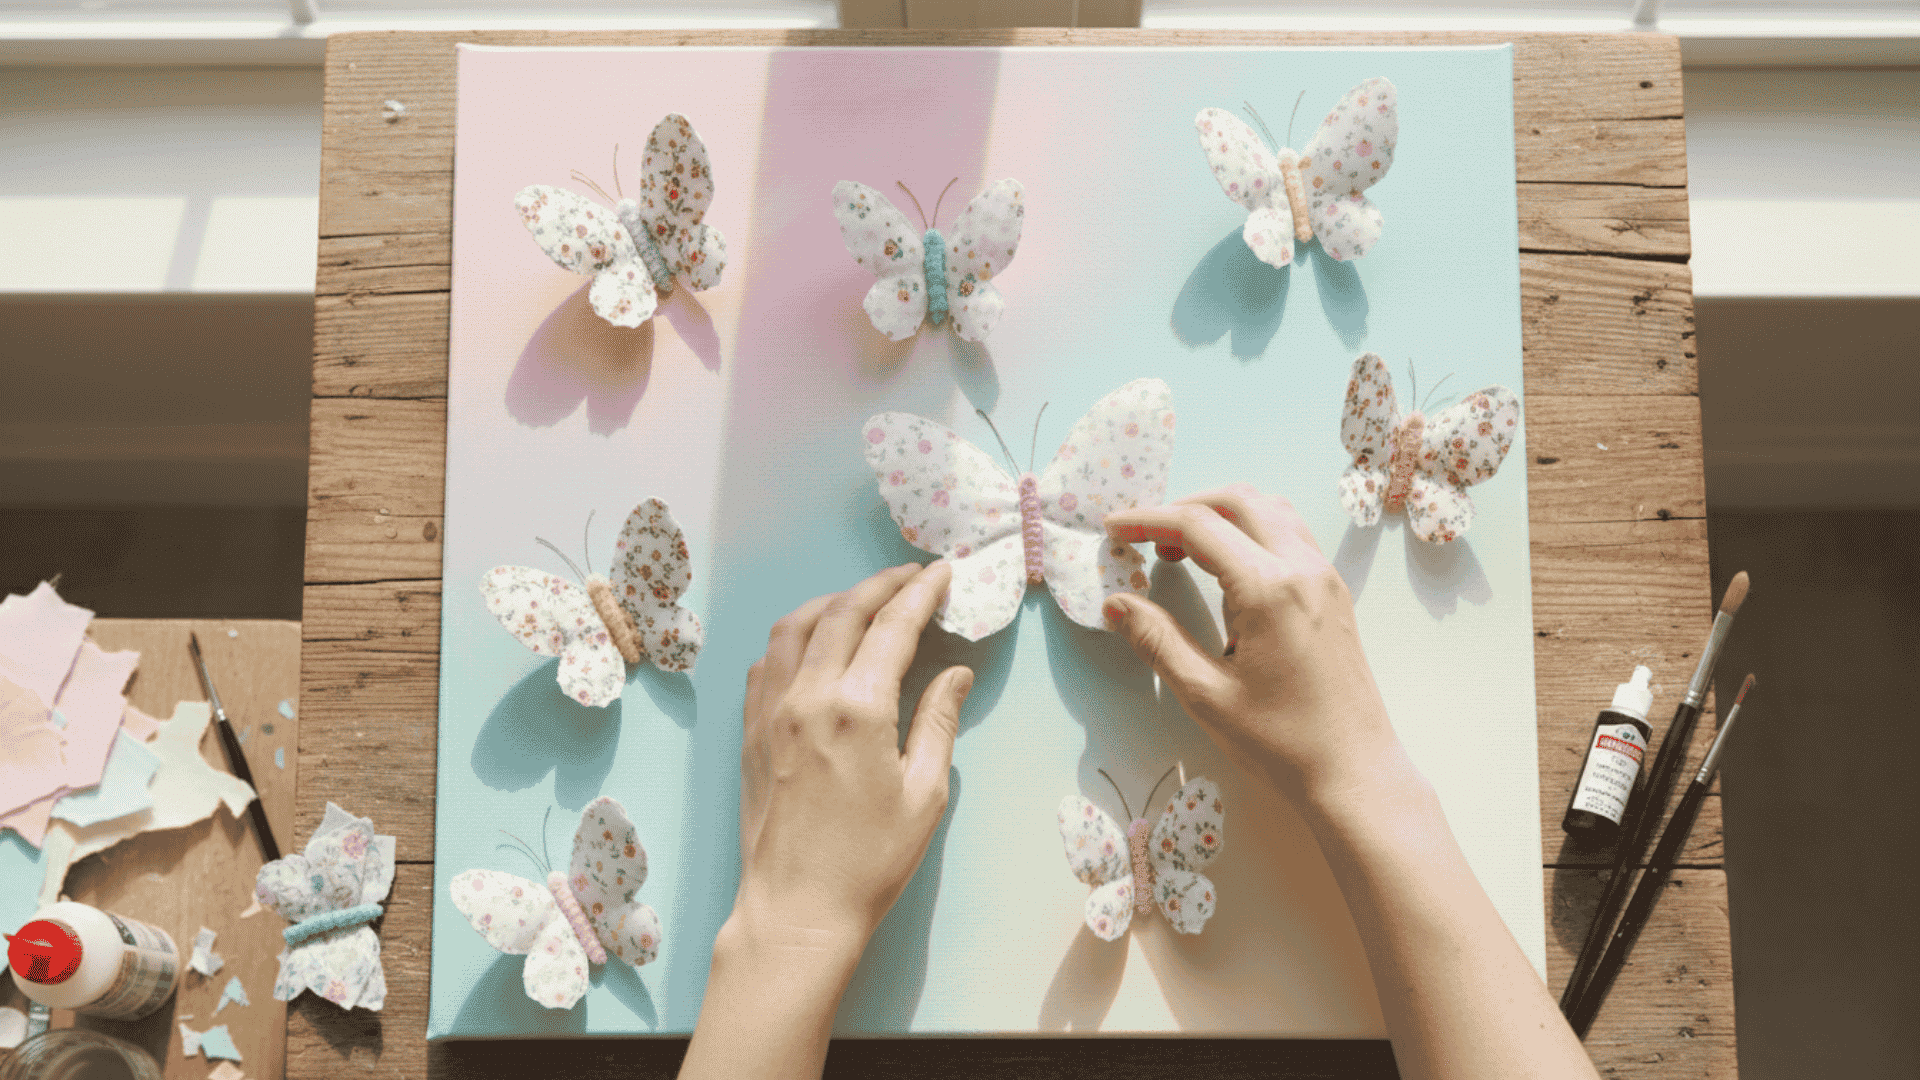
Create a three-dimensional butterfly display using fabric scraps. Mount them on canvas or directly on walls. The wings flutter slightly when air moves past them.
Difficulty Level: Intermediate
Time Needed: 50 minutes
Cost Estimate: Under $7
Materials Needed:
- Fabric scraps in bright patterns
- Canvas board or cardboard backing
- Pipe cleaners (for bodies and antennae)
- Fabric stiffener or watered-down glue
- Scissors
- Hot glue gun
- Paint (for background)
- Small paintbrush
Instructions:
- Paint your canvas background in a soft spring color. Sky blue or pale yellow works well. Let it dry.
- Cut butterfly wing shapes from fabric. You need two large and two small wings per butterfly.
- Brush fabric stiffener on both sides of the wings. Let them dry in a curved shape over a rolling pin.
- Twist a pipe cleaner into a butterfly body with antennae. The body should be about three inches long.
- Glue wings to the pipe cleaner body. Mount butterflies on the canvas using hot glue dots.
Pro Tip: Only glue the butterfly body to the canvas. Let the wings stand free for a three-dimensional effect.
Quick and Easy Spring Crafts
Sometimes you need a craft that comes together fast. These projects take fifteen minutes or less to complete. They work perfectly for last-minute activities or when attention spans run short.
Kids can finish them before losing interest. Adults appreciate crafts that fit into busy schedules. Each project uses minimal supplies and requires almost no prep work. Keep these ideas ready for rainy afternoons or surprise guests.
21. Paper Straw Tulips
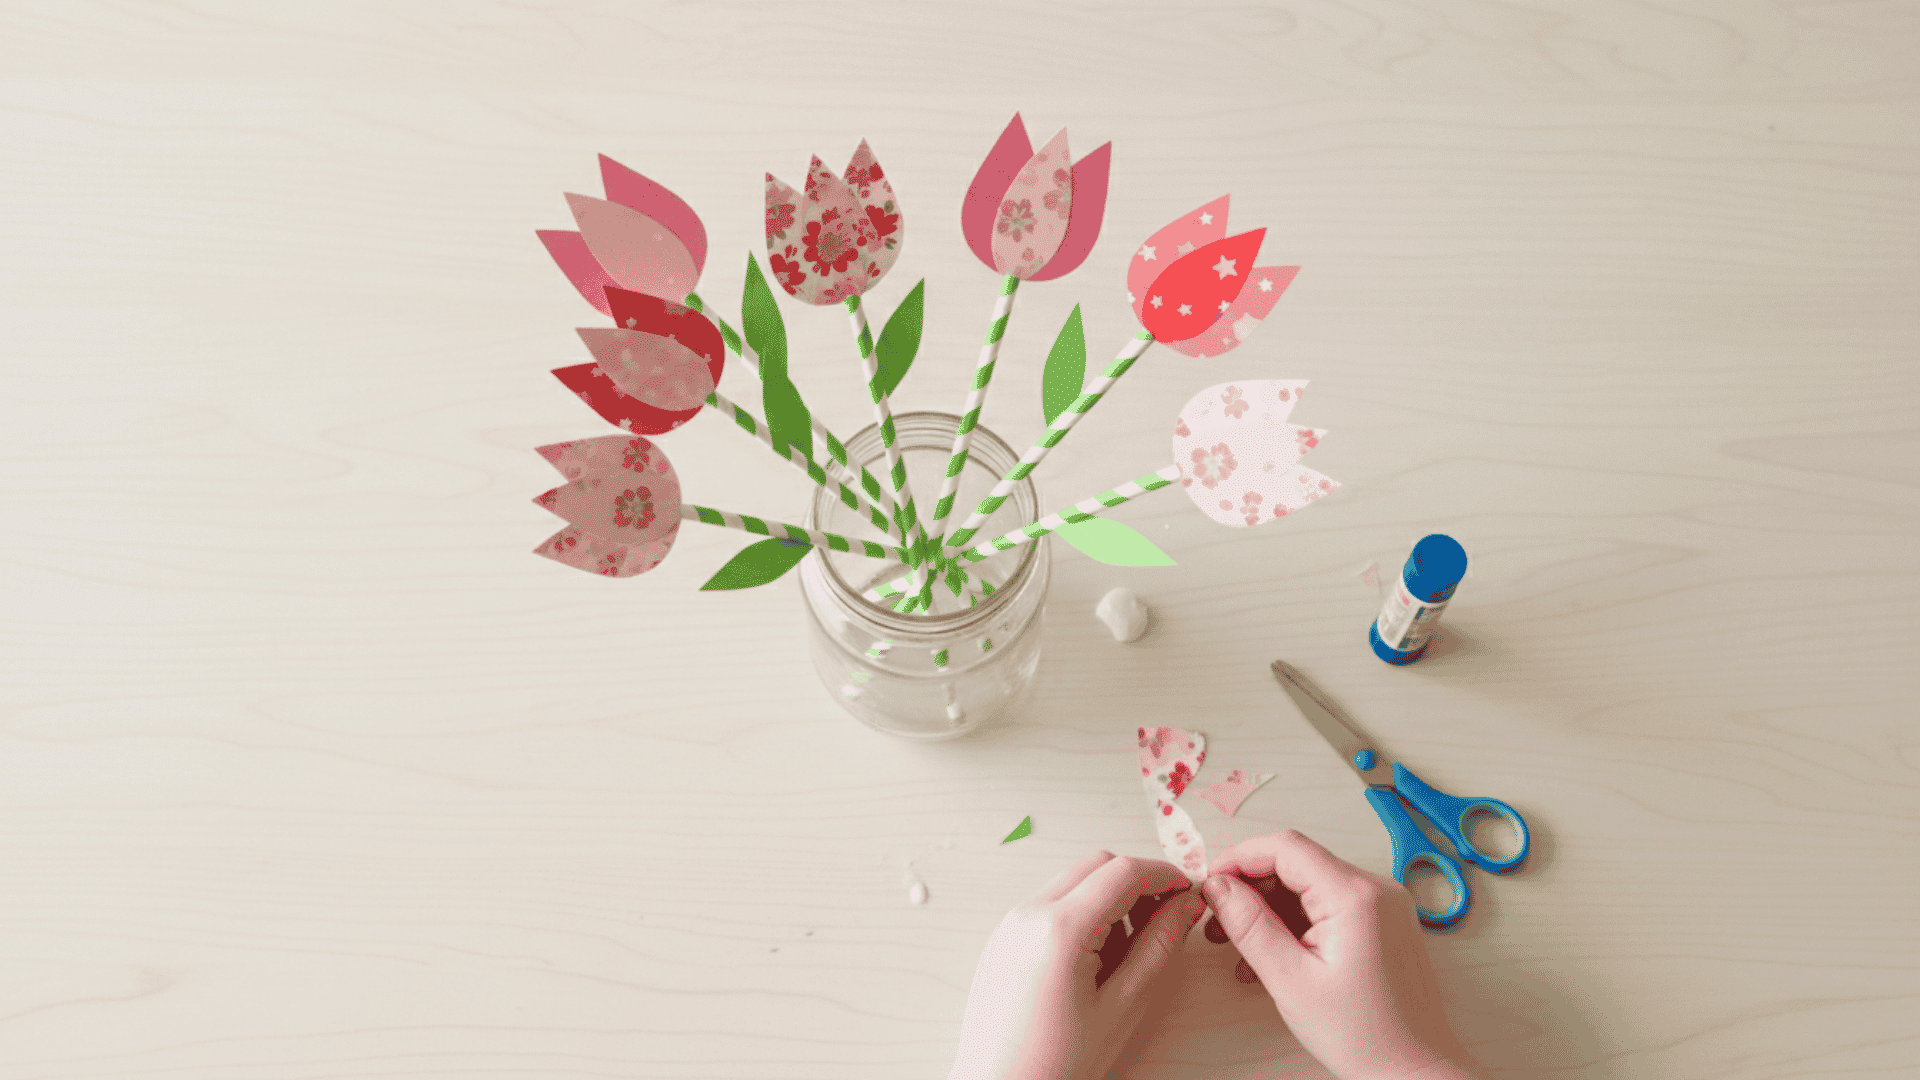
Paper straws become colorful tulips in minutes. This simple craft needs only three materials. Even toddlers can help with the folding and gluing.
Difficulty Level: Beginner
Time Needed: 15 minutes
Cost Estimate: Under $3
Materials Needed:
- Colored paper straws (or regular straws painted green)
- Construction paper in tulip colors
- Scissors
- Glue stick
- Green construction paper (for leaves)
Instructions:
- Cut a tulip shape from colored paper. Make it about three inches tall with a rounded cup shape at the top.
- Fold the bottom of the tulip shape around the top of the straw. Glue it closed tightly.
- Cut two leaf shapes from green paper. Make them long and narrow like real tulip leaves.
- Glue one leaf on each side of the straw about halfway down the stem.
- Display your tulips in a small vase or jar. Make several in different colors for a full bouquet.
Pro Tip: Use patterned scrapbook paper for the tulip heads. Polka dots and stripes look fun and festive.
22. Cork Stamp Spring Art
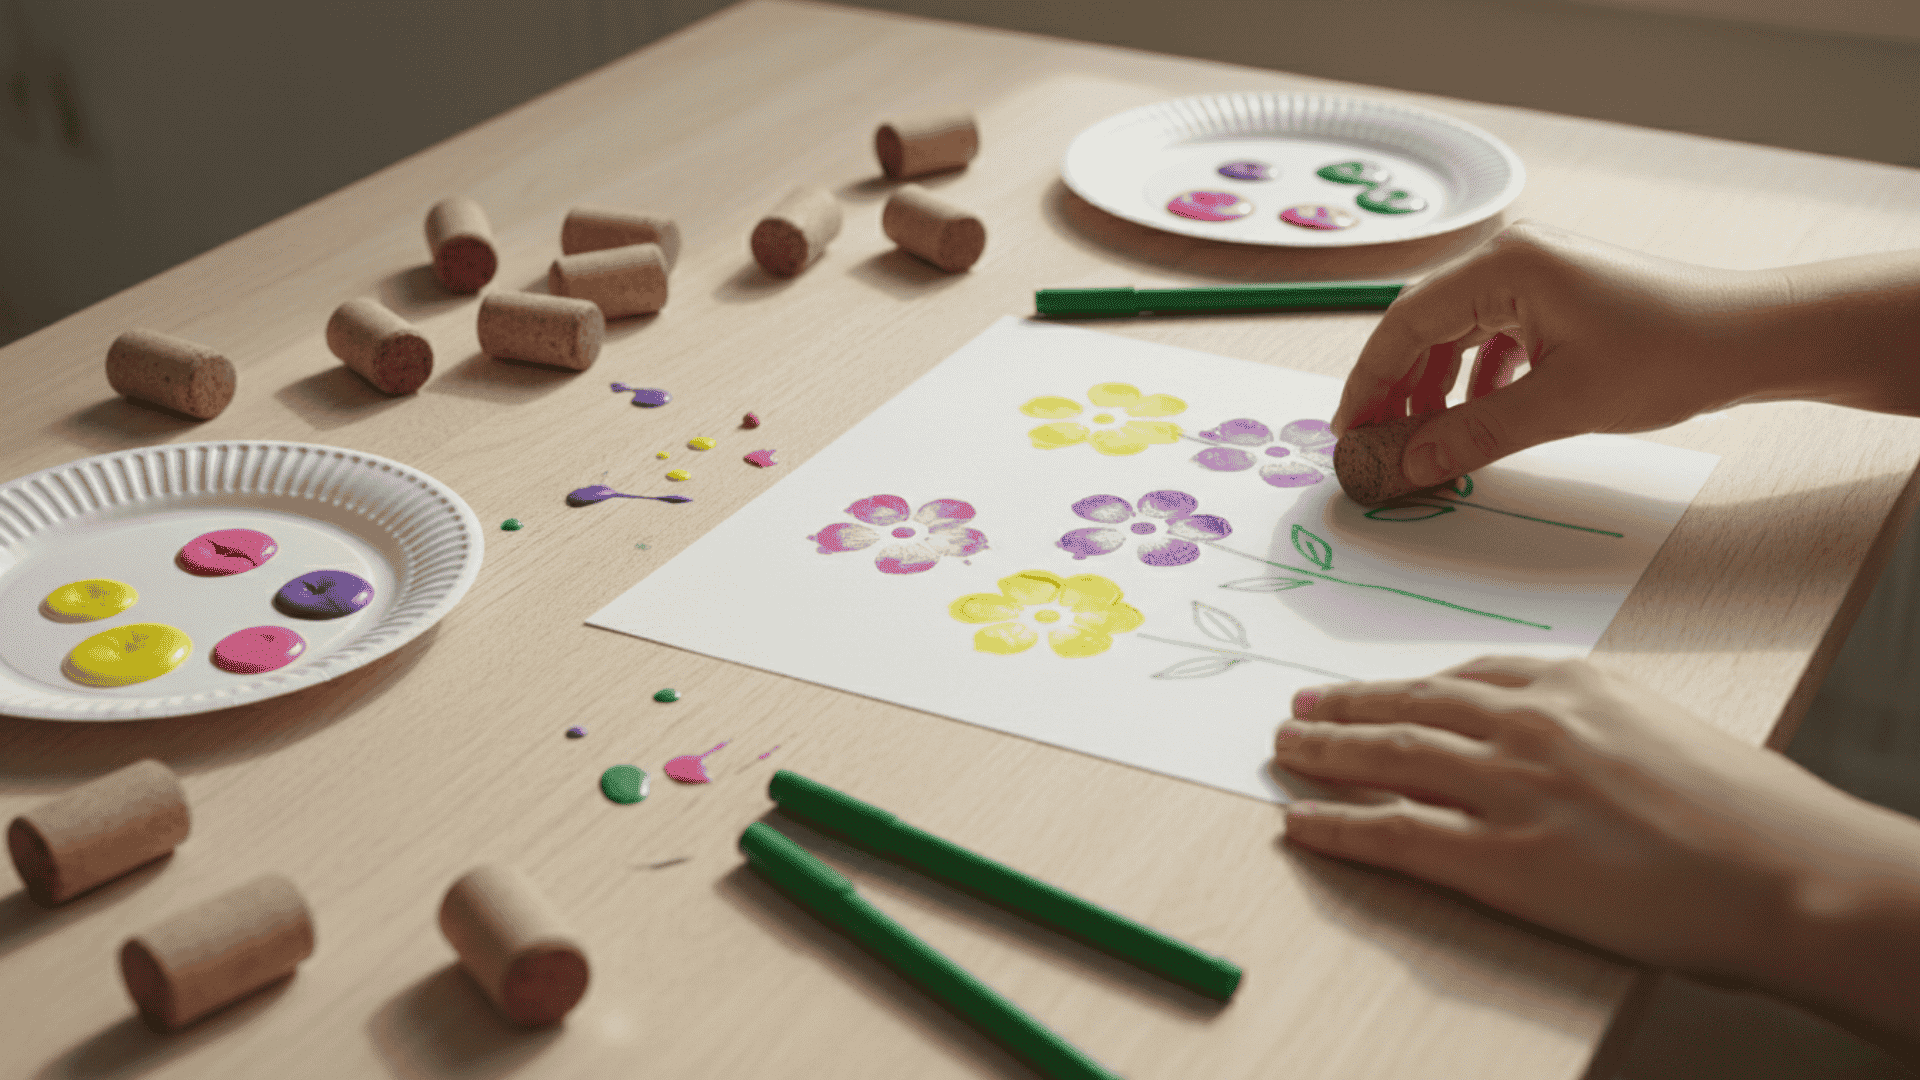
Wine corks make perfect circle stamps. Press them into paint and create spring scenes. This process art focuses on creativity over perfection.
Difficulty Level: Beginner
Time Needed: 15 minutes
Cost Estimate: Under $4
Materials Needed:
- Wine corks (save them from bottles or buy at craft stores)
- Tempera or acrylic paint
- White paper or cardstock
- Paper plates (for paint palettes)
- Markers or crayons
- Paper towels
Instructions:
- Pour different paint colors onto paper plates. Use spring colors like pink, yellow, green, and purple.
- Press the flat end of a cork into paint. Make sure the entire end gets covered.
- Stamp the cork onto your paper repeatedly to create flowers, trees, or abstract designs.
- Let the paint dry for about ten minutes. Add details with markers or crayons.
- Draw stems and leaves to turn cork circles into flowers. Add grass, sky, or other background elements.
Pro Tip: Cut the cork at an angle to create different shaped stamps. V-shapes work great for birds or leaves.
23. Sponge-Painted Spring Trees
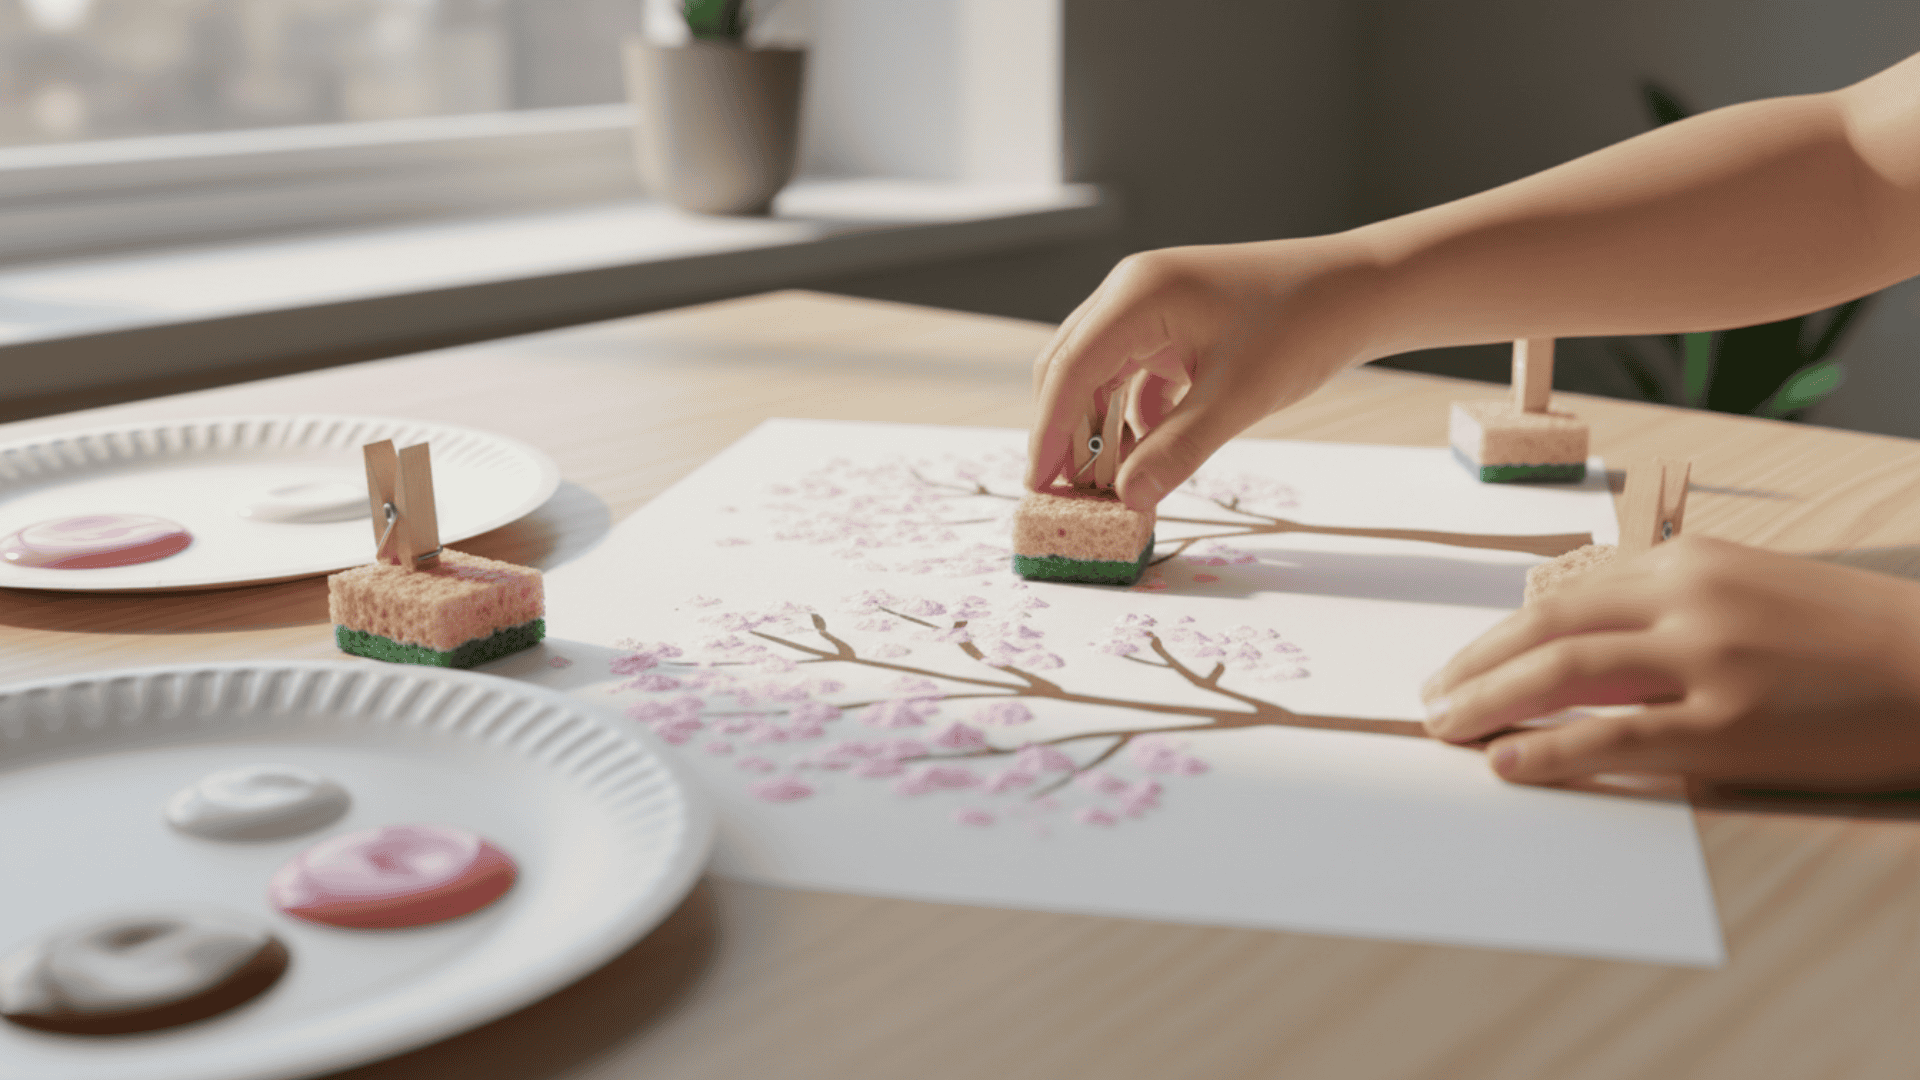
Kitchen sponges create fluffy tree blossoms. Cut them into small pieces and dab on paint. This technique works for all ages and abilities.
Difficulty Level: Beginner
Time Needed: 20 minutes
Cost Estimate: Under $3
Materials Needed:
- Cellulose kitchen sponges
- Scissors
- Tempera or acrylic paint (pink, white, green)
- Paper or canvas
- Brown paint or marker
- Paper plate (for paint palette)
- Clothespins (to hold sponge pieces)
Instructions:
- Draw or paint a brown tree trunk and branches on your paper. Keep the branches sparse with room for blossoms.
- Cut sponges into one-inch squares. Clip a clothespin to each piece for a handle.
- Pour pink, white, or light green paint onto a paper plate. These colors look like spring blossoms.
- Dip the sponge into paint and dab it onto the branches. Use a pouncing motion instead of wiping.
- Layer different colors on top of each other. Let some overlap for depth and interest.
Pro Tip: Mix pink and white paint together on some sponge dabs. This creates a natural blended look.
Conclusion
Spring crafts bring the season indoors with color and creativity. These projects work for every age and skill level. Most use materials you already have at home.
Paper plates, egg cartons, and yard findings cost nothing. Even store-bought supplies stay under ten dollars per project. Quick fifteen-minute crafts fit busy schedules. Longer projects offer weekend family time together.
Start with one craft today. Toddlers love paper plate flowers and tissue rainbows. Older kids enjoy yarn bouquets and painted rocks. Adults appreciate watercolor cards and nature wreaths.
These spring crafts do more than pass the time. They teach recycling, build fine motor skills, and create lasting memories. Your finished pieces brighten every room with handmade charm.
Pick your favorite project from this list. Gather your supplies and start creating. Share your finished crafts with friends and family. What will you make first this spring?