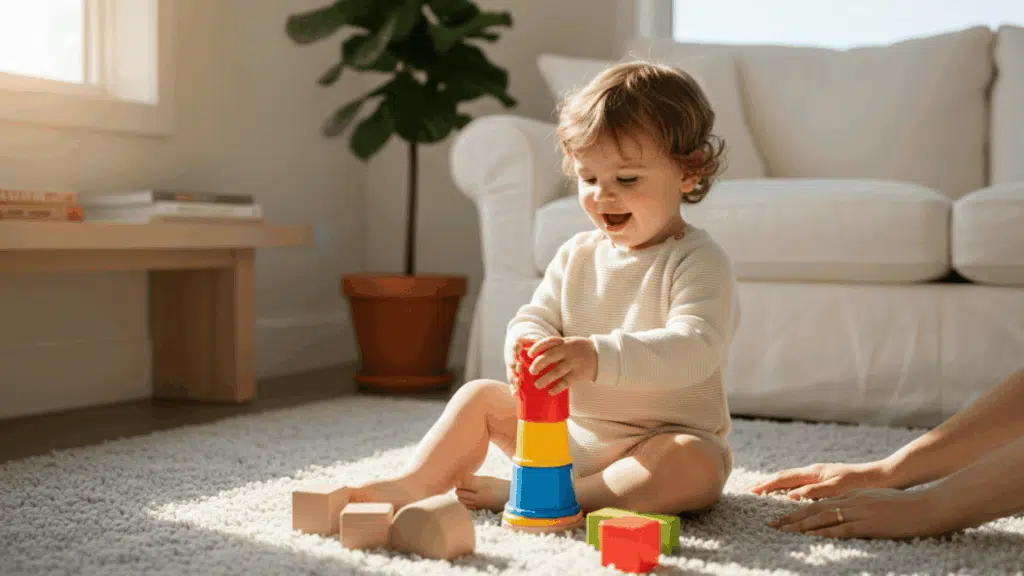
Looking for fun ways to keep kids busy on rainy days?
Construction paper crafts for kids are perfect for sparking creativity without breaking the bank. You probably already have scissors, glue, and colorful paper sitting in your drawer right now.
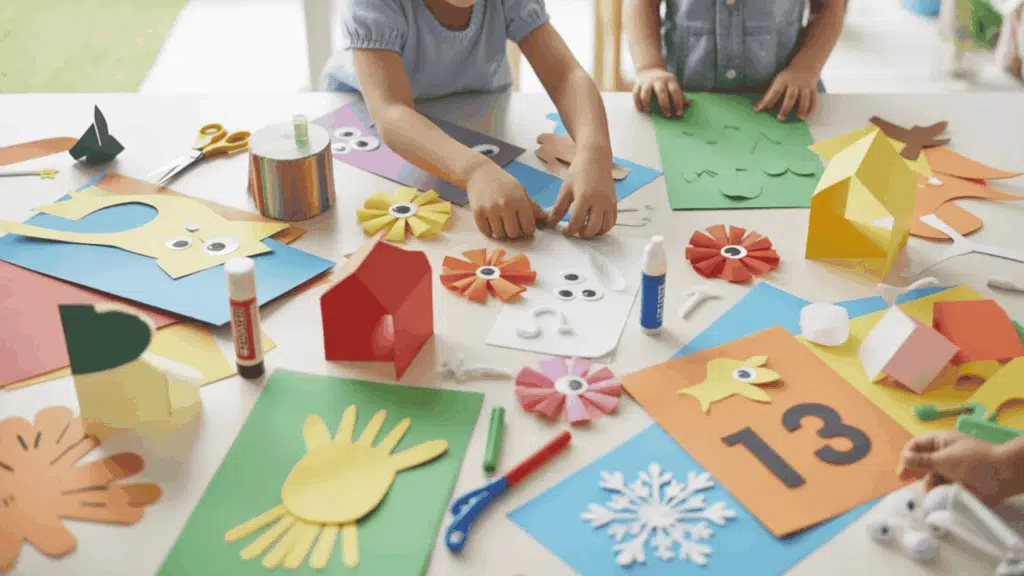
These simple projects work great for toddlers learning to cut and older kids exploring their artistic side. From cheerful animals to festive holiday decorations, there’s something here for every occasion and skill level.
This guide shares easy construction paper crafts for kids that build fine motor skills while creating colorful keepsakes. Each project uses basic supplies you likely already own.
Let’s get started with projects your children will love making today.
Easy Construction Paper Crafts for Kids of All Ages
Construction paper is one of the most versatile craft supplies you can find. It comes in bright colors and costs very little. Most projects need just paper, scissors, and glue.
These crafts help children develop important skills. Cutting with scissors strengthens hand muscles. Folding paper improves coordination. The following steps teach patience and focus.
Here are fun construction paper crafts for kids that anyone can make at home or school.
1. Rainbow Paper Chain Garland
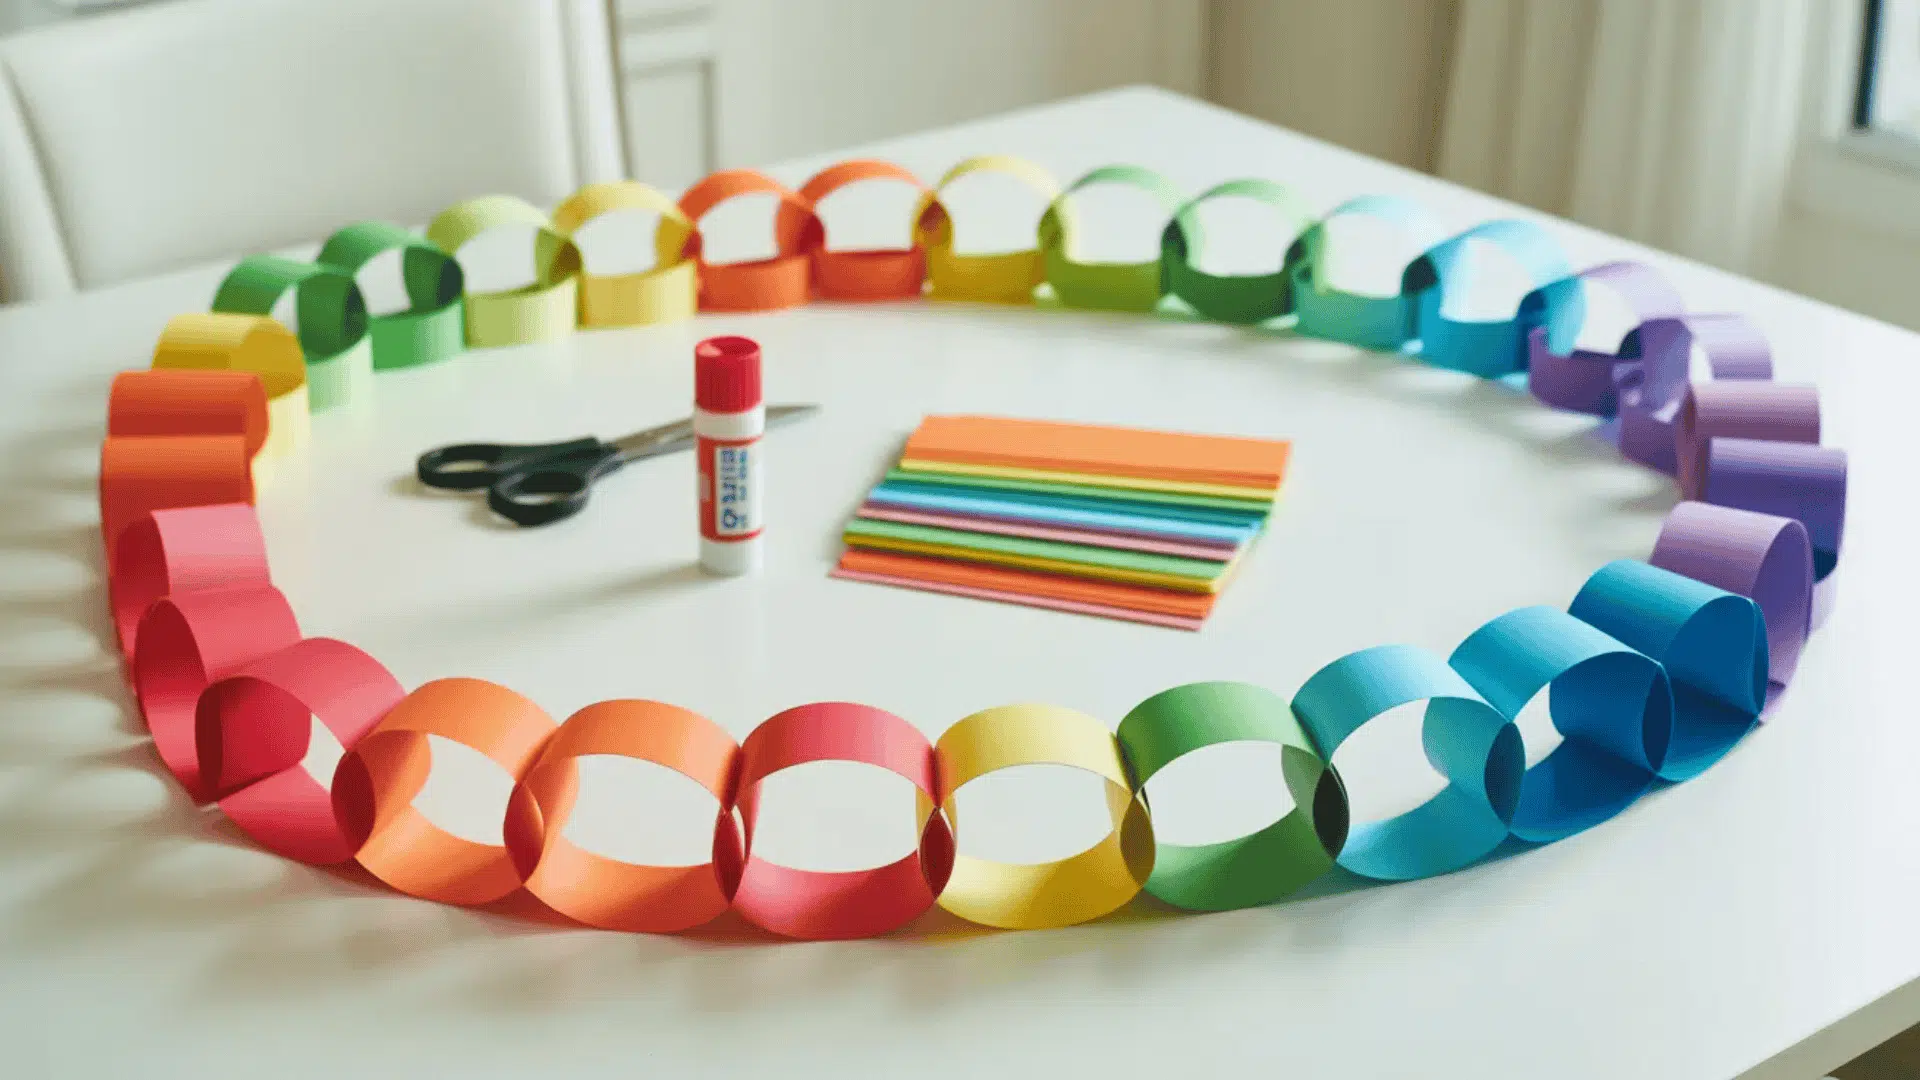
Difficulty: Easy | Time: 15-20 minutes | Best for ages: 4 and up
Paper chains are a classic craft that never gets old. Kids love linking colorful loops together to make long garlands. This project teaches pattern-making and counting.
What You’ll Need:
- Construction paper (rainbow colors)
- Scissors
- Glue stick or tape
- Ruler (optional)
Steps:
- Cut construction paper into strips about 1 inch wide and 6 inches long.
- Pick your first color and form it into a loop.
- Glue or tape the ends together.
- Thread a second strip through the first loop.
- Close it into a loop and secure the ends.
- Keep adding strips through the previous loop.
- Create patterns by repeating colors.
Pro Tip: Use a paper cutter for faster, straighter strips, and pre-cut them for younger children who need help.
What Kids Learn: Fine motor skills, pattern recognition, color sequencing, and basic measuring.
2. Handprint Butterfly Craft
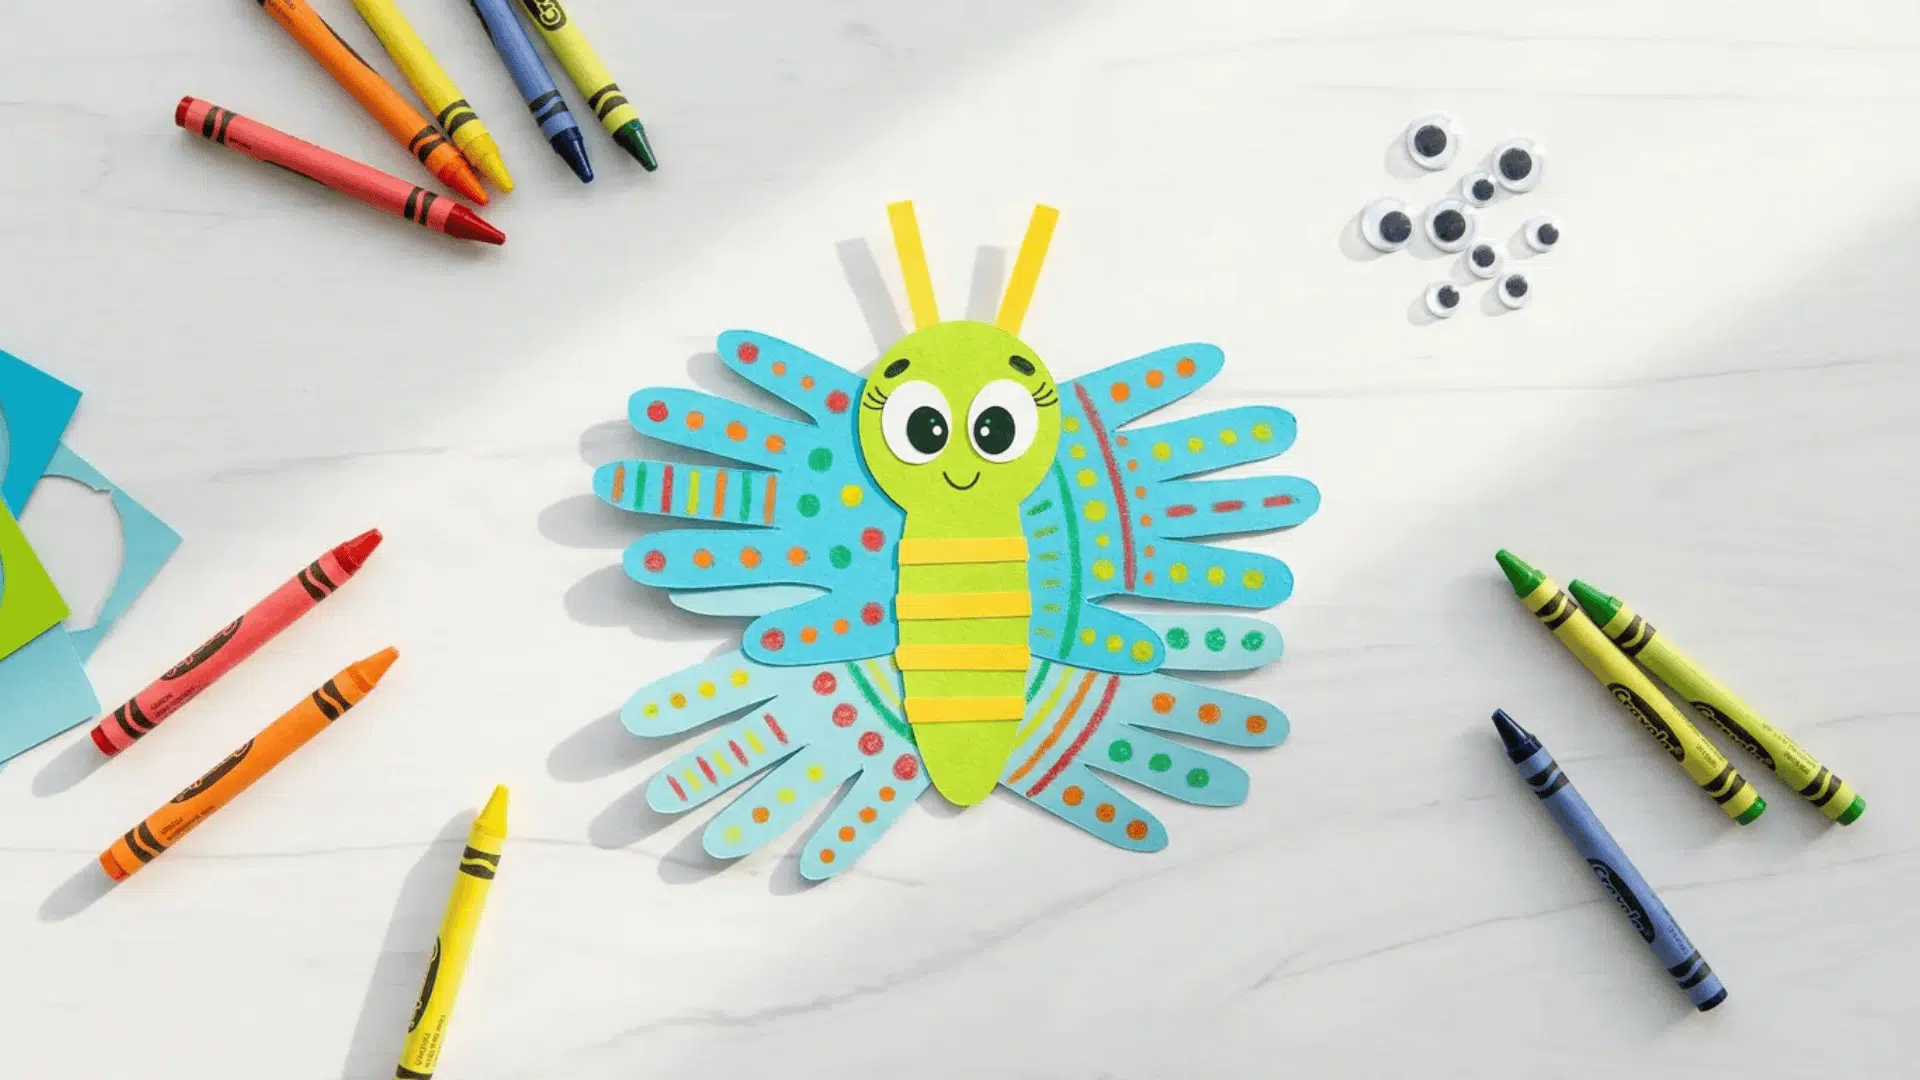
Difficulty: Easy | Time: 10-15 minutes | Best for ages: 3 and up
Handprint crafts make sweet keepsakes that parents treasure forever. This butterfly uses your child’s handprints as colorful wings. It’s perfect for spring or summer projects.
What You’ll Need:
- Construction paper (various colors)
- Pencil
- Scissors
- Glue stick
- Markers or crayons
- Googly eyes (optional)
Steps:
- Trace your child’s hand four times on different colored paper.
- Cut out all four handprints carefully.
- Cut a long oval shape from black or brown paper for the body.
- Glue two handprints on each side of the body with fingers pointing out.
- Add googly eyes or draw eyes on the top of the body.
- Draw antennae with a marker or cut thin strips for them.
- Decorate the wings with dots, stripes, or patterns.
Pro Tip: Use bright, contrasting colors for the wings to make the butterfly pop, and let kids choose their favorite color combinations.
What Kids Learn: Shape recognition, symmetry, creative expression, and tracing skills.
3. 3D Paper Flowers
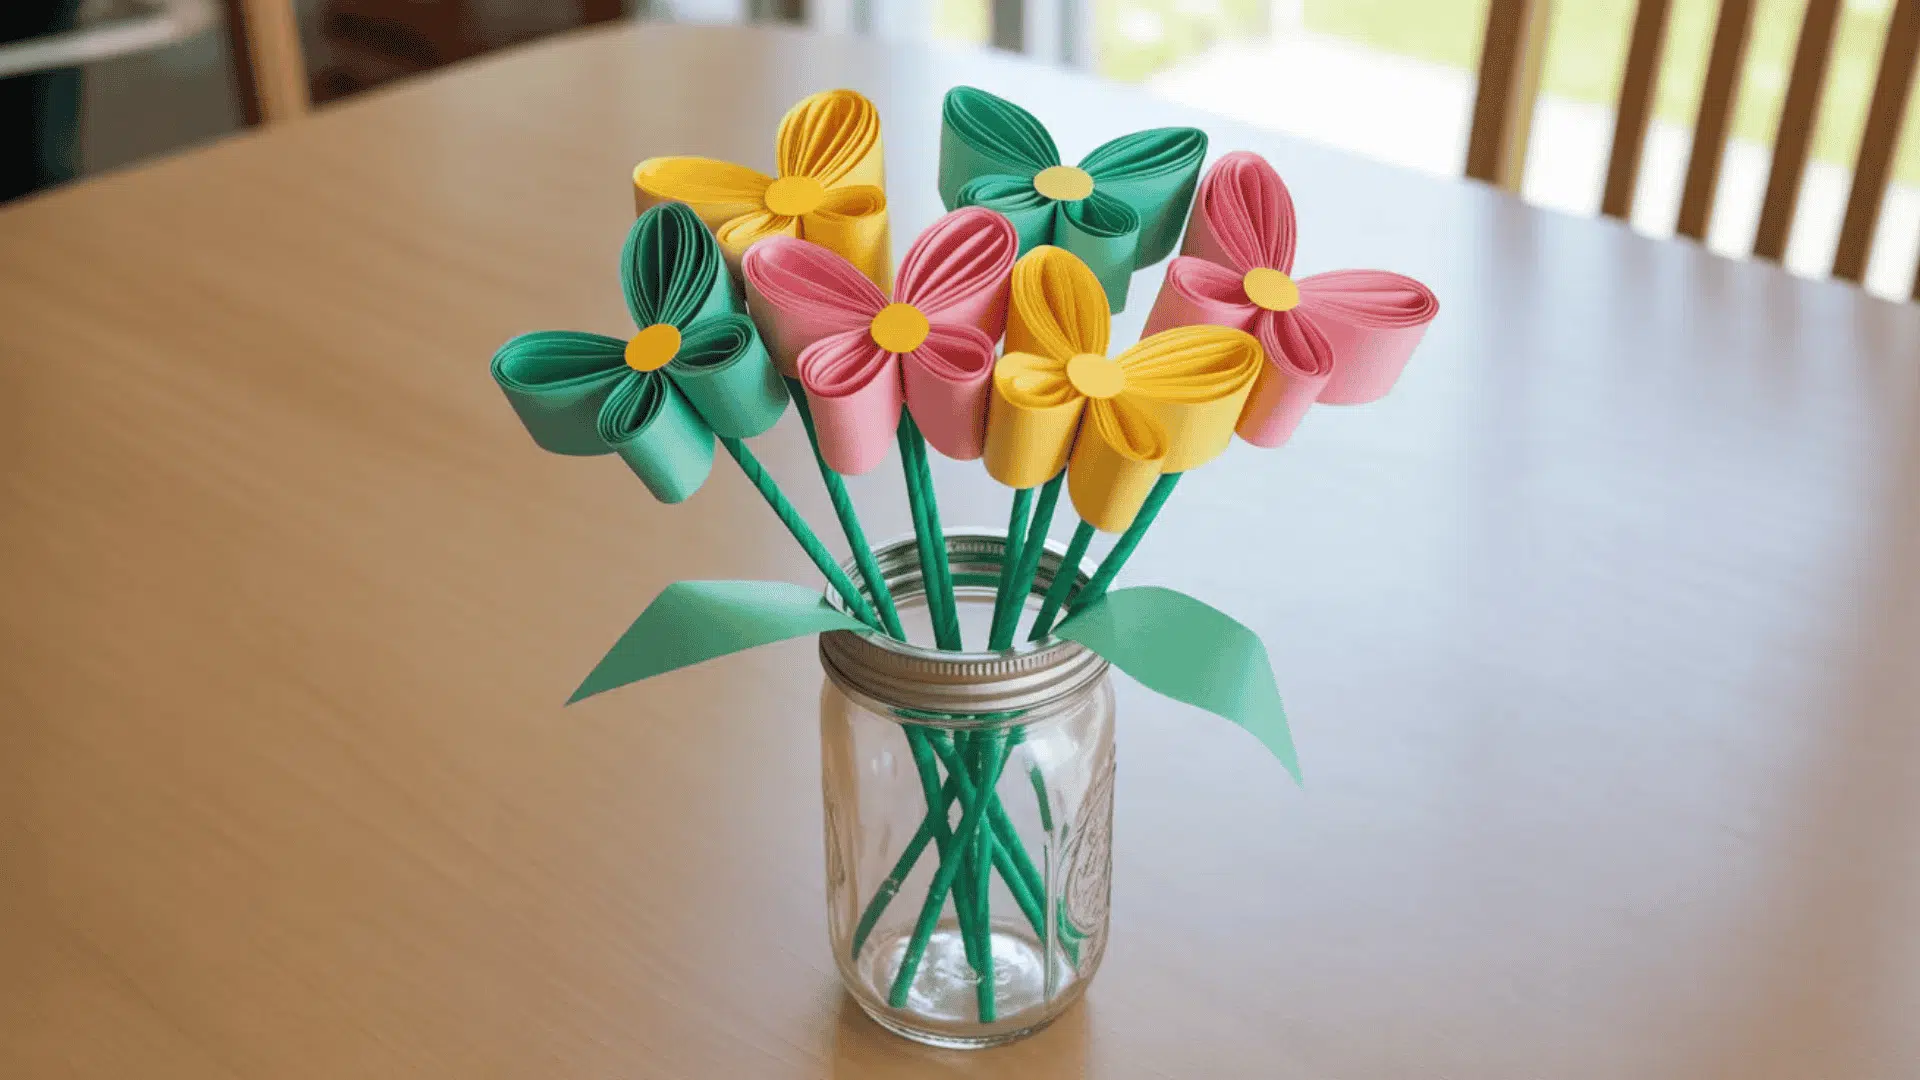
Difficulty: Medium | Time: 20-25 minutes | Best for ages: 6 and up
These flowers look fancy but are surprisingly simple to make. Stack colorful petals to create beautiful bouquets. They make great gifts for Mother’s Day or teacher appreciation.
What You’ll Need:
- Construction paper (multiple colors)
- Scissors
- Glue stick
- Popsicle sticks or straws
- Green construction paper for leaves
Steps:
- Cut out five heart shapes from the same color paper.
- Fold each heart in half lengthwise.
- Glue the folded hearts together along the fold lines.
- Fan them out to create a circular flower shape.
- Cut a small circle from yellow paper for the center.
- Glue the circle in the middle of the flower.
- Attach a popsicle stick or straw to the back as a stem.
- Cut leaf shapes from green paper and glue to the stem.
Pro Tip: Make flowers in different sizes by cutting smaller or larger hearts, and create a whole bouquet with various colors.
What Kids Learn: Spatial awareness, precision cutting, following multi-step directions, and understanding 3D shapes.
4. Paper Plate Turtle
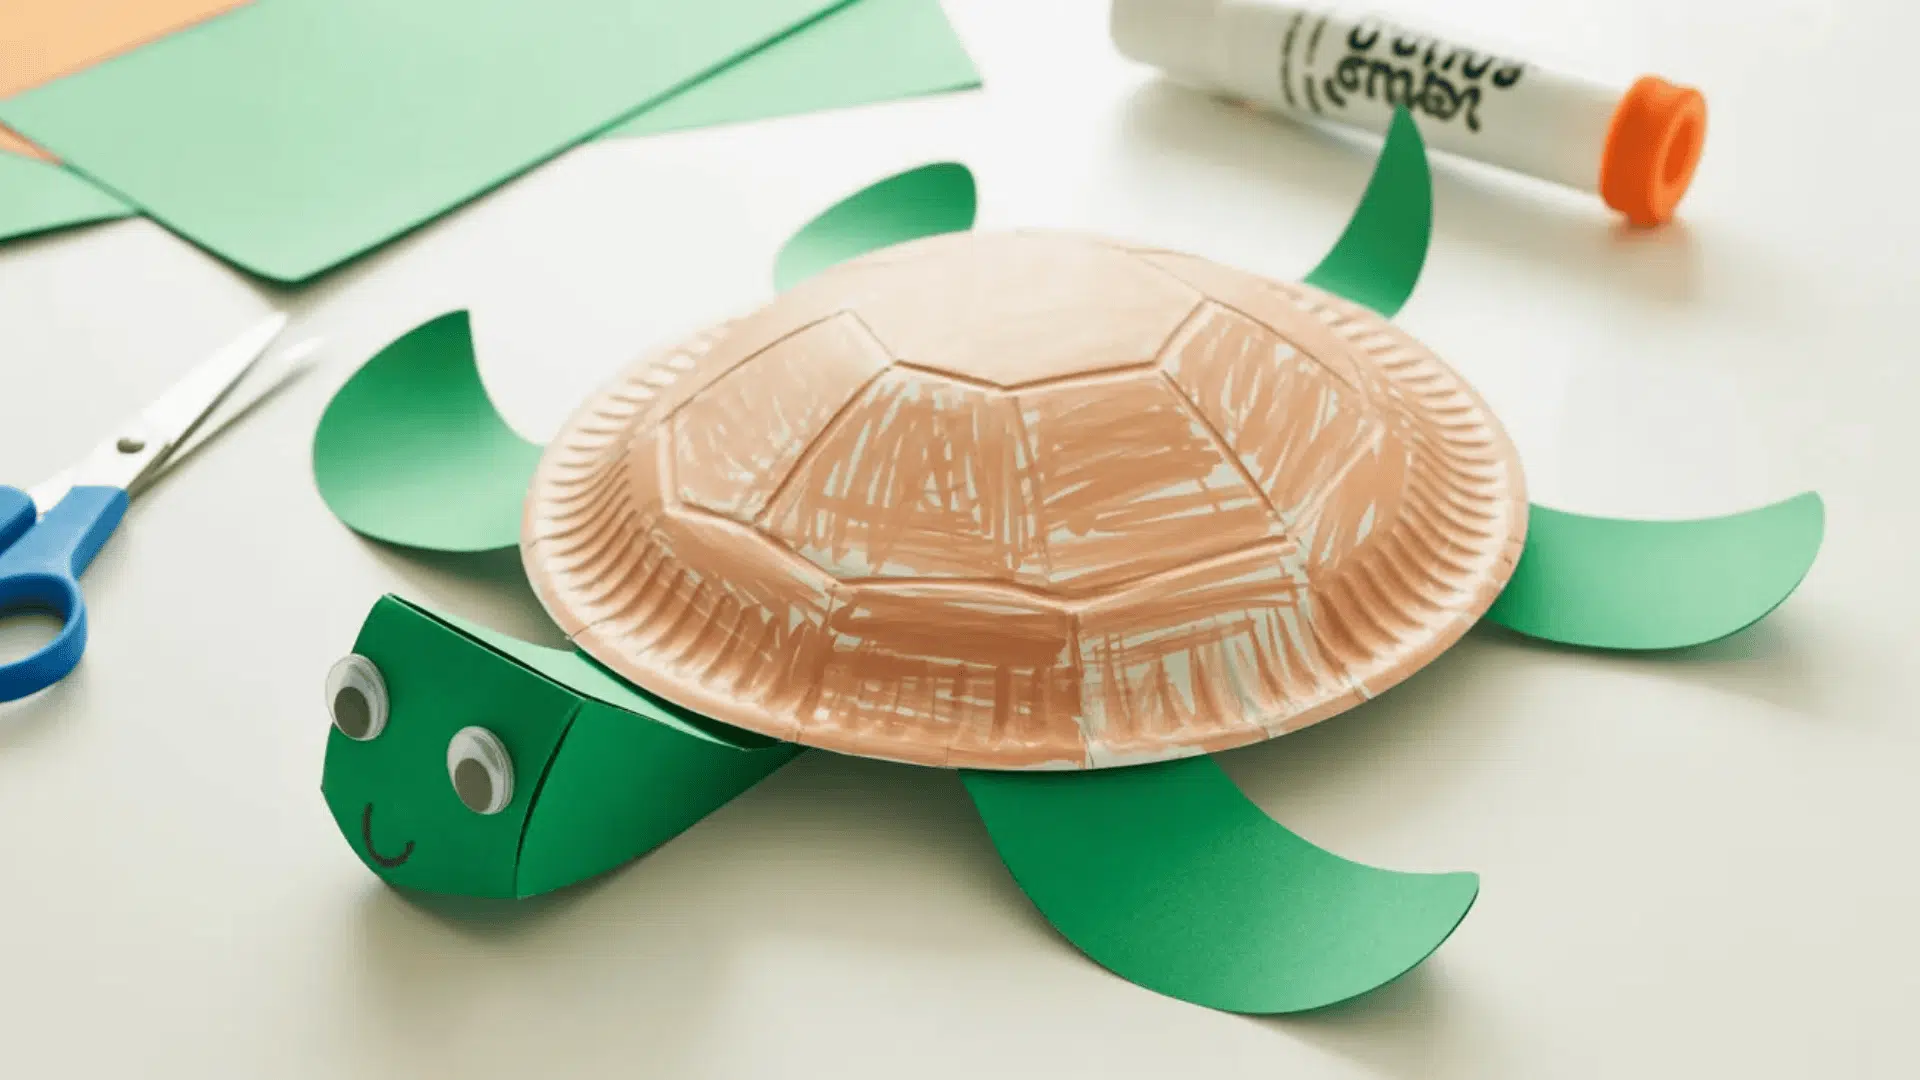
Difficulty: Easy | Time: 15-20 minutes | Best for ages: 4 and up
Turn a simple paper plate into an adorable turtle. This craft combines paper plates with construction paper for a fun ocean or pond theme. Kids love making the shell patterns.
What You’ll Need:
- Paper plate (one per turtle)
- Green construction paper
- Scissors
- Glue stick
- Markers or crayons
- Googly eyes (optional)
Steps:
- Color or paint the paper plate green or brown.
- Cut a turtle head, four legs, and a tail from green construction paper.
- Flip the paper plate upside down so the bottom faces up.
- Glue the head to one edge of the plate.
- Attach two legs on each side of the plate.
- Glue the tail to the back edge.
- Draw shell patterns on the plate with markers.
- Add googly eyes or draw eyes on the head.
Pro Tip: Use different shades of green to create depth, and let kids create unique shell patterns with shapes or colors.
What Kids Learn: Animal anatomy, pattern creation, cutting circles and ovals, and color mixing.
5. Accordion Fold Snake
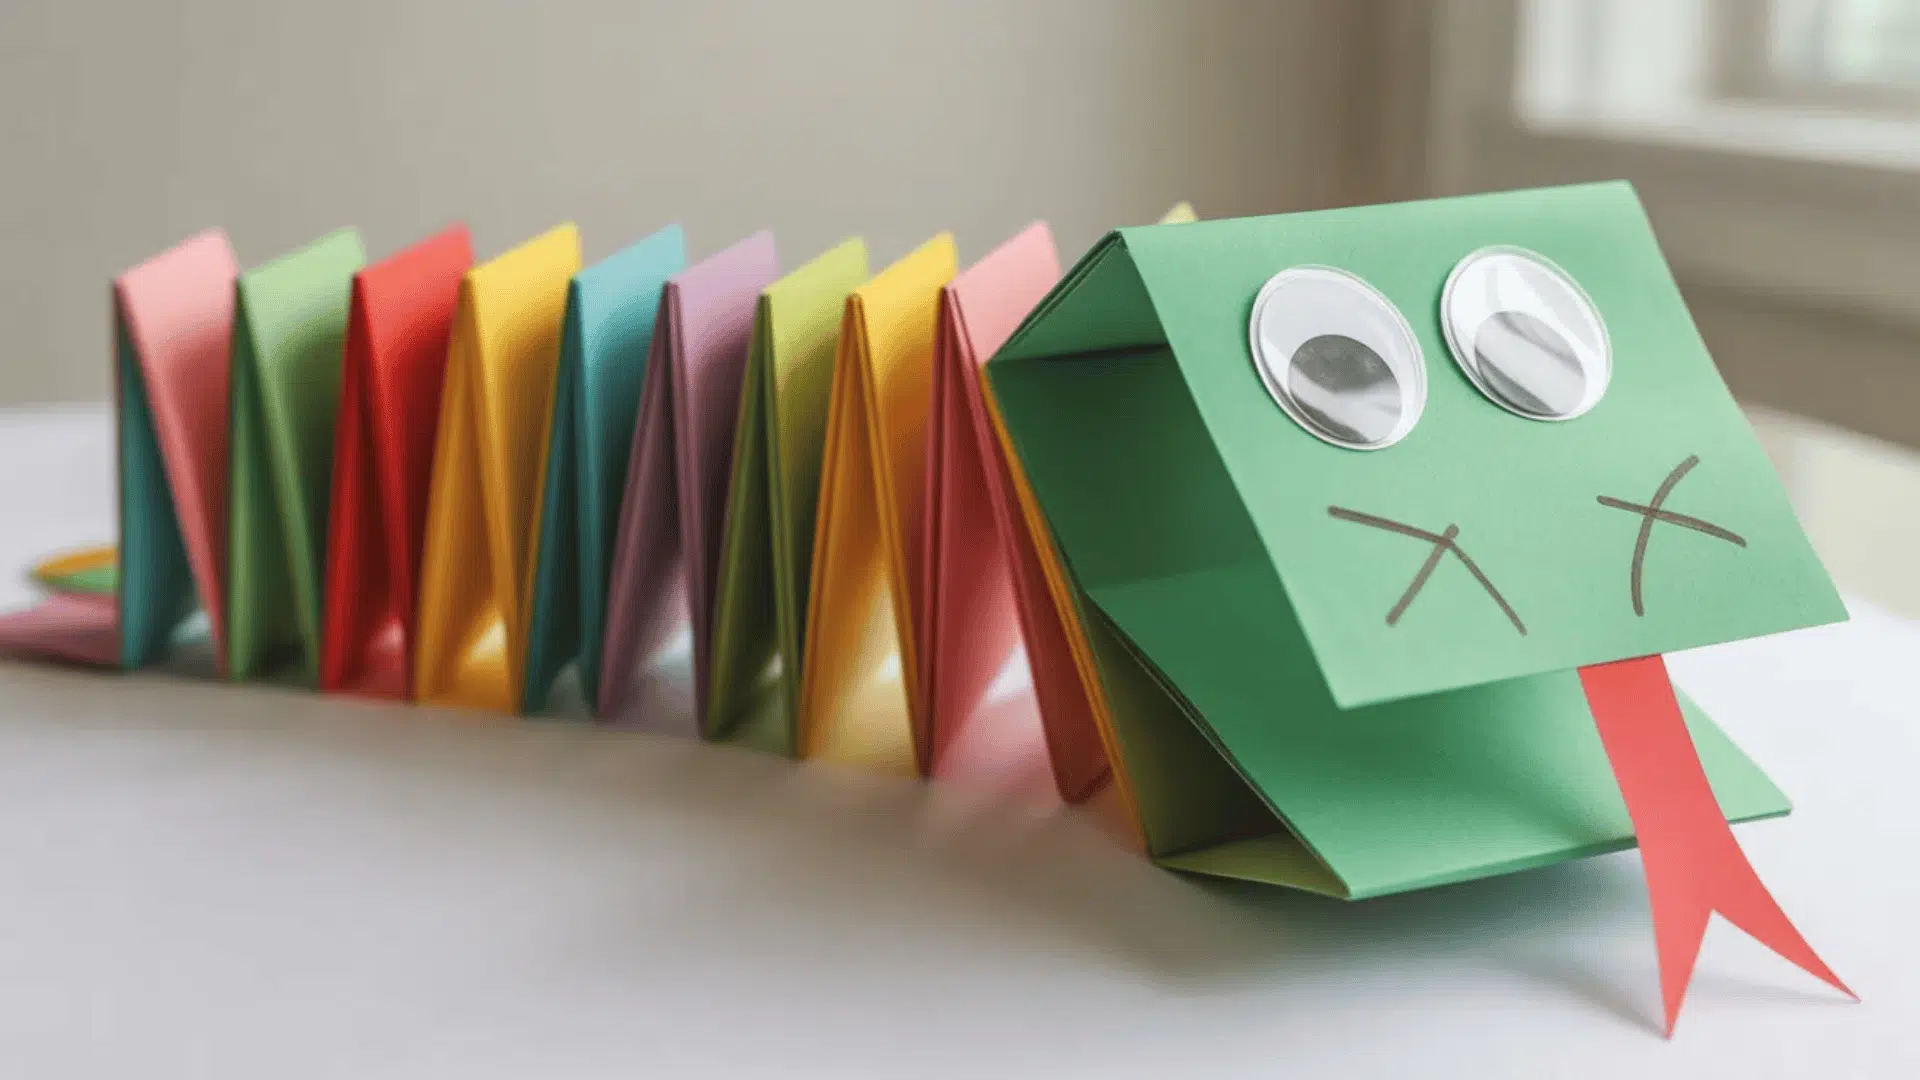
Difficulty: Easy | Time: 10-15 minutes | Best for ages: 5 and up
This wiggly snake is fun to play with after making it. The accordion fold creates a springy body that moves. Choose bright colors or make realistic patterns.
What You’ll Need:
- Construction paper (two sheets in different colors)
- Scissors
- Glue stick
- Markers
- Googly eyes
- Red paper or ribbon for the tongue
Steps:
- Cut two long strips from different colored paper, about 1 inch wide.
- Glue the ends of both strips together at a right angle.
- Fold one strip over the other, alternating back and forth.
- Keep folding until you reach the end of both strips.
- Glue the final ends together to secure.
- Cut a triangle head from construction paper.
- Glue the head to one end of the accordion body.
- Add googly eyes and a forked tongue.
- Draw scales or patterns on the body with markers.
Pro Tip: Gently pull the accordion to make it longer or push it together to make it scrunch up like a real snake moving.
What Kids Learn: Folding techniques, alternating patterns, cause and effect, and reptile characteristics.
6. Paper Strip Rainbow
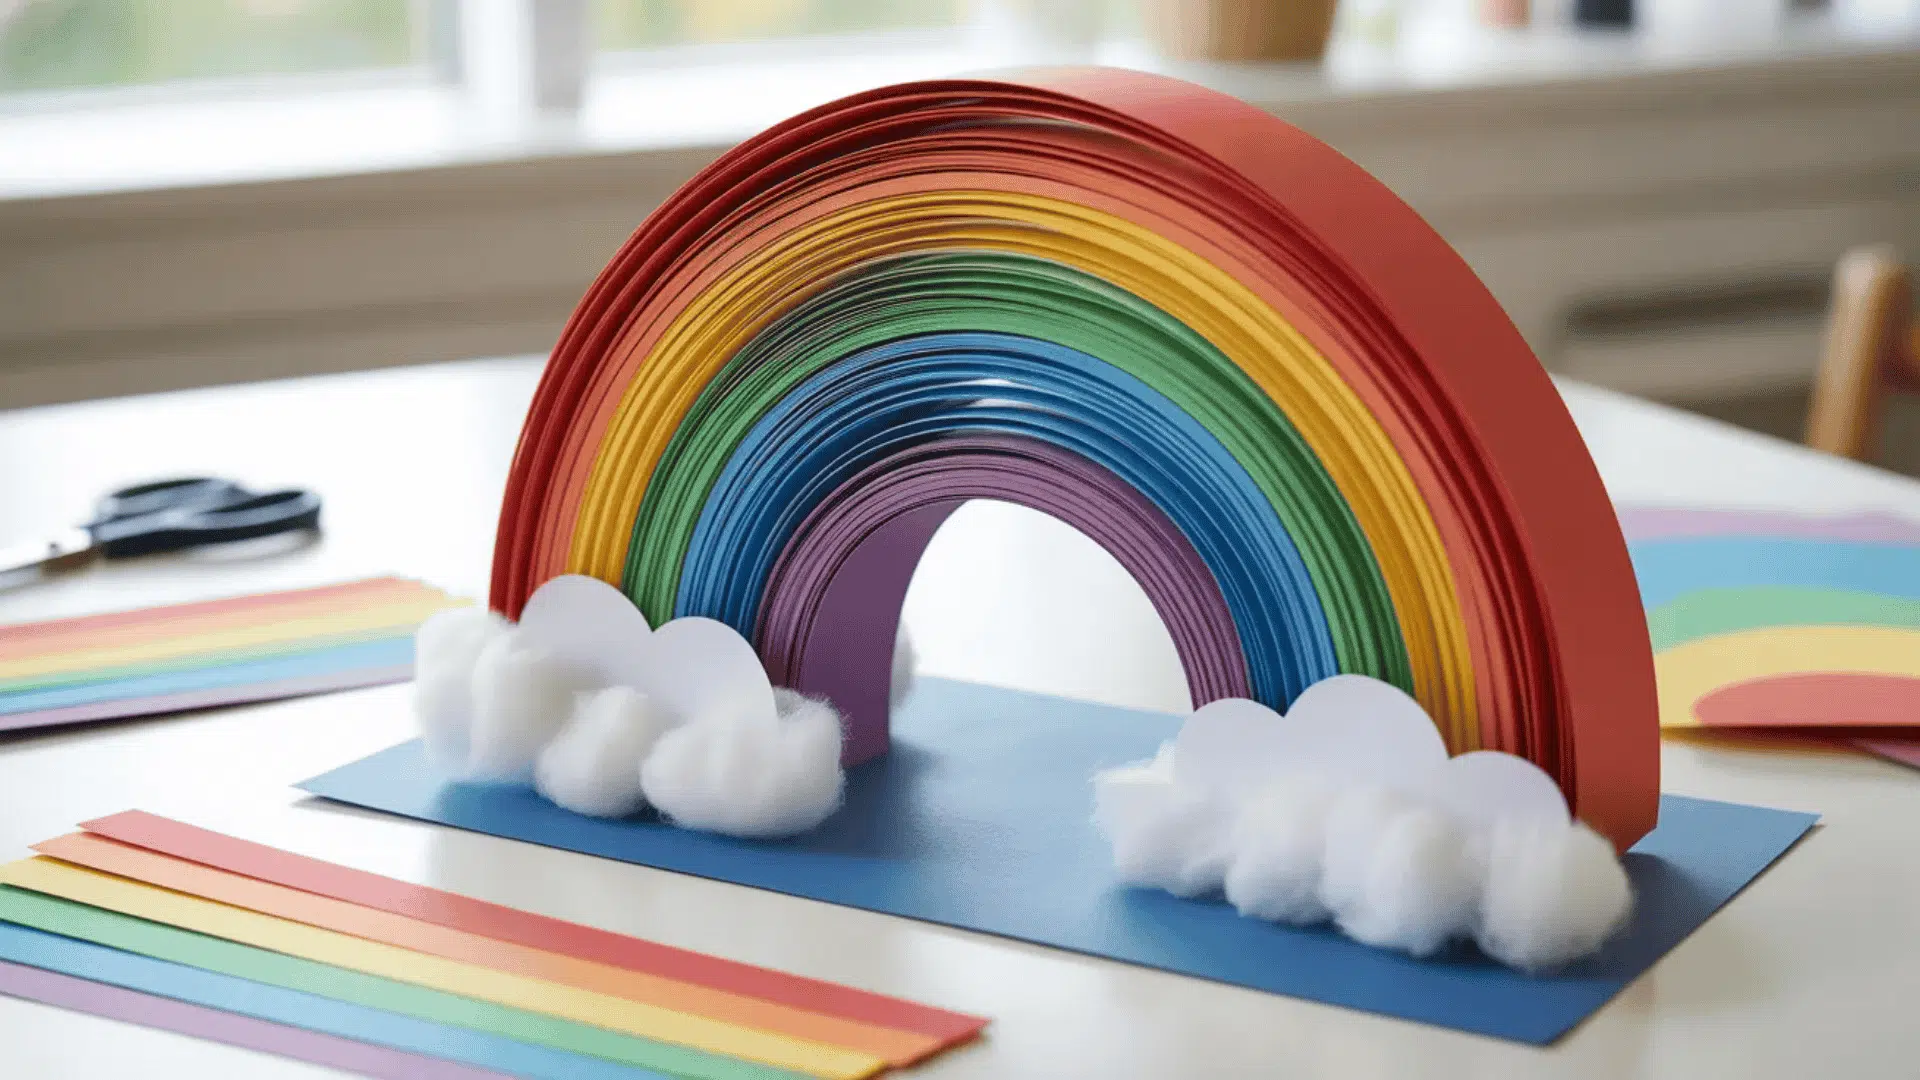
Difficulty: Easy | Time: 15-20 minutes | Best for ages: 4 and up
Create a standing rainbow that sits on any flat surface. This craft teaches color order and makes a cheerful decoration. Add cotton ball clouds for extra cuteness.
What You’ll Need:
- Construction paper (red, orange, yellow, green, blue, purple)
- White paper for clouds
- Scissors
- Ruler
- Stapler or glue
- Cotton balls (optional)
Steps:
- Cut one strip from each rainbow color, all the same width.
- Make each strip one inch shorter than the previous color.
- Stack strips with red (longest) on the bottom and purple (shortest) on the top.
- Line up one end of all strips evenly.
- Staple or glue all strips together at that end.
- Bend each strip into an arch shape.
- Line up the other ends and staple or glue them together.
- Cut two cloud shapes from white paper.
- Glue or staple clouds to each end of the rainbow.
- Add cotton balls to the clouds if desired.
Pro Tip: Use the rainbow to teach color order (ROY G BIV), and make multiple rainbows in different sizes for a colorful display.
What Kids Learn: Color sequence, size comparison, measuring skills, and arc shapes.
7. Simple Paper Heart Bookmarks
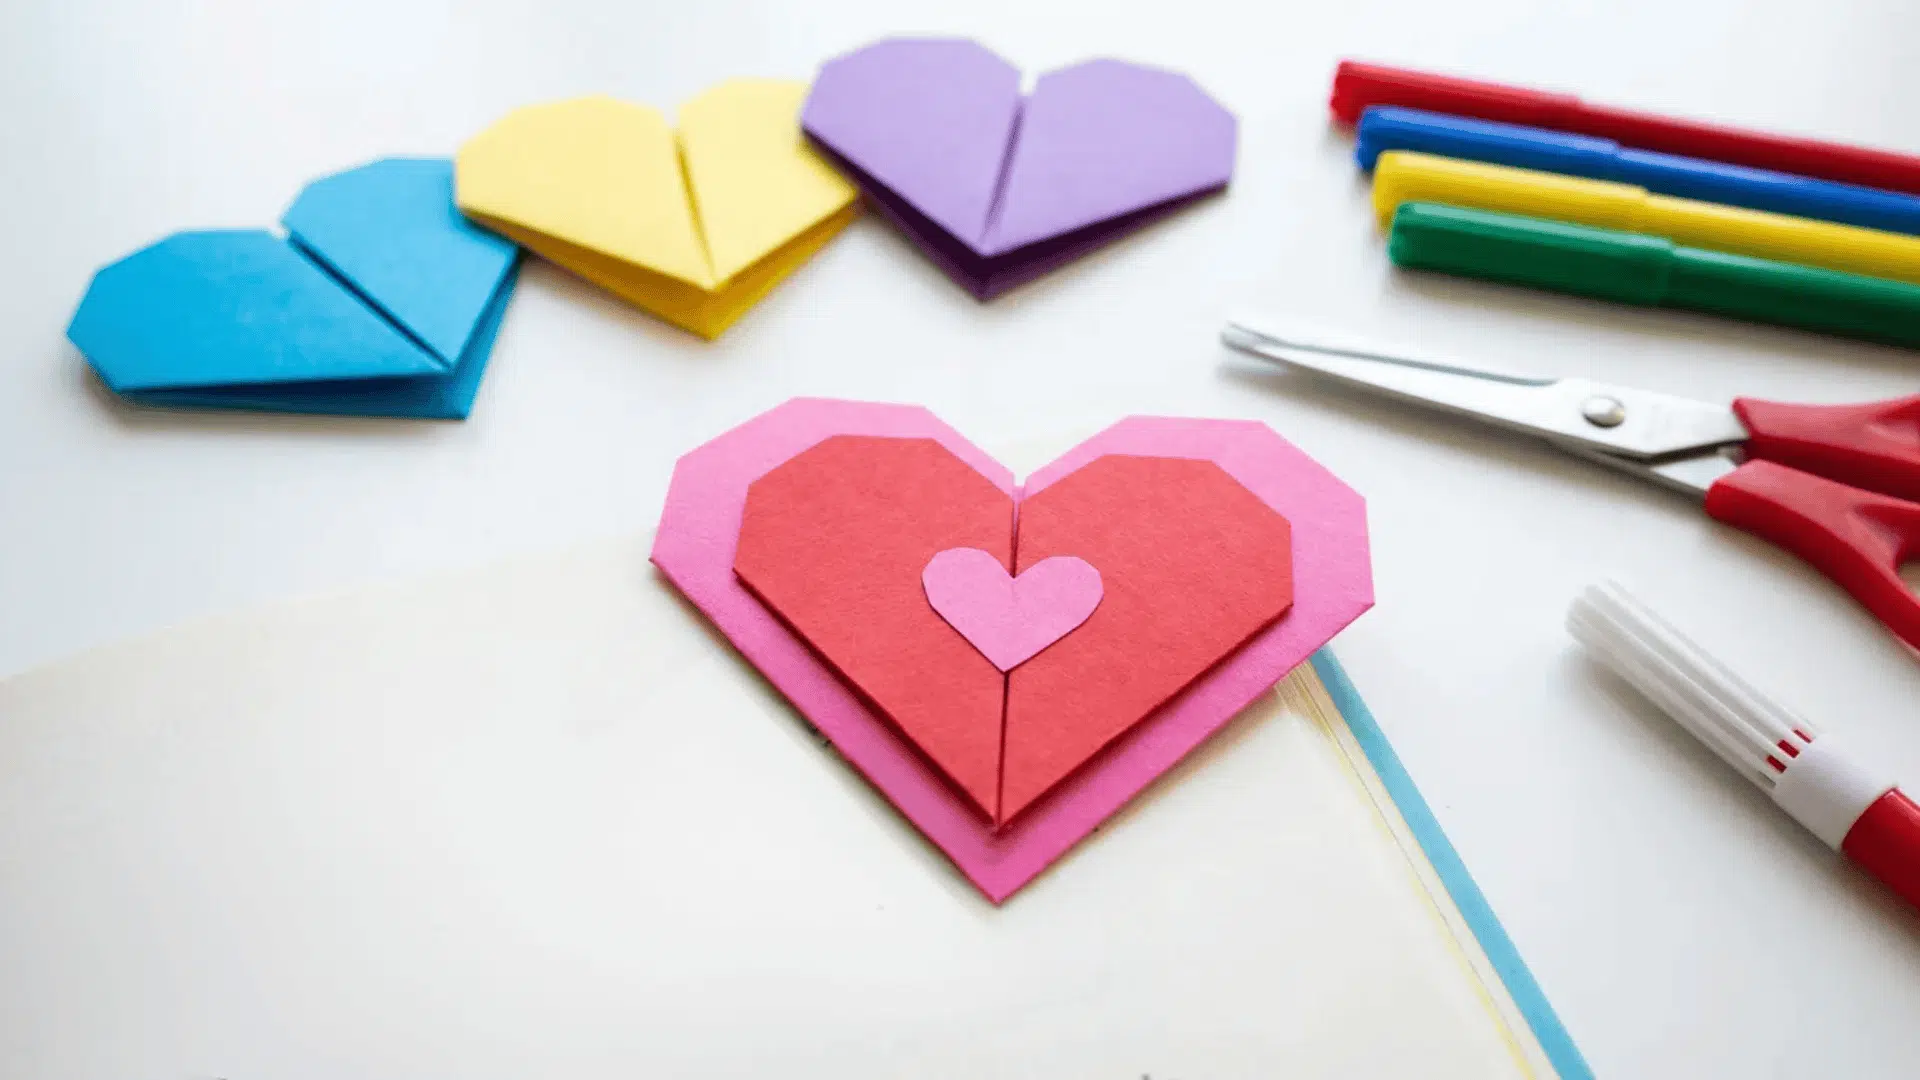
Difficulty: Easy | Time: 10-15 minutes | Best for ages: 5 and up
Heart bookmarks make perfect gifts for Valentine’s Day or any time. They slip onto page corners and stay in place. Kids can make several in different colors for all their books.
What You’ll Need:
- Construction paper (various colors)
- Scissors
- Glue stick
- Markers or stickers for decoration
- Ruler
Steps:
- Cut a square from construction paper (4 inches works well).
- Fold the square in half diagonally to make a triangle.
- Fold it in half again to make a smaller triangle.
- Unfold back to the larger triangle.
- Fold the two bottom corners up to meet the top point.
- Unfold those corners back down.
- Fold the top layer down to create a pocket.
- Tuck the two bottom corners into the pocket.
- Cut a heart shape from another color and glue it to the front.
- Decorate with markers, stickers, or patterns.
Pro Tip: Make bookmarks in different sizes for different book types, and use glitter glue or sequins for special occasion gifts.
What Kids Learn: Origami basics, geometric folding, gift-giving skills, and precision work.
8. Construction Paper Caterpillar
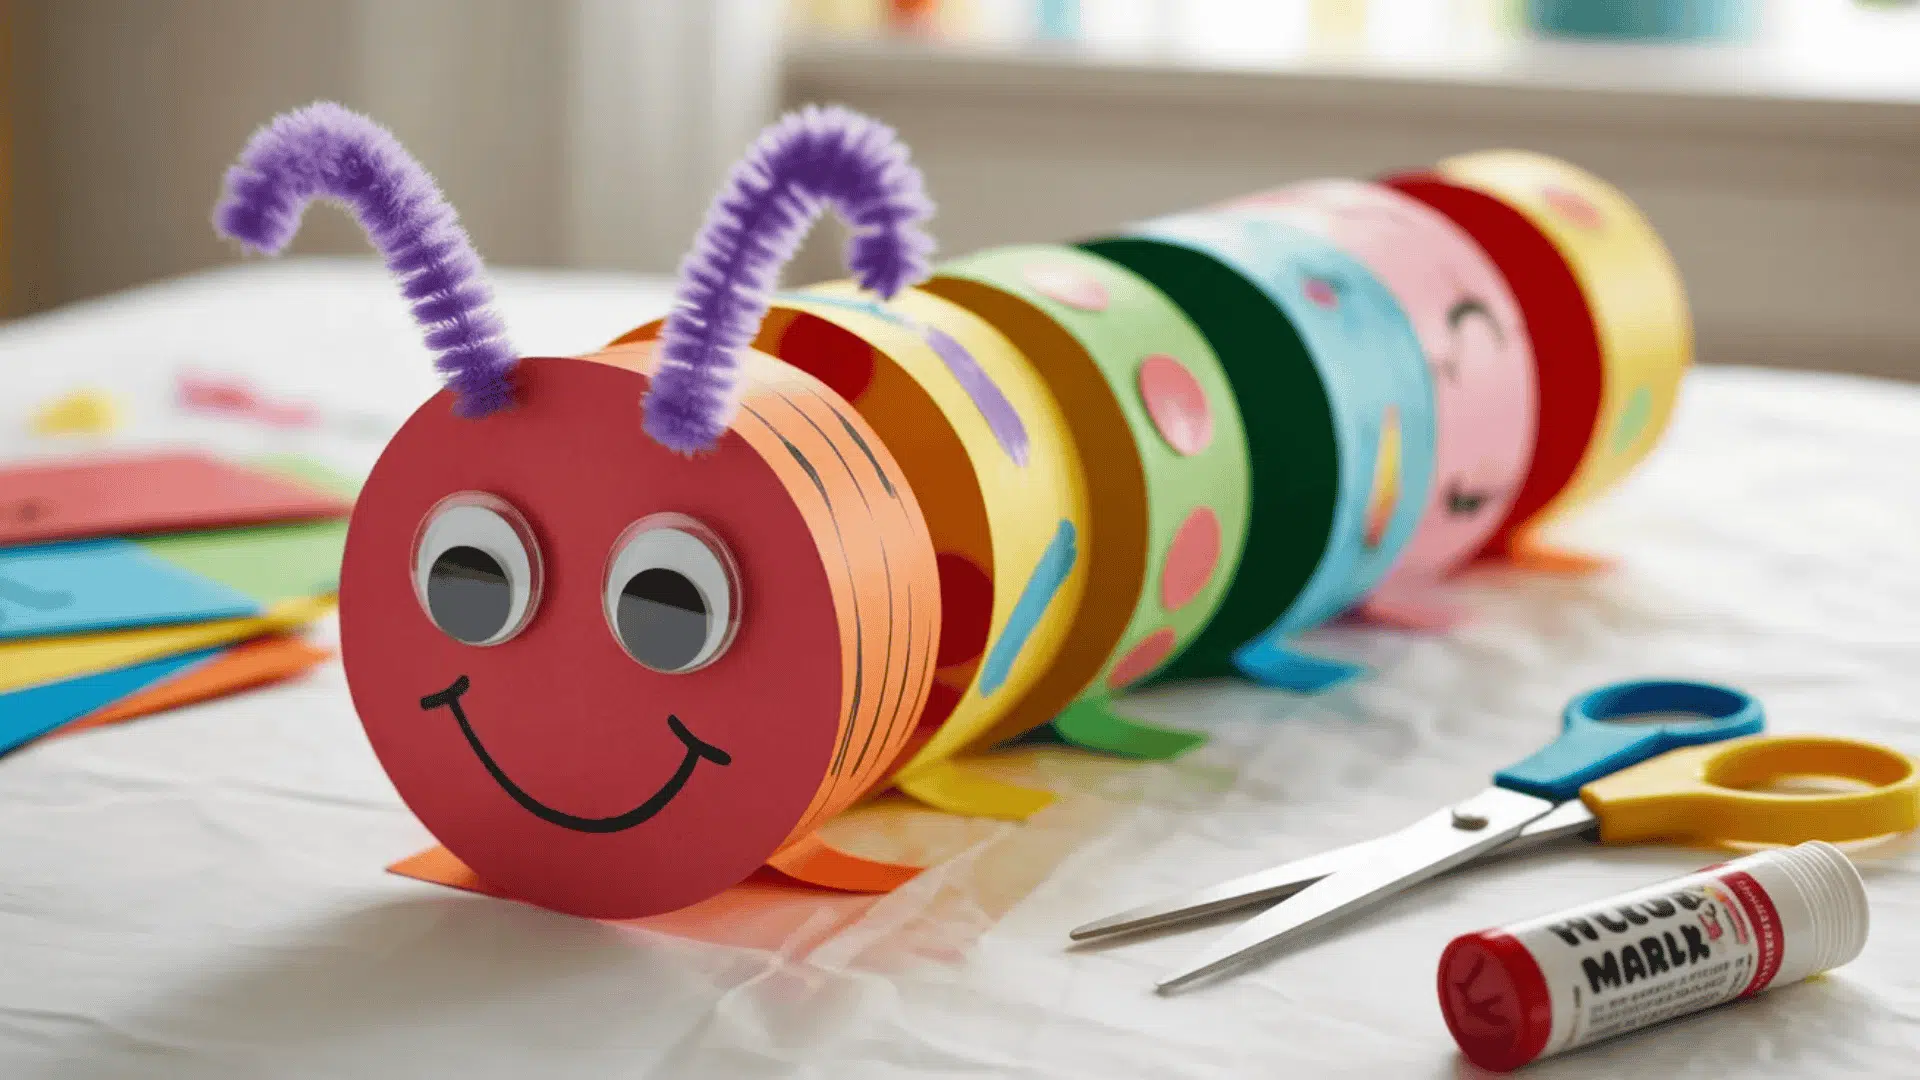
Difficulty: Easy | Time: 15-20 minutes | Best for ages: 3 and up
This cheerful caterpillar uses paper circles in a row. Kids practice cutting circles and creating patterns. It’s great for learning about insects and life cycles.
What You’ll Need:
- Construction paper (multiple colors)
- Scissors
- Glue stick
- Googly eyes
- Markers
- Pipe cleaners for antennae
Steps:
- Cut six to eight circles from different colored paper.
- Arrange circles in a line, overlapping slightly.
- Glue the circles together where they overlap.
- Make the first circle the head by adding a face.
- Glue googly eyes on the head circle.
- Draw a smile with markers.
- Poke two small holes for antennae or glue pipe cleaners on top.
- Add legs by drawing them or cutting small strips.
- Decorate each body circle with dots or patterns.
Pro Tip: Use a cup or jar lid as a template for perfect circles, and let younger kids use pre-cut circles to focus on arranging.
What Kids Learn: Circle shapes, pattern sequences, insect anatomy, and counting skills.
9. Paper Ice Cream Cone Craft
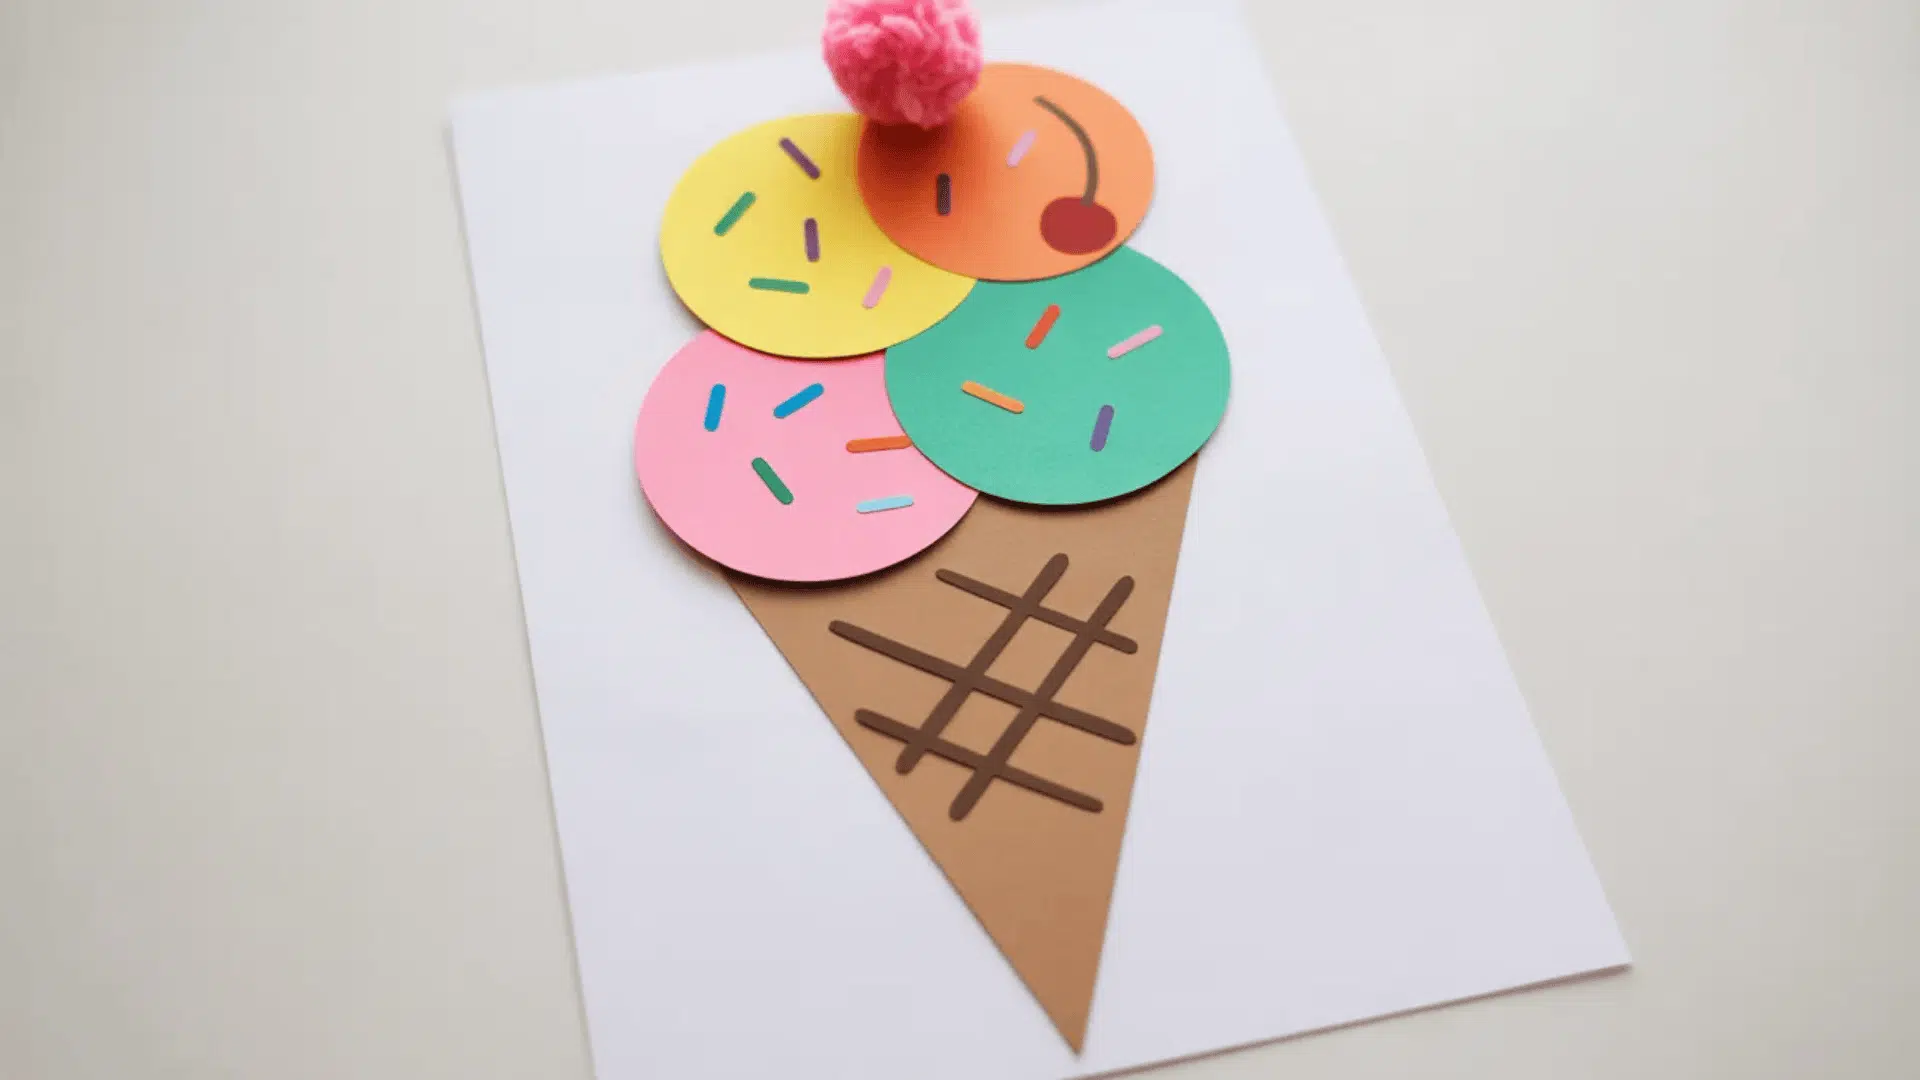
Difficulty: Easy | Time: 10-15 minutes | Best for ages: 4 and up
Who doesn’t love ice cream? This sweet craft lets kids create their favorite flavors without the mess. Stack multiple scoops for extra fun.
What You’ll Need:
- Brown or tan construction paper
- Colored paper for ice cream scoops
- Scissors
- Glue stick
- Markers or crayons
- Pom poms for toppings (optional)
Steps:
- Cut a large triangle from brown paper for the cone.
- Draw crisscross lines on the triangle to look like a waffle cone.
- Cut circles from colored paper for ice cream scoops.
- Choose your favorite flavors (pink for strawberry, brown for chocolate).
- Glue the cone triangle onto a background paper.
- Glue one scoop on top of the cone.
- Add more scoops if you want a tall ice cream.
- Draw toppings like sprinkles, chocolate chips, or cherries.
- Glue small pom poms on top for texture.
Pro Tip: Make a whole ice cream shop display with different cone styles and flavor combinations, and label each flavor for reading practice.
What Kids Learn: Shape layering, color recognition, creative choices, and basic addition with scoops.
10. Easy Origami Fish
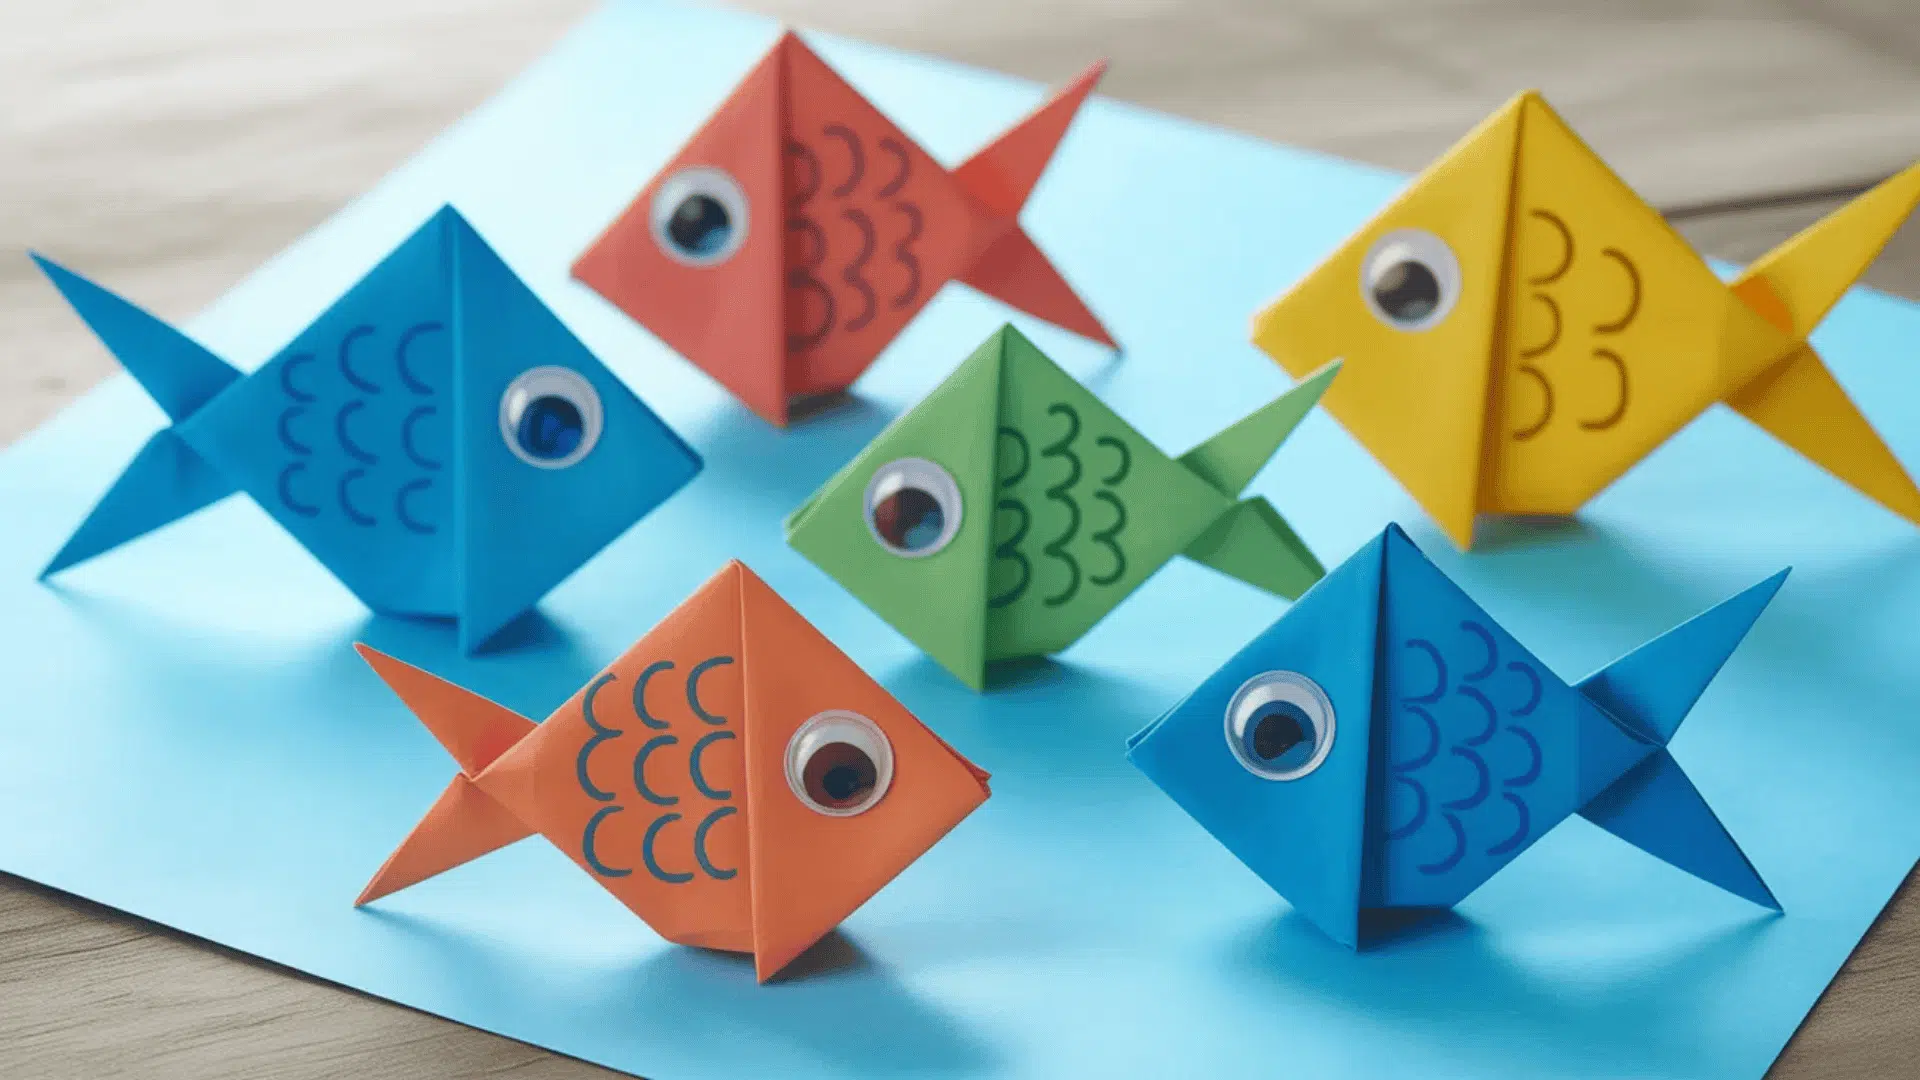
Difficulty: Medium | Time: 15-20 minutes | Best for ages: 6 and up
Origami teaches patience and precision. This simple fish is perfect for beginners. Make a whole school of fish in different colors and sizes.
What You’ll Need:
- Square construction paper
- Scissors
- Markers or crayons
- Googly eyes
- Glue (optional)
Steps:
- Start with a square piece of construction paper.
- Fold the square in half diagonally to make a triangle.
- Fold the triangle in half again and unfold to mark the center.
- Fold both bottom corners up to meet at the top point.
- The shape should now look like a diamond.
- Fold the top layer down about halfway.
- Flip the paper over.
- Cut a small triangle from the bottom point for the tail.
- Draw scales with markers or add patterns.
- Glue on googly eyes or draw them.
Pro Tip: Use different paper sizes to create parent and baby fish, and hang them with string to make a mobile.
What Kids Learn: Following diagrams, precise folding, symmetry, and Japanese art traditions.
11. Paper Bag Puppet Animals
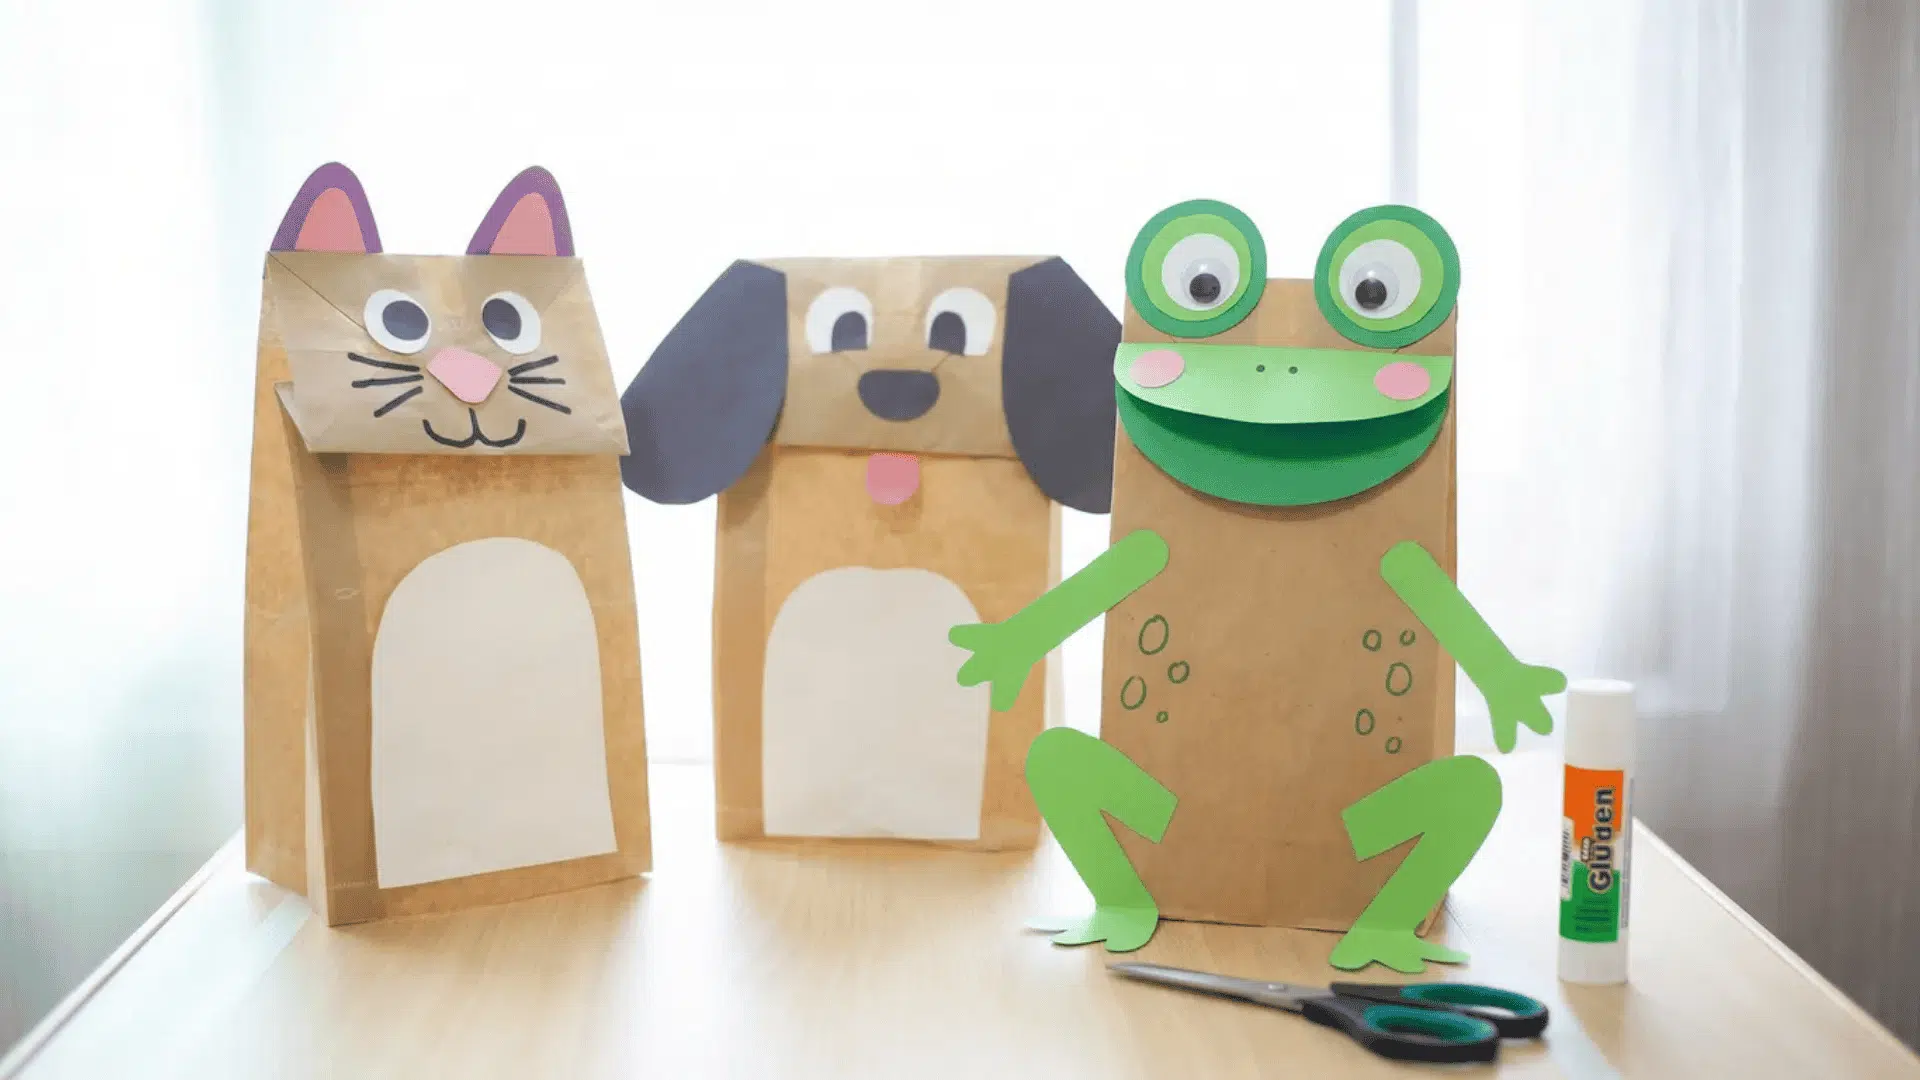
Difficulty: Easy | Time: 20-25 minutes | Best for ages: 4 and up
Paper bag puppets bring stories to life. Kids can create any animal they imagine. These puppets work great for putting on shows after crafting.
What You’ll Need:
- Small paper lunch bags
- Construction paper (various colors)
- Scissors
- Glue stick
- Markers
- Googly eyes
Steps:
- Keep the paper bag folded flat with the flap facing you.
- Choose an animal to create (dog, cat, frog, etc.).
- Cut a mouth shape from red or pink paper.
- Glue the mouth under the bag’s bottom flap.
- Cut ears from construction paper, matching your animal.
- Glue ears to the top of the bag.
- Add googly eyes above the flap.
- Cut a nose from black or pink paper and glue it on.
- Draw whiskers, spots, or other details with markers.
- Slip your hand inside to make the puppet talk.
Pro Tip: Create multiple animal puppets and use them to retell favorite stories or make up new ones together.
What Kids Learn: Storytelling skills, dramatic play, animal features, and puppet manipulation.
12. Tissue Paper Collage Art
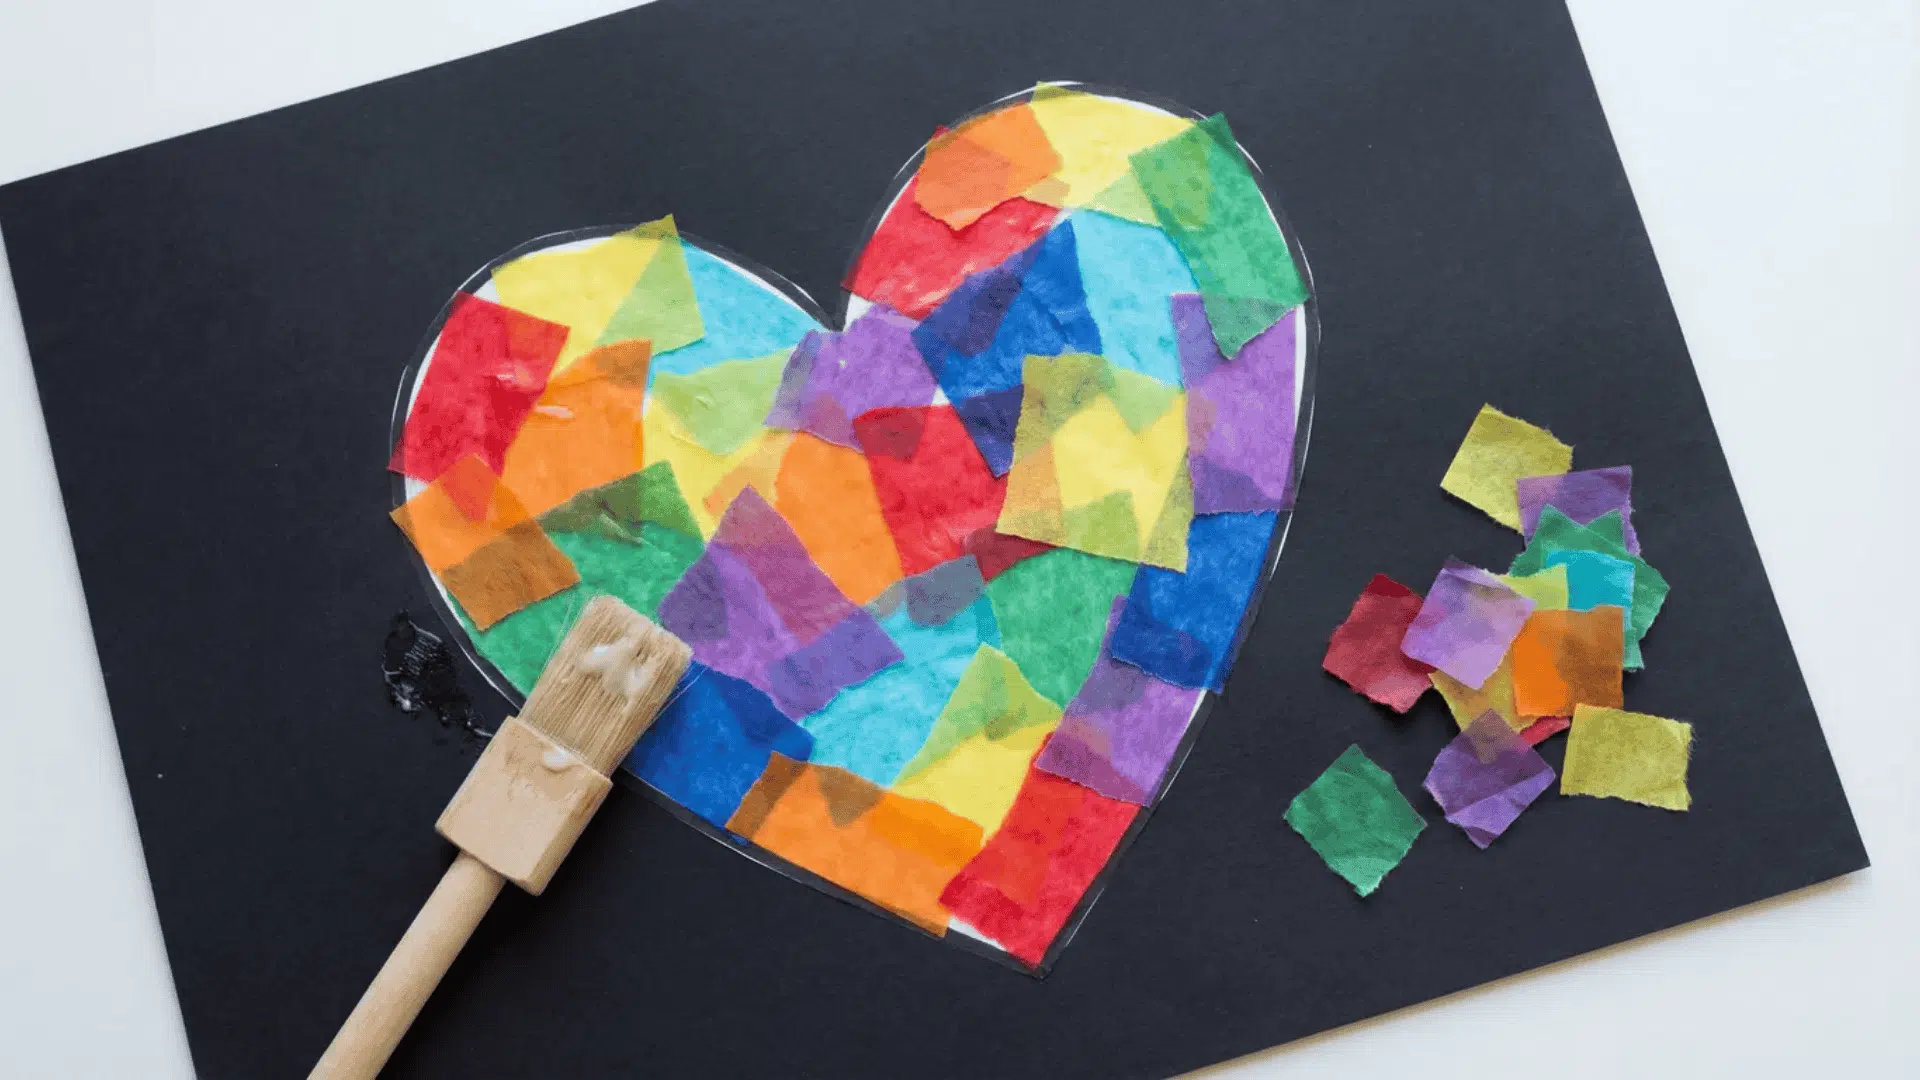
Difficulty: Easy | Time: 20-30 minutes | Best for ages: 3 and up
Tissue paper collage creates colorful masterpieces with a stained glass effect. Kids tear and layer pieces to make unique designs. This craft is perfect for open-ended creativity.
What You’ll Need:
- Tissue paper (multiple colors)
- Construction paper or cardstock
- Glue stick or liquid glue
- Water and a paintbrush
- Pencil for sketching (optional)
Steps:
- Draw a simple outline on construction paper (heart, flower, sun).
- Tear tissue paper into small pieces about 1-2 inches.
- Mix equal parts glue and water in a small cup.
- Brush the glue mixture onto a section of your outline.
- Place tissue paper pieces on the wet glue.
- Overlap pieces to create new colors where they meet.
- Brush more glue mixture over the tissue paper to seal.
- Continue filling in all sections of your design.
- Let dry completely before displaying.
Pro Tip: Layer different colors to teach color mixing (blue and yellow make green), and use contact paper instead of glue for mess-free crafting.
What Kids Learn: Color theory, fine motor control, texture exploration, and patience waiting for drying.
13. Paper Snowflake Garland
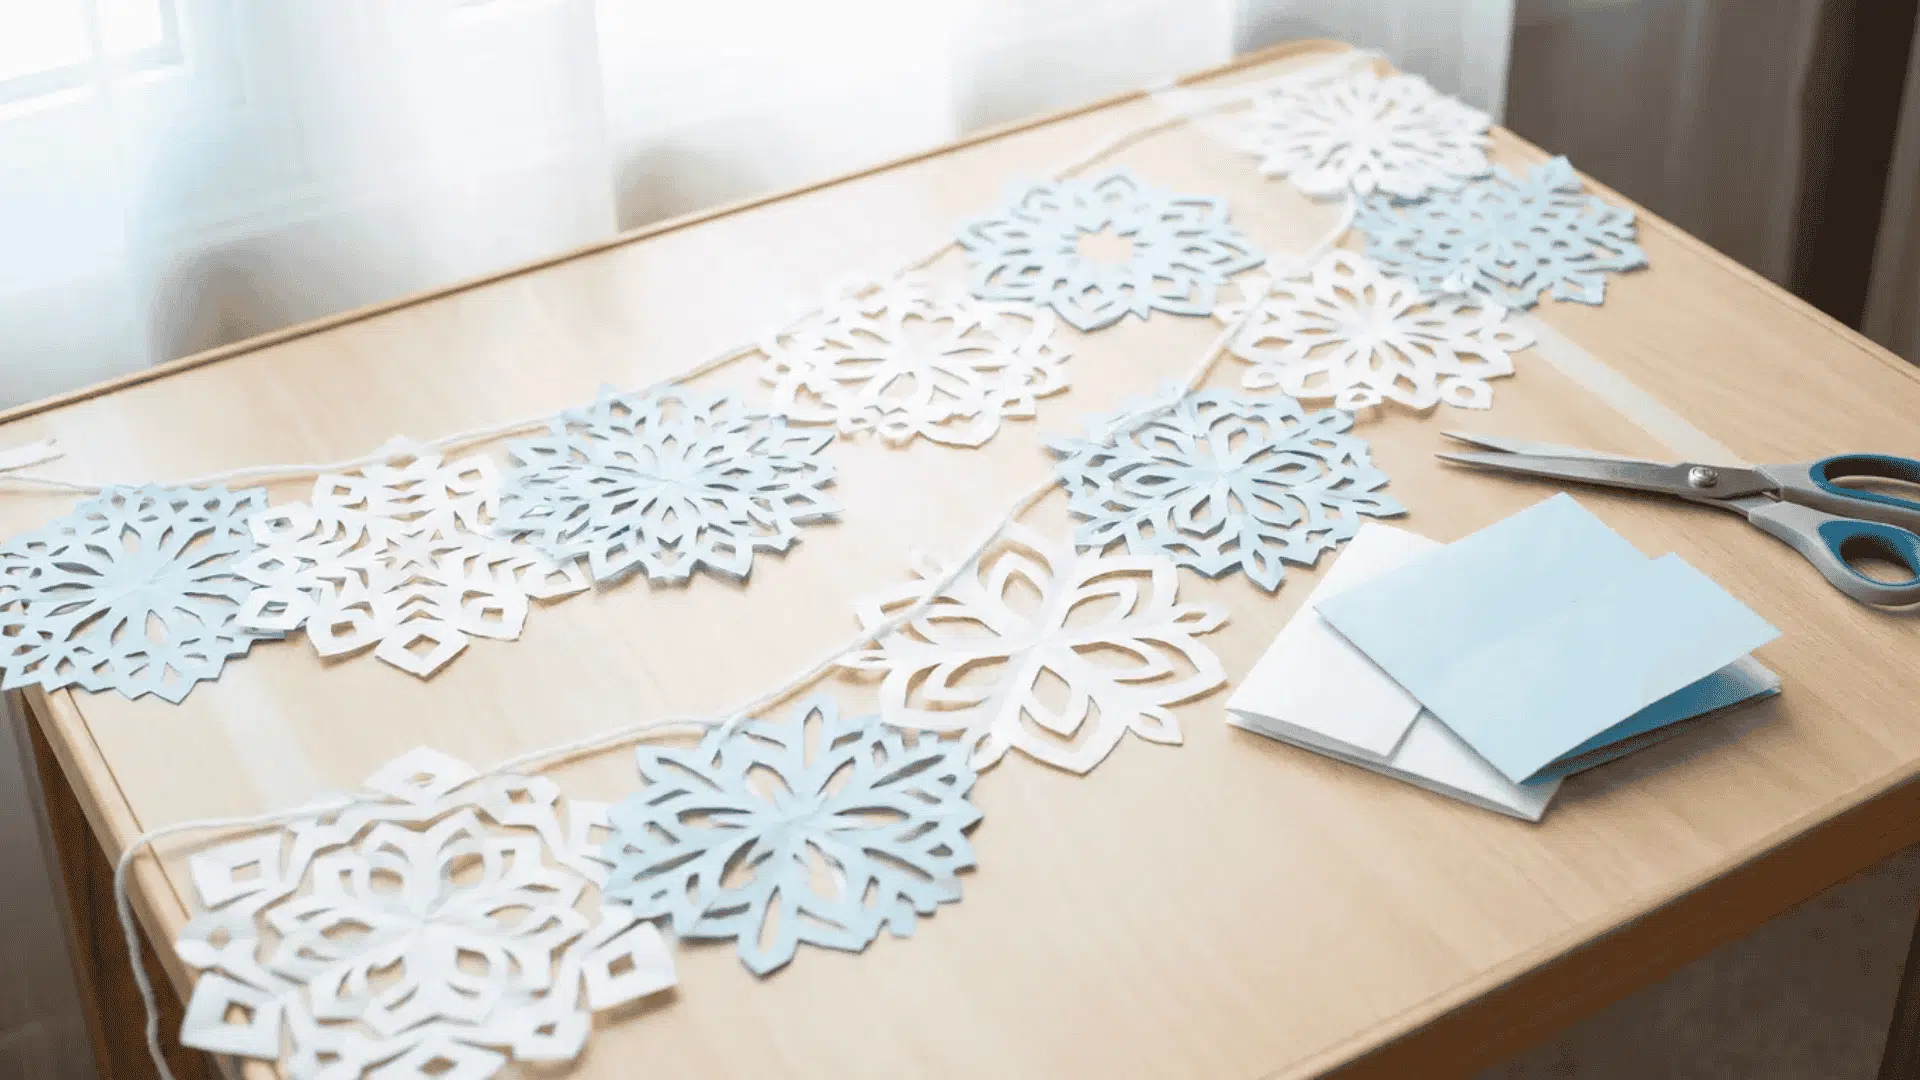
Difficulty: Medium | Time: 25-30 minutes | Best for ages: 6 and up
Paper snowflakes are a winter classic. String them together to make festive garlands. Each snowflake turns out to be unique because of different cutting patterns.
What You’ll Need:
- White or light blue construction paper
- Scissors
- Pencil
- String or yarn
- Tape or hole punch
- Ruler
Steps:
- Cut construction paper into squares (any size works).
- Fold each square in half diagonally.
- Fold the triangle in half again.
- Fold one more time into a smaller triangle.
- Cut small shapes along all the edges (triangles, curves, notches).
- Carefully unfold to reveal your snowflake pattern.
- Make at least six snowflakes in different designs.
- Punch a hole at the top of each snowflake.
- Thread the string through the holes.
- Space snowflakes evenly and hang the garland.
Pro Tip: No two snowflakes are alike in nature, so encourage kids to cut random shapes and celebrate each unique design.
What Kids Learn: Symmetry, geometric patterns, winter science, and spatial reasoning.
14. Construction Paper Ladybug

Difficulty: Easy | Time: 15-20 minutes | Best for ages: 4 and up
Ladybugs bring good luck and bright colors to any room. This craft uses circles and simple shapes. Kids love adding the signature black spots.
What You’ll Need:
- Red and black construction paper
- Scissors
- Glue stick
- Black marker
- Googly eyes
- White paper for background
Steps:
- Cut a large circle from red construction paper for the body.
- Cut the circle in half to create two wings.
- Cut a smaller circle from black paper for the head.
- Glue the black head to your background paper.
- Position the two red half-circles as wings below the head.
- Leave a small gap between wings to show the body line.
- Cut small circles from black paper for spots.
- Glue three to five spots on each wing.
- Add googly eyes to the head.
- Draw six thin legs with a black marker.
Pro Tip: Make ladybugs in different sizes to create a family, and use them to practice counting spots and legs.
What Kids Learn: Circle halves, insect body parts, counting, and symmetrical design.
15. Paper Strip Basket
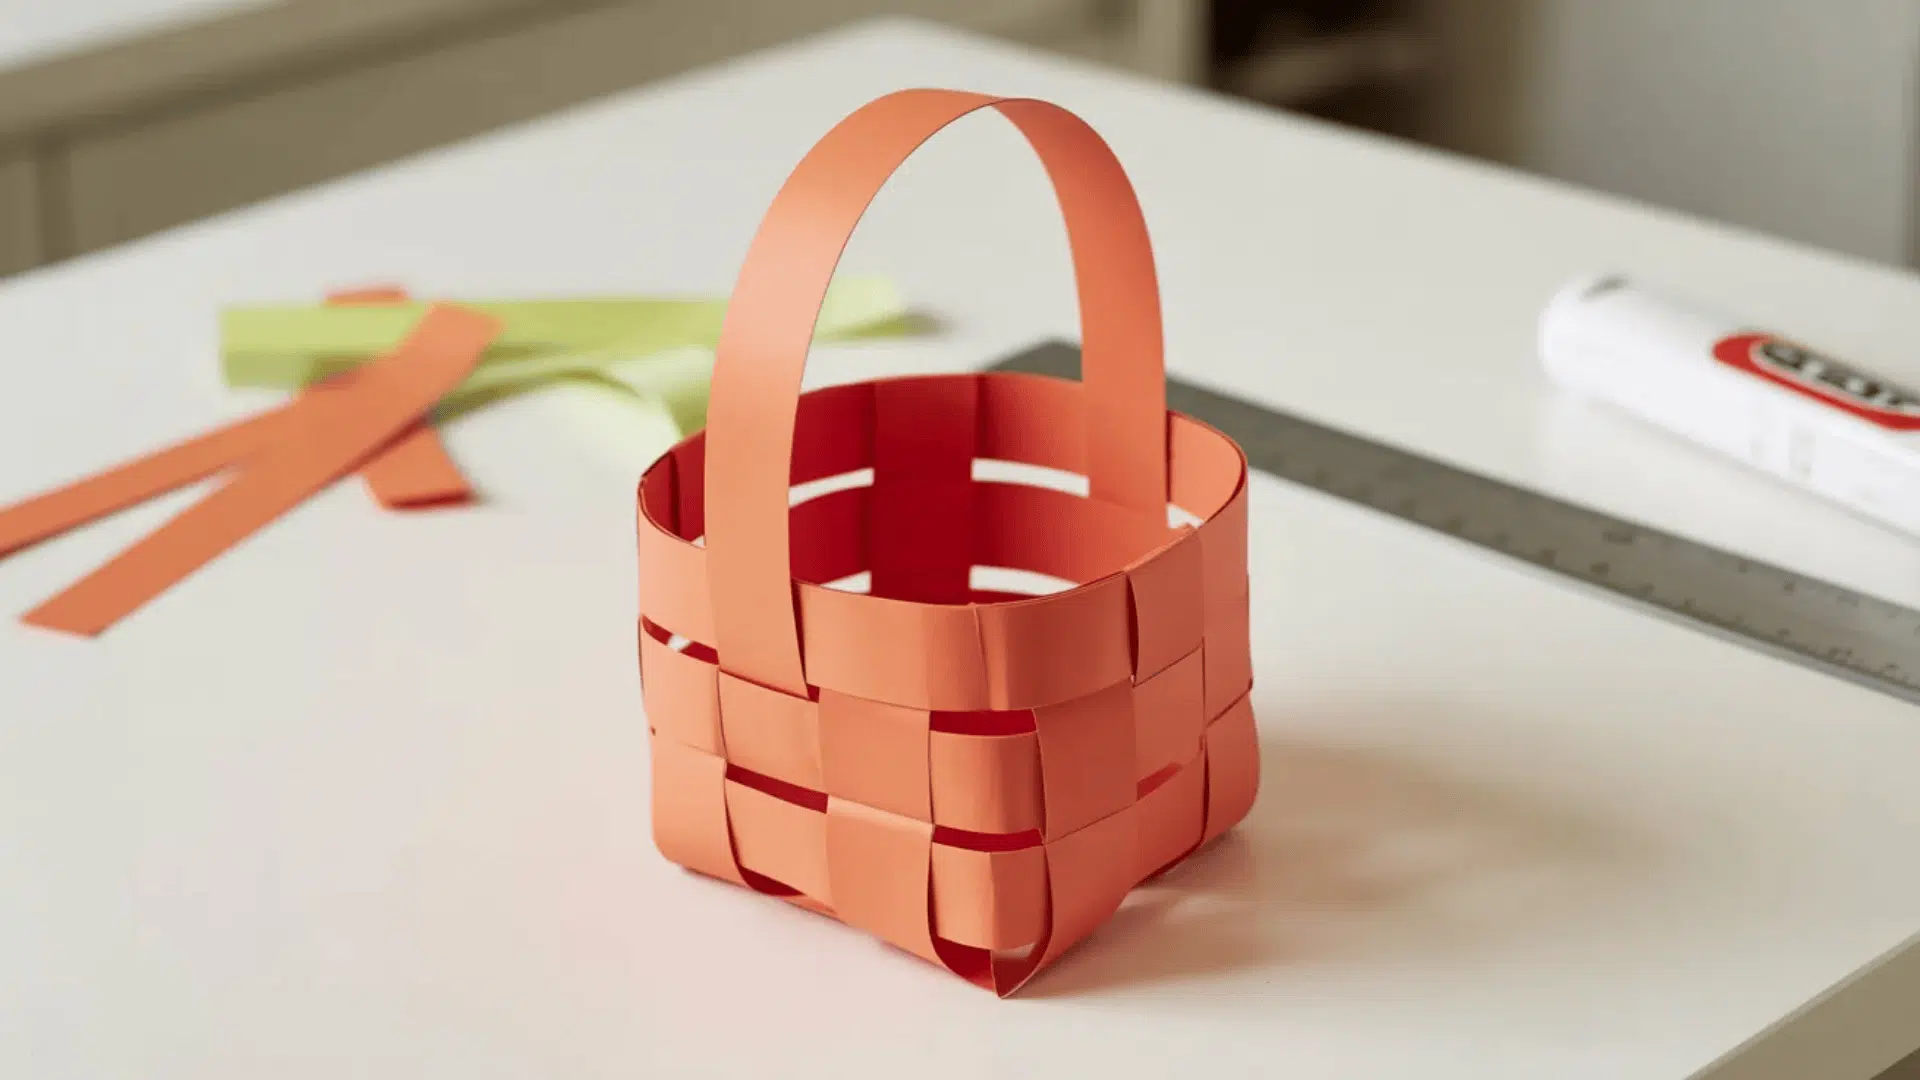
Difficulty: Medium | Time: 30-35 minutes | Best for ages: 7 and up
Weaving paper strips creates a functional basket. Kids can use it to hold small treasures or Easter eggs. This project teaches basic weaving techniques.
What You’ll Need:
- Construction paper (two contrasting colors)
- Scissors
- Ruler
- Glue stick or tape
- Stapler
Steps:
- Cut one piece of paper into strips about 1 inch wide.
- Keep strips attached at one end by stopping cuts 1 inch from the top.
- Cut the second color into separate strips of equal width.
- Weave the first loose strip over and under the attached strips.
- Push it to the top and secure the ends with glue.
- Weave the second strip under and over (opposite pattern).
- Continue alternating the weaving pattern with all strips.
- Glue down all loose ends on the sides.
- Bring the four corners up to form a basket shape.
- Staple corners together and add a handle strip.
Pro Tip: Use a checkerboard pattern with two colors to make the weaving easier to see, and reinforce the bottom with cardboard for heavier items.
What Kids Learn: Weaving basics, pattern following, over-under concept, and hand-eye coordination.
16. Simple Paper Airplane Designs
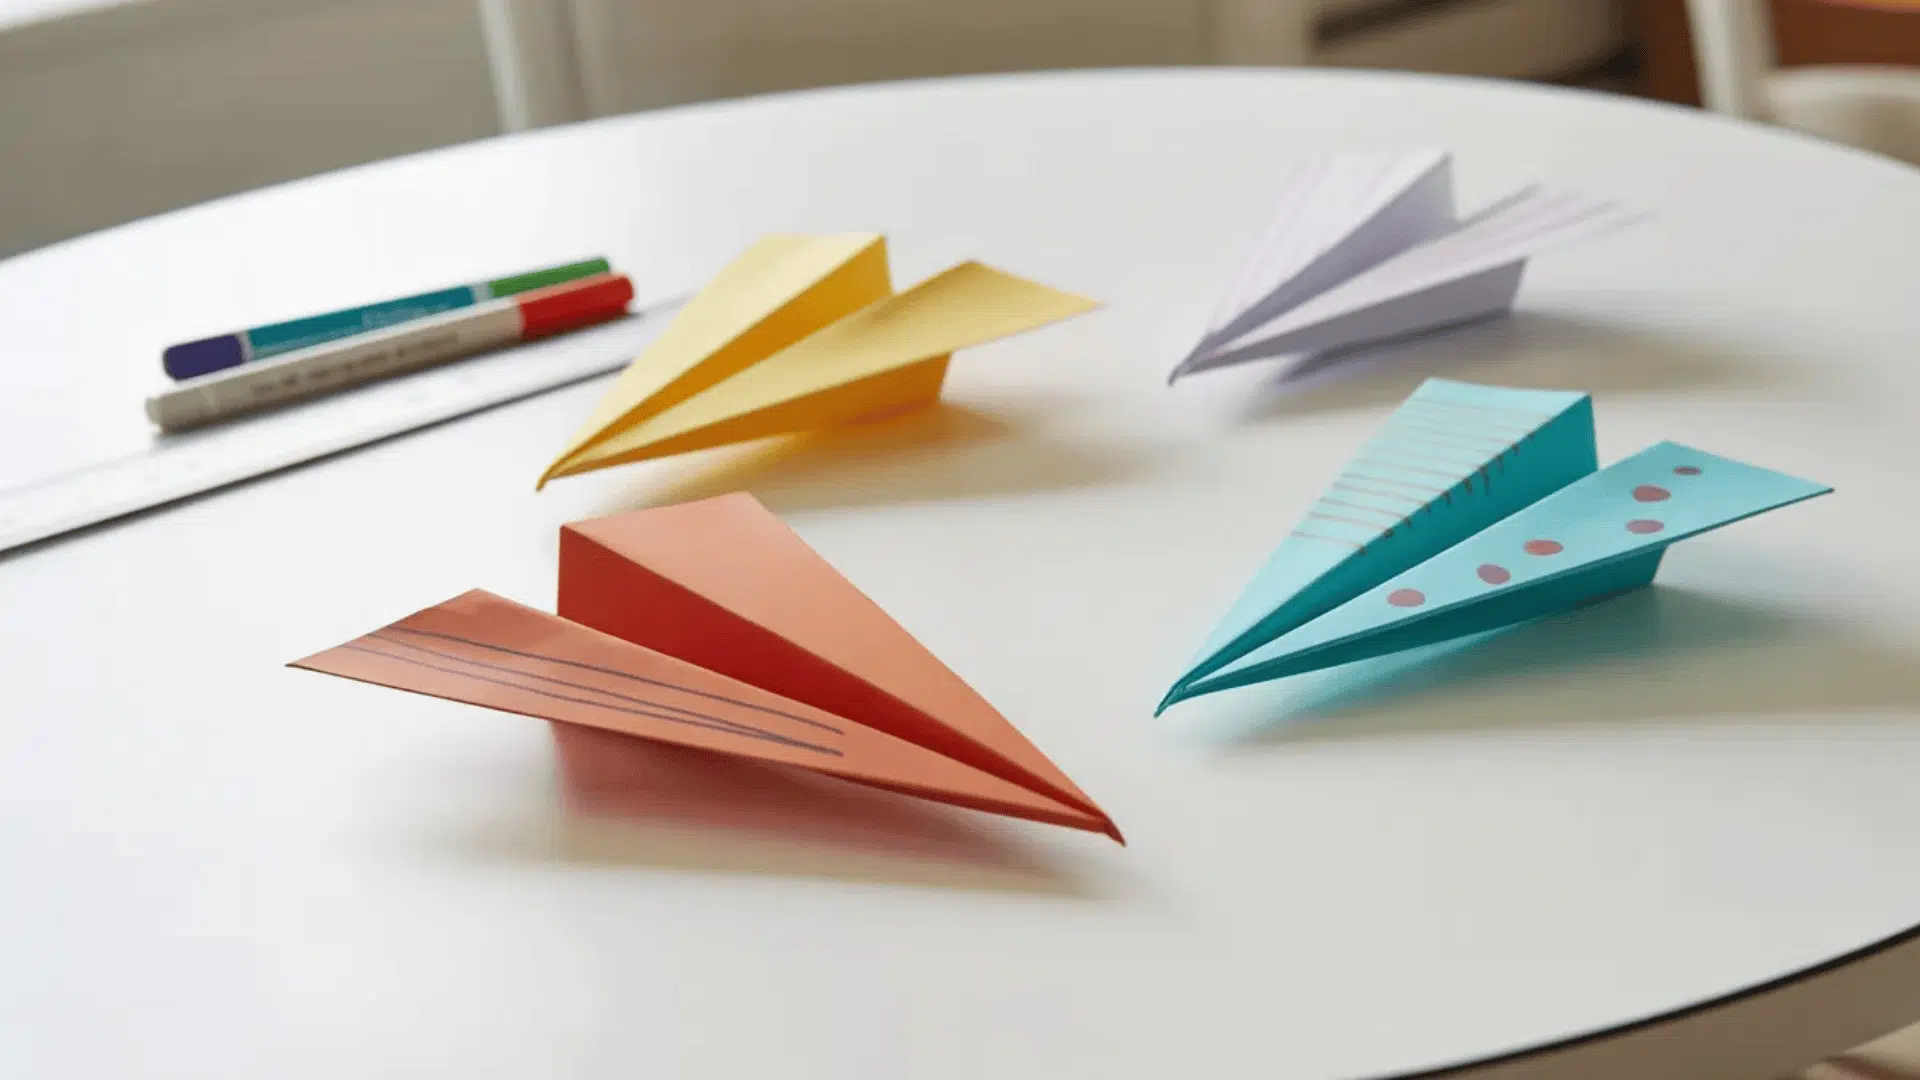
Difficulty: Easy to Medium | Time: 10-15 minutes each | Best for ages: 5 and up
Paper airplanes never go out of style. Try different folding techniques to see which flies farthest. This craft combines art with simple physics.
What You’ll Need:
- Construction paper or regular paper
- Flat surface for folding
- Markers for decoration
- Ruler (optional for crisp folds)
Steps:
- Start with a rectangular piece of paper.
- Fold the paper in half lengthwise and unfold.
- Fold both top corners down to meet the center line.
- Fold the angled edges to the center line again.
- Fold the entire plane in half along the center crease.
- Fold one wing down, leaving about 1 inch for the body.
- Flip and fold the other wing to match.
- Open the wings slightly and adjust for balance.
- Decorate with markers before or after folding.
- Test fly and adjust wings as needed.
Pro Tip: Experiment with wing angles and nose weight to change flight patterns, and hold competitions for distance, accuracy, or trick flying.
What Kids Learn: Aerodynamics basics, cause and effect, measurement, and problem-solving through testing.
17. Paper Plate Sun Craft
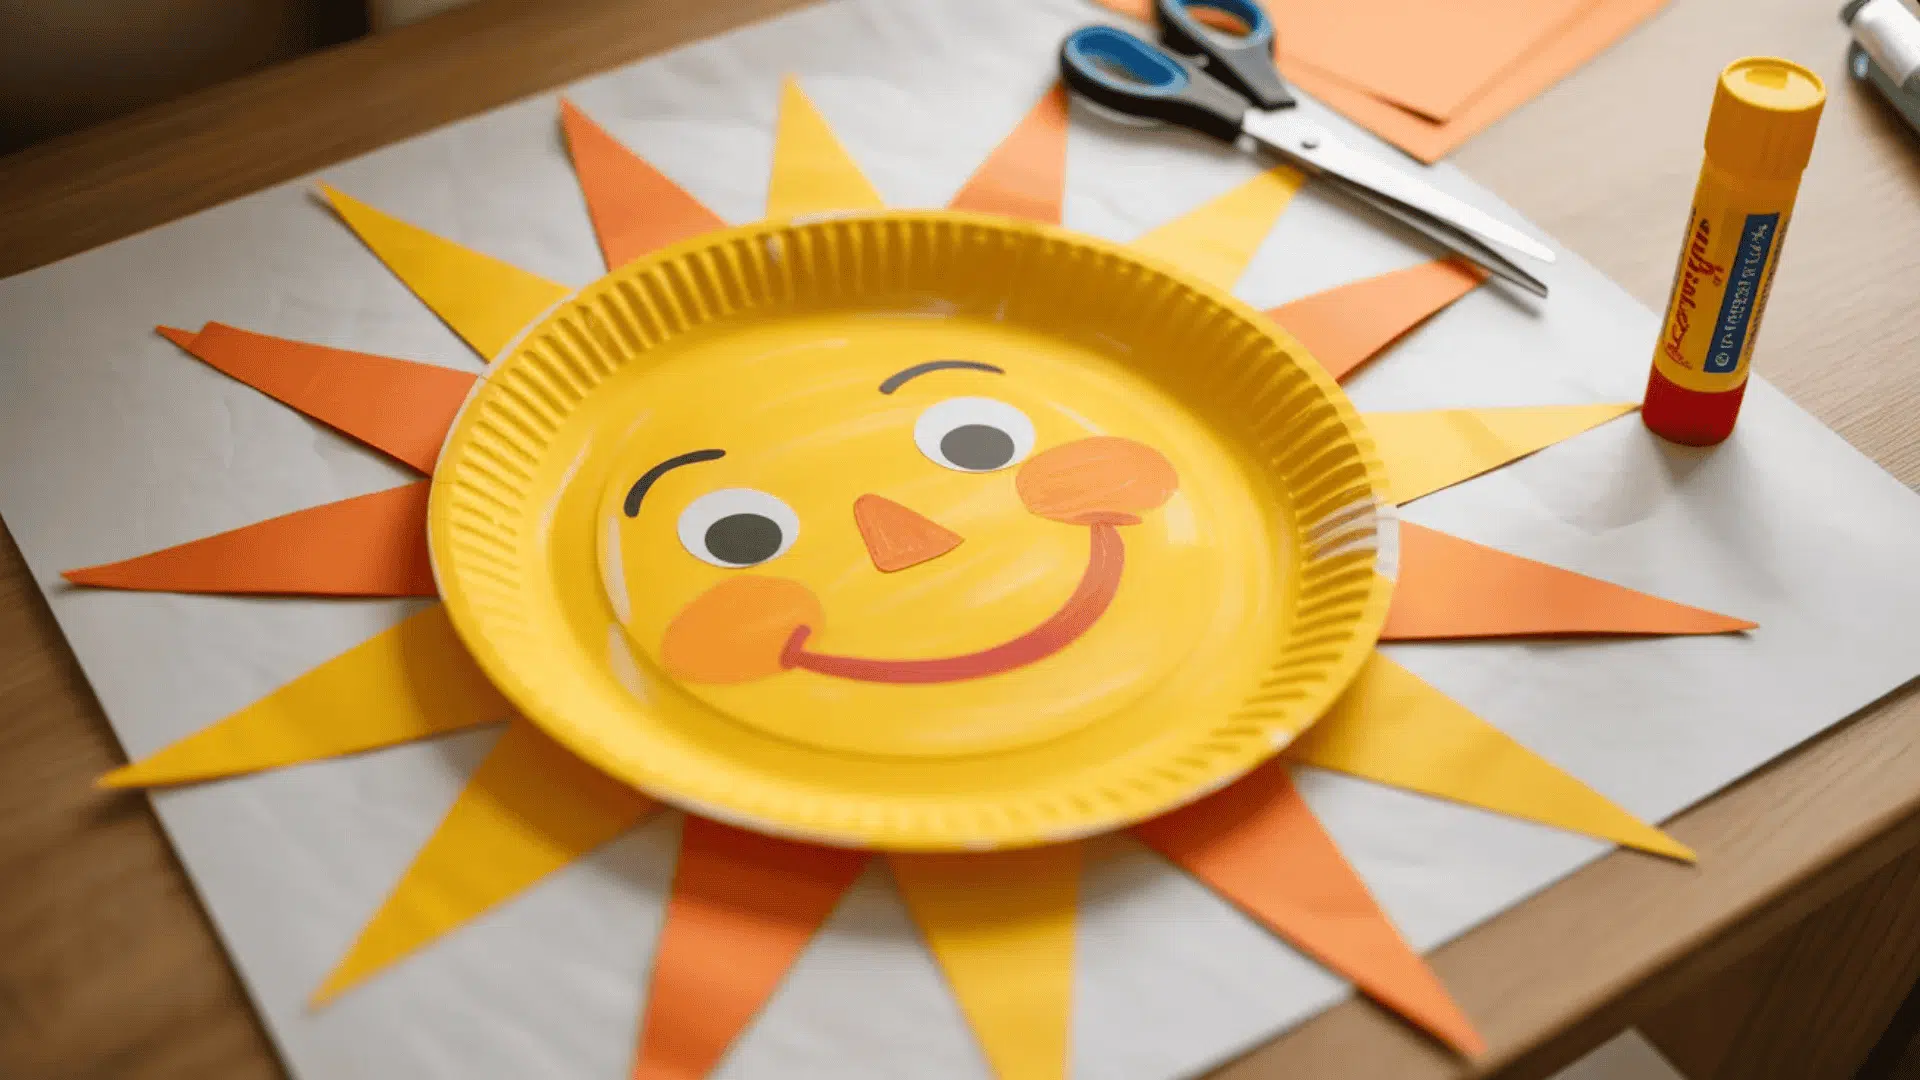
Difficulty: Easy | Time: 15-20 minutes | Best for ages: 3 and up
Bright and cheerful sun crafts welcome summer or teach about the weather. Kids enjoy painting and adding rays. This project works well for solar system units too.
What You’ll Need:
- Paper plate
- Yellow and orange construction paper
- Scissors
- Glue stick
- Yellow paint or markers
- Googly eyes (optional)
Steps:
- Paint the paper plate yellow or color it with markers.
- Let the paint dry completely if using wet paint.
- Cut triangles from yellow and orange paper for sun rays.
- Make about 12-16 triangles in varying sizes.
- Glue triangles around the edge of the plate, points facing out.
- Alternate yellow and orange triangles for variety.
- Draw a happy face in the center of the plate.
- Add googly eyes or draw eyes with markers.
- Draw rosy cheeks and a big smile.
- Display in a window to catch real sunlight.
Pro Tip: Make handprint rays instead of triangles for a personal touch, and create moon and star crafts to teach day and night cycles.
What Kids Learn: Circle shapes, weather concepts, warm colors, and facial expressions.
18. Construction Paper Crown
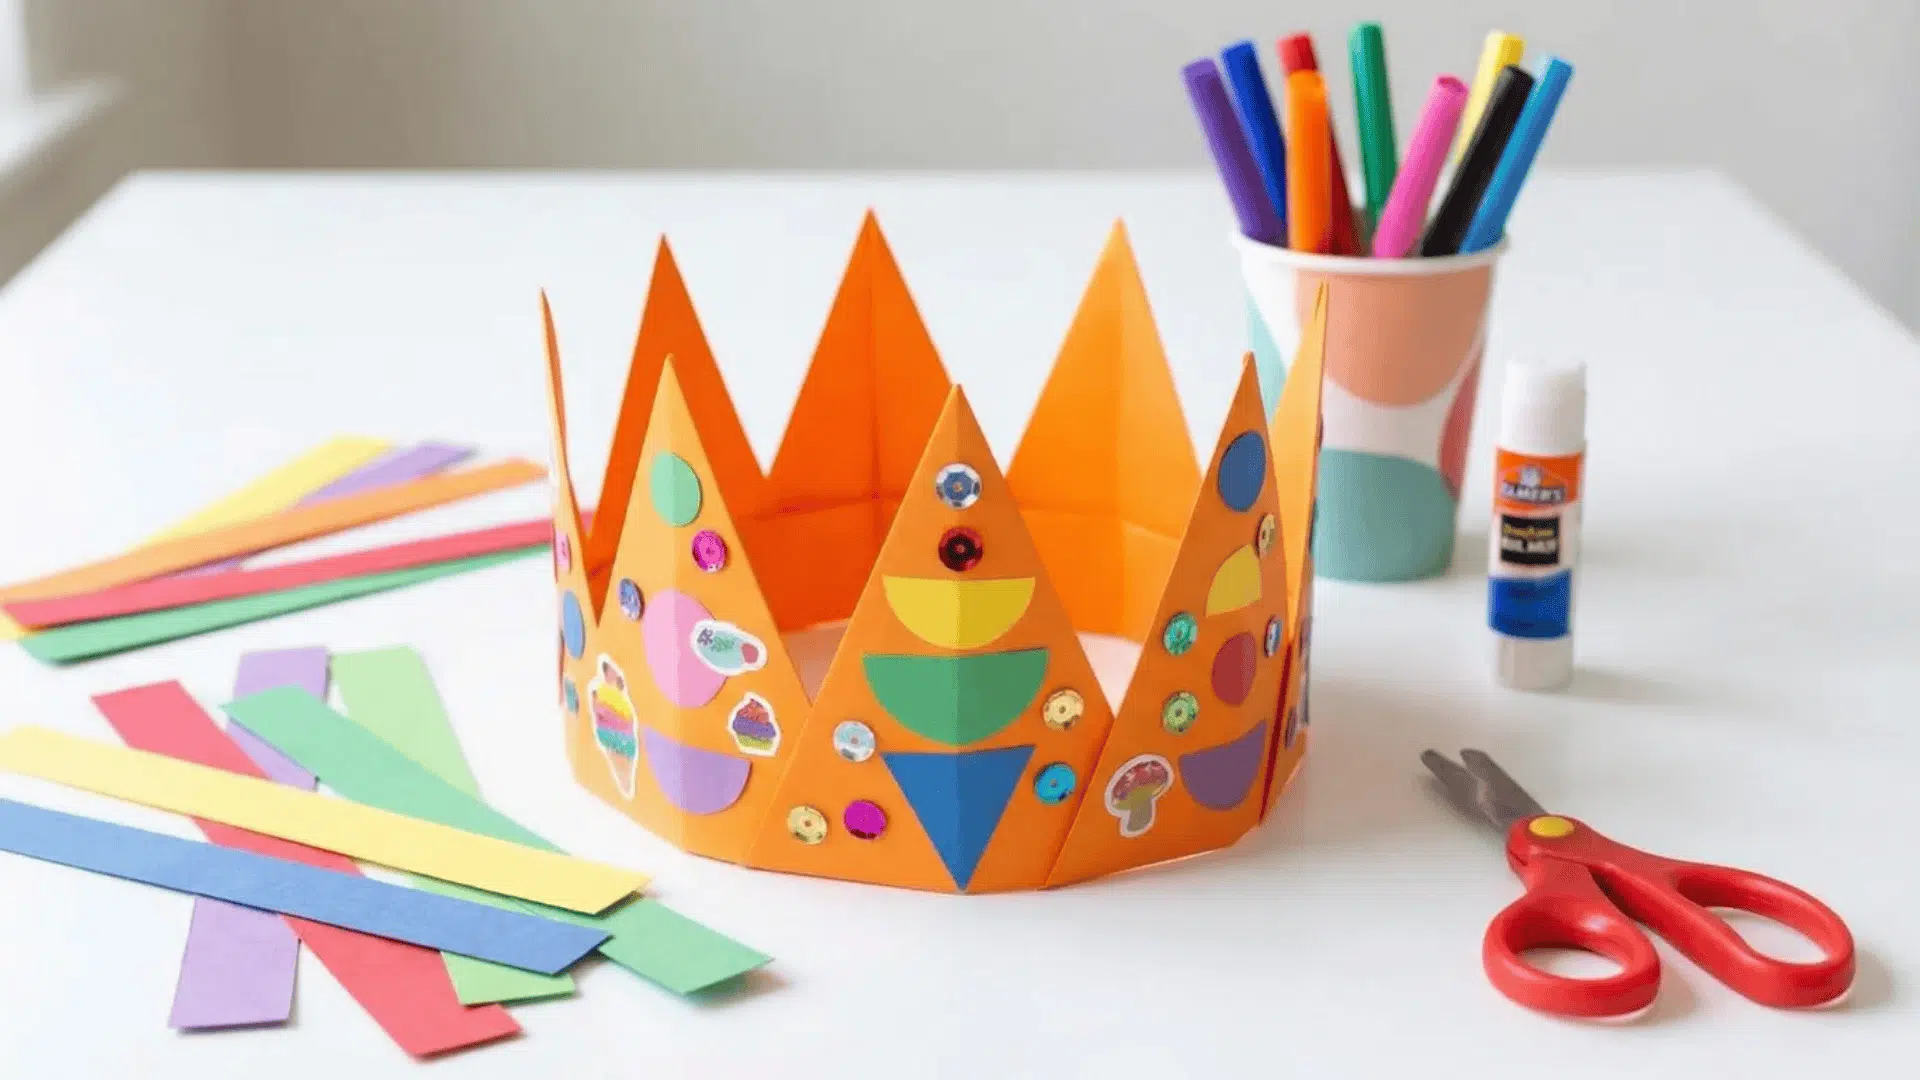
Difficulty: Easy | Time: 15-20 minutes | Best for ages: 4 and up
Every child deserves to feel royal. These crowns are perfect for dress-up play or birthday celebrations. Customize with jewels and special decorations.
What You’ll Need:
- Construction paper (gold, yellow, or any color)
- Scissors
- Glue or tape
- Markers or crayons
- Stickers, sequins, or glitter glue
- Stapler
Steps:
- Cut a strip of construction paper about 3 inches wide.
- Make the strip long enough to wrap around the child’s head.
- Cut zigzag points along one long edge for crown peaks.
- Decorate with markers, stickers, or glitter glue.
- Add foam jewels or sequins between the points.
- Draw swirls, stars, or patterns along the bottom edge.
- Wrap the strip around the child’s head to check the size.
- Overlap the ends and staple or tape them together.
- Adjust fit as needed for comfort.
Pro Tip: Let birthday children decorate their own crowns as a party activity, and make matching crowns for stuffed animals or dolls.
What Kids Learn: Measurement for fit, design choices, self-expression, and imaginative play skills.
19. Paper Mosaic Picture Frame
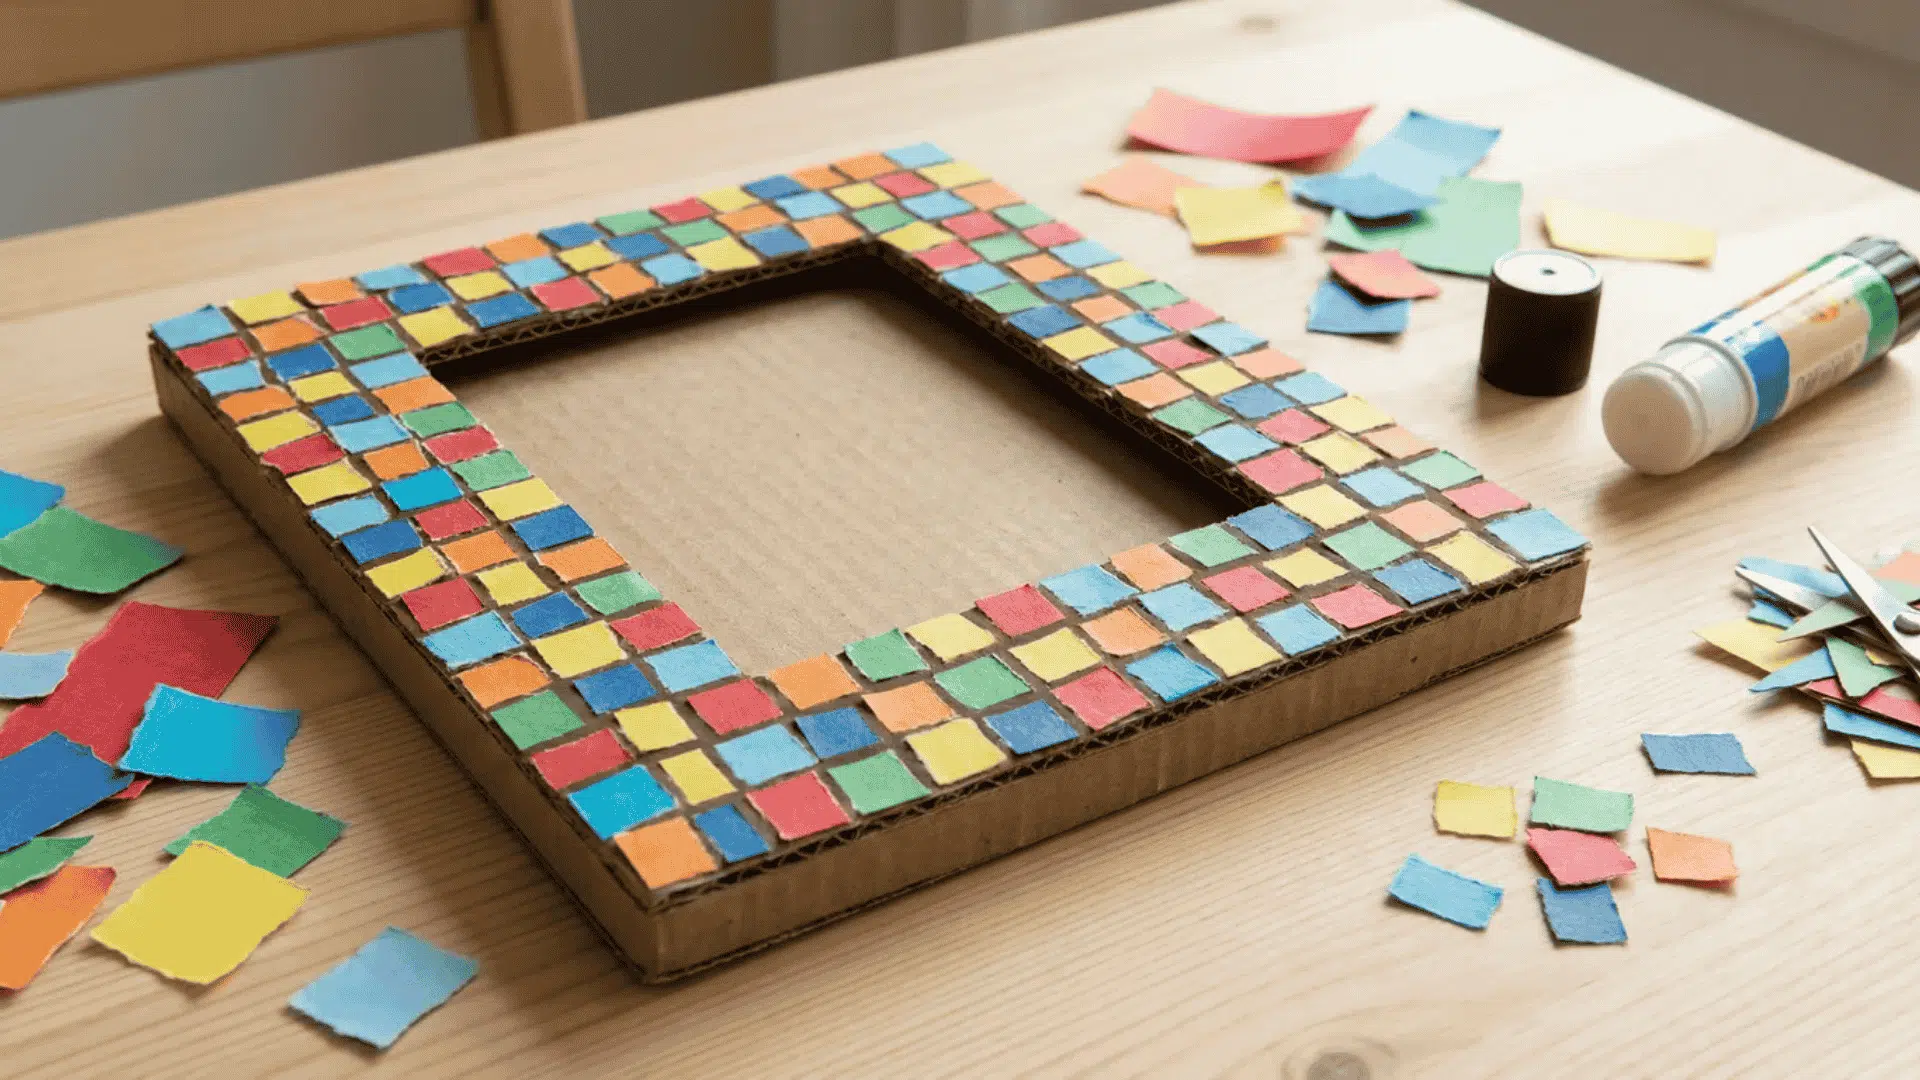
Difficulty: Medium | Time: 30-40 minutes | Best for ages: 6 and up
Mosaics look impressive but use simple torn paper pieces. Create frames for photos or artwork. This project teaches patience and color arrangement.
What You’ll Need:
- Cardboard or thick construction paper
- Colored construction paper scraps
- Scissors
- Glue stick
- Pencil
- Photo or drawing to frame
Steps:
- Cut a rectangle from cardboard for the frame base.
- Draw a smaller rectangle in the center for the photo opening.
- Carefully cut out the center rectangle.
- Tear colored paper into small squares about half an inch.
- Sort torn pieces by color into piles.
- Spread glue on a small section of the frame.
- Press paper pieces onto the glue, leaving small gaps between.
- Continue gluing and placing pieces around the entire frame.
- Create patterns or random color arrangements.
- Let dry completely and tape a photo to the back.
Pro Tip: Use monochromatic colors (all blues or greens) for a sophisticated look, or mix bright colors for a cheerful frame.
What Kids Learn: Mosaic art technique, color coordination, spatial planning, and gift-making skills.
20. 3D Paper Christmas Tree
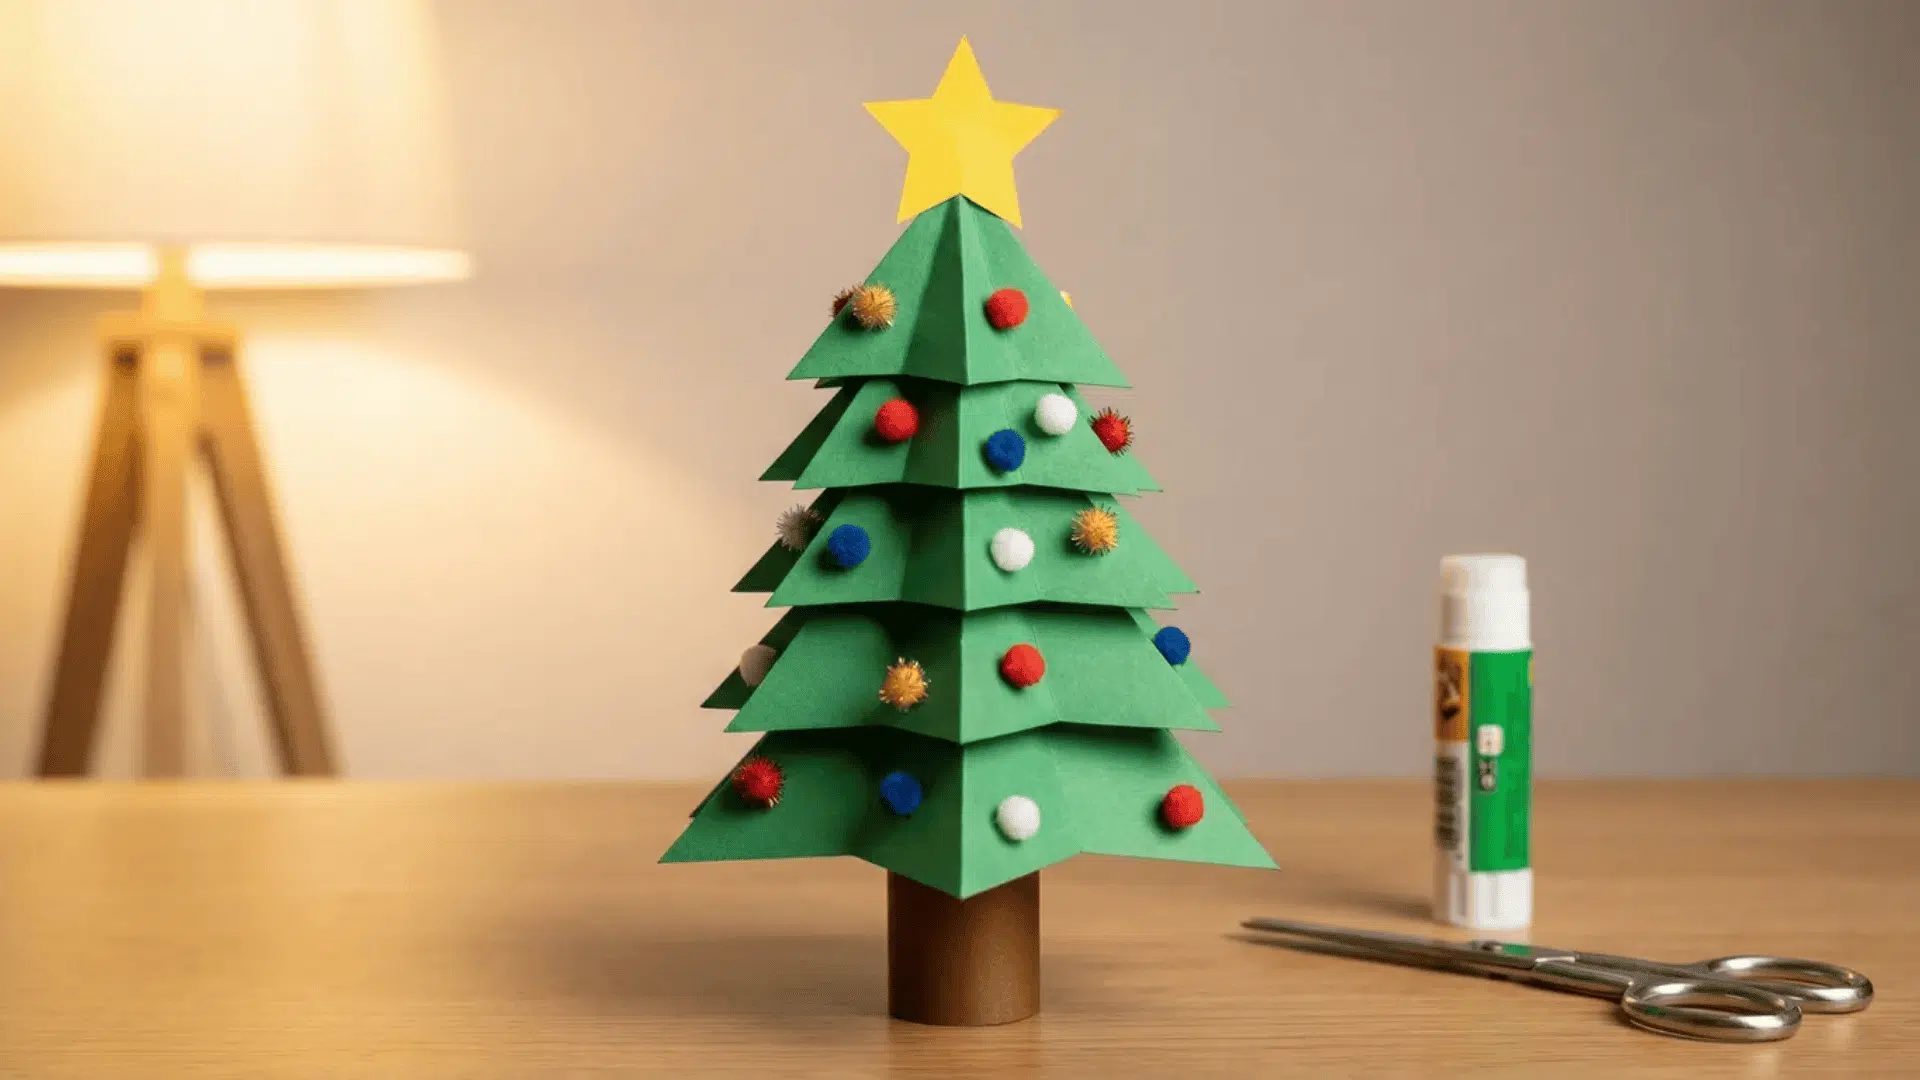
Difficulty: Medium | Time: 20-25 minutes | Best for ages: 6 and up
These trees stand up on their own and look great on mantels or tables. Stack different-sized triangles to create dimension. Decorate with paper ornaments and stars.
What You’ll Need:
- Green construction paper
- Brown construction paper
- Scissors
- Glue stick
- Markers or crayons
- Small pompoms or sequins for ornaments
- Yellow paper for star
Steps:
- Cut three triangles from green paper in graduated sizes.
- Make each triangle smaller than the one below it.
- Cut a small rectangle from brown paper for the trunk.
- Fold each triangle in half to create a crease down the center.
- Unfold triangles slightly so they stand at an angle.
- Glue the trunk to a base piece of cardboard.
- Glue the largest triangle to the top of the trunk.
- Glue the medium triangle on top of the large one.
- Add the smallest triangle at the very top.
- Cut a star from yellow paper and glue it to the top.
- Decorate with drawn ornaments or glued pompoms.
Pro Tip: Make a forest of trees in different sizes and colors, including pink or white for variety in your holiday display.
What Kids Learn: Size comparison, 3D structure, holiday traditions, and layering techniques.
21. Paper Cup Flowers
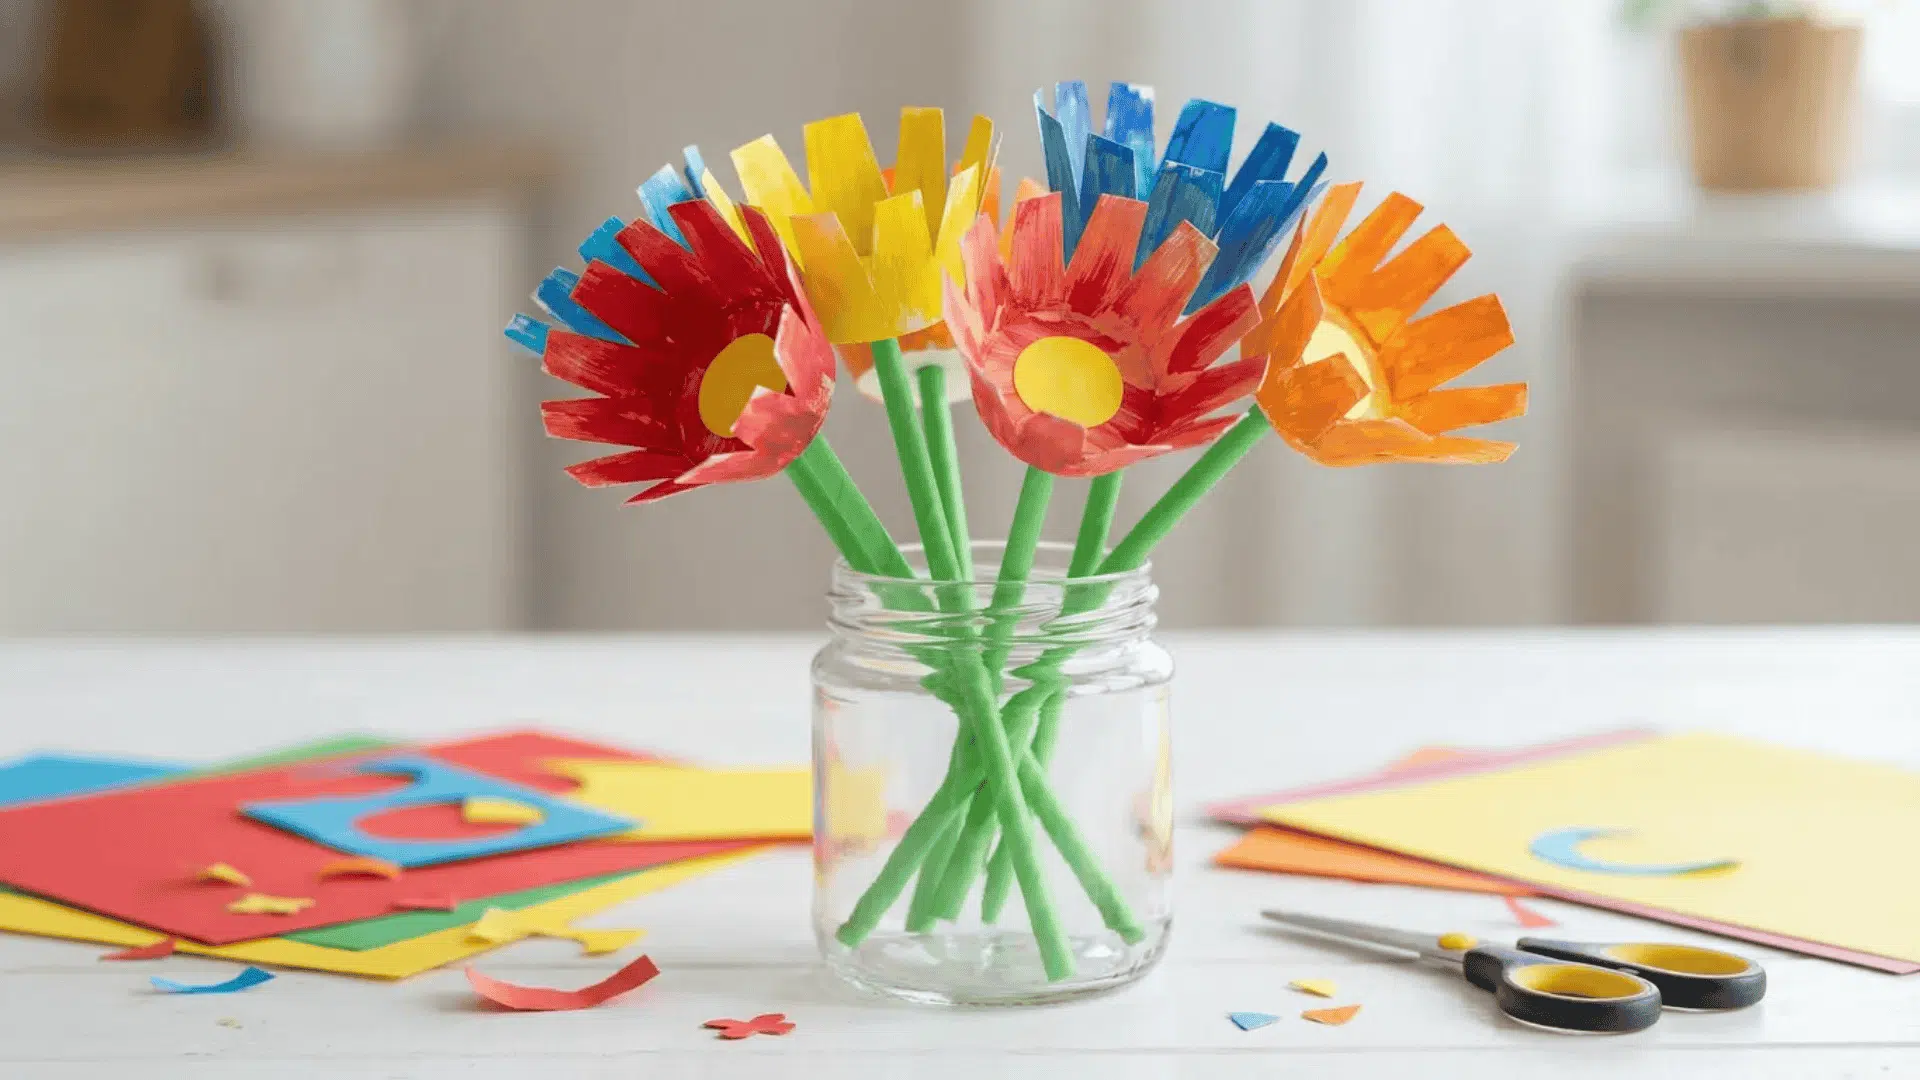
Difficulty: Easy | Time: 15-20 minutes | Best for ages: 4 and up
Transform paper cups into blooming flowers. This recycling craft uses materials you might already have. Create entire gardens with different flower types.
What You’ll Need:
- Paper cups (small or medium)
- Construction paper (various colors)
- Scissors
- Glue or tape
- Green straws or pipe cleaners
- Markers or paint
Steps:
- Cut slits around the rim of the paper cup about 1 inch deep.
- Make eight to ten evenly spaced cuts around the cup.
- Gently fold each cut section outward to form petals.
- Paint the cup or color it with markers in bright colors.
- Let dry if using paint.
- Cut a small circle from yellow paper for the flower center.
- Glue the circle inside the bottom of the cup.
- Poke a small hole in the bottom center.
- Push a green straw or pipe cleaner through for the stem.
- Secure with tape on the inside of the cup.
- Cut leaf shapes from green paper and attach to the stem.
Pro Tip: Use cupcake liners inside the cups for extra texture, and arrange multiple flowers in a vase for a lasting bouquet.
What Kids Learn: Recycling, creativity, petal formation, plant parts, and cutting control.
22. Construction Paper Owl
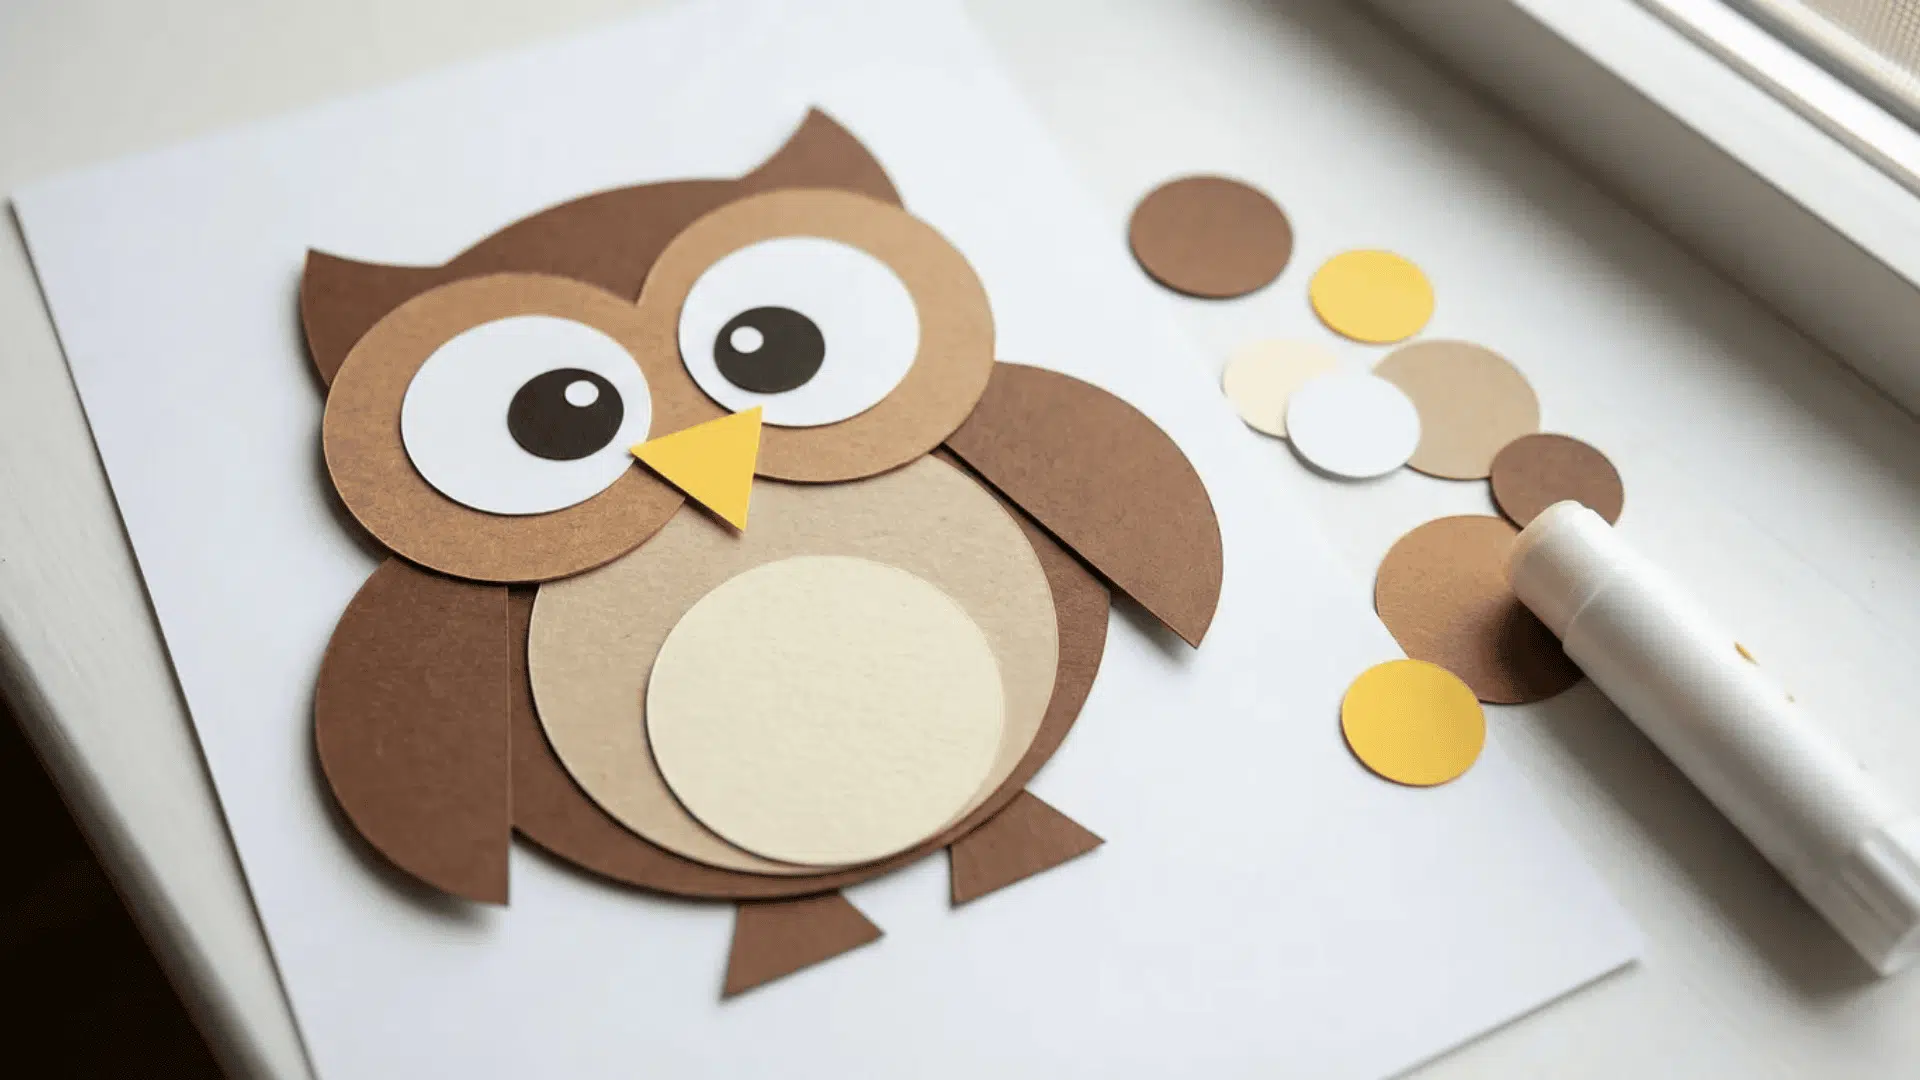
Difficulty: Easy | Time: 20-25 minutes | Best for ages: 5 and up
Owls are popular craft subjects because of their big eyes and fun features. This project uses circles and triangles to create a wise woodland friend. Display them on tree branches for extra effect.
What You’ll Need:
- Brown, orange, or gray construction paper
- White and black paper for eyes
- Yellow or orange paper for the beak and feet
- Scissors
- Glue stick
- Markers
Steps:
- Cut a large circle from brown paper for the owl’s body.
- Cut two medium white circles for the eye background.
- Cut two smaller black circles for the pupils.
- Glue white circles to the top half of the brown circle.
- Glue black pupils in the center of the white circles.
- Cut a small triangle from yellow paper for the beak.
- Glue the beak between and below the eyes.
- Cut two wing shapes from darker brown paper.
- Glue wings to each side of the body circle.
- Cut small ovals for feather details and glue to the belly.
- Cut two-foot shapes with three toes each.
- Glue feet to the bottom of the body.
Pro Tip: Make owls in different colors (snowy white, barn owl tan, or spotted brown) to learn about owl species and their habitats.
What Kids Learn: Circle assembly, nocturnal animals, layering shapes, and bird anatomy basics.
23. Paper Strip Pumpkin
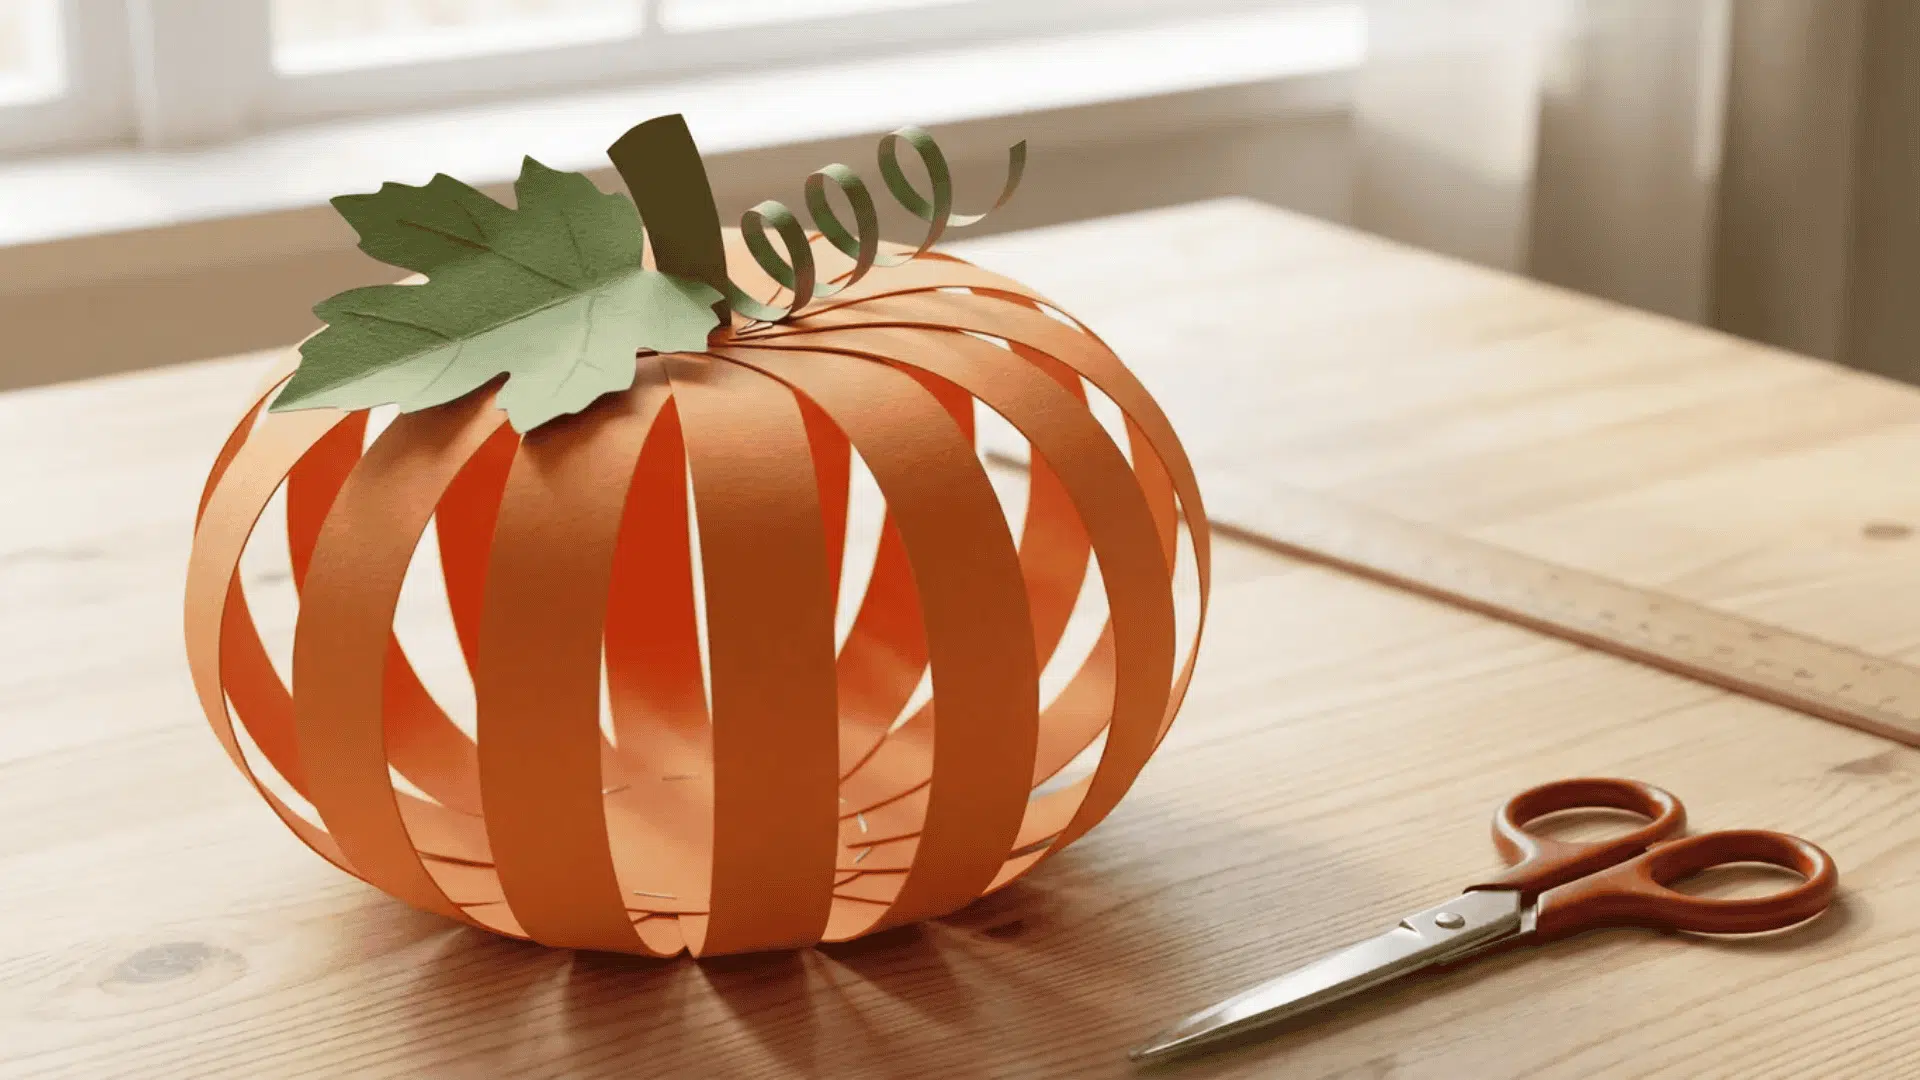
Difficulty: Easy | Time: 20-25 minutes | Best for ages: 5 and up
Create plump pumpkins perfect for fall decorating. These 3D pumpkins look great on tables or hanging from strings. Make different sizes for a pumpkin patch display.
What You’ll Need:
- Orange construction paper
- Green construction paper
- Scissors
- Stapler or glue
- Ruler
- Brown pipe cleaner (optional for stem)
Steps:
- Cut six to eight strips from orange paper, all the same length.
- Make strips about 1 inch wide and 10-12 inches long.
- Stack all strips on top of each other.
- Line up the ends evenly.
- Staple both ends together in the center.
- Fan out the strips to form a pumpkin shape.
- Arrange strips evenly in a circle around the staple.
- Adjust strips so they puff out in the middle.
- Cut a leaf shape from green paper.
- Cut a curly vine from green paper or use a pipe cleaner.
- Glue or staple the leaf and vine to the top.
- Draw a jack-o-lantern face with markers if desired.
Pro Tip: Use different strip lengths to make fat pumpkins or tall pumpkins, and create an entire pumpkin patch with various sizes and faces.
What Kids Learn: 3D shape creation, autumn themes, strip manipulation, and fall harvest concepts.
Tips for Successful Construction Paper Crafting with Kids
Cover your work surface before starting. Gather all supplies within reach. Pre-cut pieces for children under five who struggle with scissors.
Match projects to age and skill. Toddlers need simple tearing activities. Kids over six can handle multi-step folding and cutting. Break long projects into two sessions for younger children.
Thick construction paper works better than cheap, thin sheets. Store it flat to avoid wrinkles. Save scraps in a box for future details and small projects.
Fun fact: The average child uses about 50 sheets of construction paper per school year. That’s why buying bulk packs saves money.
Use glue sticks instead of liquid glue. They dry faster and make less mess. Keep wet wipes nearby for cleanup.
Let kids pick their own colors. Display finished crafts proudly. Take photos before projects fall apart. Praise creativity and effort, not perfection.
Make cleanup a race with timers or music. Kids who help organize supplies learn responsibility faster.
Conclusion
Construction paper crafts for kids offer endless possibilities with minimal supplies. From simple paper chains to 3D animals, these projects build fine motor skills while sparking imagination.
The best part? You don’t need expensive materials or special training. Just grab some colorful paper, scissors, and glue. Let your children explore their creativity at their own pace.
These crafts create more than just decorations. They build confidence, teach patience, and give families quality time together. Every finished project becomes a proud moment worth celebrating.
Ready to start crafting? Pick a project that matches your child’s age and interests. Set up your space and let the fun begin.
Which craft will you try first? Share your creations in the comments below. We’d love to see what your kids make!